Flutter + DevEco Studio 记事本开发实战
本文介绍了一个基于Flutter和鸿蒙混合架构的轻量记事本应用开发方案。采用Flutter负责UI展示与业务逻辑,鸿蒙原生实现本地数据存储,通过MethodChannel实现跨端通信。详细阐述了工程搭建、环境配置、功能实现和调试流程,包括笔记的增删改查核心功能开发、通信协议定义、数据存储实现及UI界面设计。该方案充分发挥了Flutter跨平台UI优势和鸿蒙本地存储稳定性特点,完整覆盖从开发到上架的
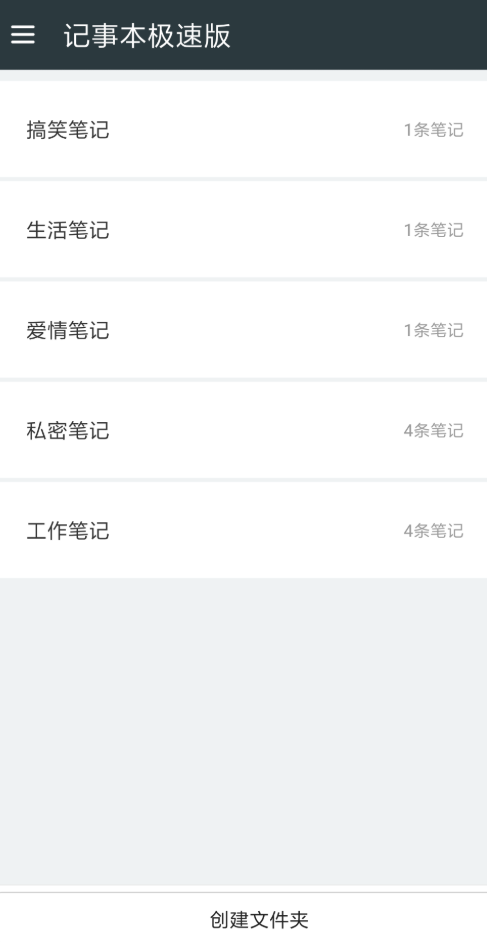
本文将开发一个轻量记事本应用,采用“Flutter负责UI与业务逻辑,鸿蒙原生负责本地存储”的架构,完整覆盖从工程搭建、跨端通信到功能调试的全流程。最终实现“新建笔记、查看列表、编辑笔记、删除笔记”核心功能,适配鸿蒙设备特性。
前置环境要求:已配置Flutter for OpenHarmony环境(含专属SDK)、DevEco Studio 4.0+(API Version 10)、鸿蒙模拟器/真机(API 9+)
Flutter + DevEco Studio 记事本开发实战大纲
开发环境准备
- Flutter SDK 安装与环境变量配置
- DevEco Studio 安装与鸿蒙开发工具链配置
- 跨平台兼容性检查:确保 Flutter 支持鸿蒙设备
项目初始化与配置
- 使用
flutter create创建项目 - 在 DevEco Studio 中导入 Flutter 项目
- 配置鸿蒙应用的
config.json文件(如权限声明)
UI 界面设计
- 使用 Flutter Widget 构建记事本主界面
ListView展示笔记列表FloatingActionButton实现添加功能
- 适配鸿蒙系统 UI 规范(如字体、间距)
- 暗黑模式与多主题支持
数据存储方案
- 使用
sqflite插件实现本地数据库存储 - 鸿蒙端数据持久化兼容性处理
- 数据模型定义与 CRUD 操作封装
功能模块实现
- 笔记编辑页面:
TextFormField与富文本支持 - 时间戳与排序功能
- 搜索功能:基于标题或内容的模糊查询
鸿蒙特性集成
- 调用鸿蒙原生能力(如系统通知提醒)
- 使用
channel实现 Flutter 与鸿蒙原生代码通信 - 鸿蒙分布式能力探索(可选)
调试与测试
- Flutter 热重载在 DevEco Studio 中的应用
- 鸿蒙设备/模拟器上的运行测试
- 跨平台行为一致性验证
性能优化与发布
- 应用包体积分析及优化策略
- 鸿蒙应用签名与上架流程
- Flutter 产物集成到鸿蒙项目的最终打包
扩展方向
- 云同步功能(结合鸿蒙帐号体系)
- 多端协同场景下的记事本共享
- 鸿蒙原子化服务探索
一、工程架构设计与环境准备
1. 核心架构逻辑
采用“Flutter前端+鸿蒙原生存储”的混合架构,优势在于:Flutter实现跨端统一UI,鸿蒙原生API确保本地存储稳定性(利用鸿蒙分布式数据管理能力)。核心交互流程:
-
Flutter通过MethodChannel调用鸿蒙原生接口;
-
鸿蒙端实现笔记的增删改查(基于Preferences存储轻量数据);
-
原生端将数据结果通过通道返回给Flutter,驱动UI更新。
2. 工程创建步骤
需分别创建鸿蒙工程与Flutter模块,再建立关联,确保包名一致(避免通信失败)。
步骤1:创建鸿蒙Stage工程(DevEco Studio)
-
打开DevEco Studio,选择“Create Project”,模板选“Empty Ability”;
-
配置工程信息: Project Name:OHOSNotepad
-
Bundle Name:com.example.ohos_notepad(核心,需与Flutter一致)
-
Save Location:自定义路径
-
Compile SDK Version:API 10
-
Model:Stage
-
点击“Finish”,等待工程初始化完成。
步骤2:创建Flutter模块(VS Code/Android Studio)
-
打开终端,执行命令创建Flutter模块(路径建议与鸿蒙工程同级):
# 注意flutter_ohos是适配鸿蒙的命令,需安装专属SDKflutter_ohos create -t module flutter_notepad_module -
进入Flutter模块目录,修改
pubspec.yaml,确保包名一致:name: ohos_notepad description: A Flutter Notepad for OpenHarmony environment: sdk: '>=3.0.0 <4.0.0' dependencies: flutter: sdk: flutter # 用于日期格式化 intl: ^0.18.1 -
执行
flutter pub get安装依赖。
步骤3:关联Flutter模块与鸿蒙工程
-
在DevEco Studio中,右键鸿蒙工程根目录 → New → Module,选择“Flutter Module”;
-
在弹出的配置窗口中,“Flutter Module Path”选择步骤2创建的`flutter_notepad_module`路径,点击“Finish”;
-
DevEco Studio会自动在鸿蒙工程的`oh-package.json5`中添加Flutter依赖,检查配置是否生效:
// 鸿蒙工程oh-package.json5 { "dependencies": { "flutter_notepad_module": "file:../flutter_notepad_module" // 自动生成的依赖 } } -
执行“Sync Project”同步依赖,确保无报错(若提示“Flutter SDK not found”,需在DevEco Studio → Settings → Flutter中配置专属SDK路径)。
步骤4:配置Flutter页面入口(鸿蒙端)
需将Flutter页面嵌入鸿蒙的Ability中,作为应用入口:
3. 常见问题排查
|
问题现象 |
解决方案 |
|---|---|
|
Flutter页面加载空白 |
1. 检查Flutter模块依赖是否同步;2. 确认`FlutterPage`的pageName与Flutter路由一致;3. 执行`flutter clean`清除缓存 |
|
存储失败,提示“权限拒绝” |
1. 检查`module.json5`权限配置是否正确;2. 在设备“设置→应用→记事本→权限”中手动开启存储权限 |
|
通信失败,提示“Method not found” |
1. 核对Flutter与鸿蒙端的通道名称、方法名是否完全一致;2. 确认NoteChannel已在Ability中初始化 |
四、功能扩展与打包上架
1. 功能扩展建议
2. 打包鸿蒙应用
总结
本实战通过“Flutter UI+鸿蒙原生存储”的架构,实现了记事本核心功能,核心亮点在于:
通过本案例可掌握Flutter与鸿蒙融合开发的核心流程,后续可基于此架构扩展更复杂的应用场景。若在调试中遇到具体问题,可针对场景补充日志或代码细节进一步排查。
-
打开鸿蒙工程`entry/src/main/ets/pages/Index.ets`,替换为以下代码:
  import router from '@ohos.router';
import { FlutterPage } from '@flutter.notepad_module'; // 引入Flutter模块

@Entry
@Component
struct Index {
  build() {
    // 鸿蒙页面仅作为入口,直接加载Flutter页面
    FlutterPage({
      bundleName: 'com.example.ohos_notepad',
      moduleName: 'flutter_notepad_module',
      pageName: 'notepad_main' // 对应Flutter中定义的路由名称
    })
  }
}
在鸿蒙工程`entry/src/main/ets/ability/EntryAbility.ets`中,初始化Flutter引擎:
  import Ability from '@ohos.application.Ability';
import { FlutterAbility } from '@flutter.notepad_module';

export default class EntryAbility extends Ability {
  onCreate(want, launchParam) {
    // 初始化Flutter能力
    FlutterAbility.init(this.context);
    super.onCreate(want, launchParam);
  }

  onDestroy() {
    // 销毁Flutter引擎,避免内存泄漏
    FlutterAbility.destroy();
    super.onDestroy();
  }
}
二、核心功能实现:跨端通信与数据交互
1. 定义通信协议(统一两端交互规则)
提前约定MethodChannel通道名称、方法名与参数格式,避免通信混乱:
通道名称
方法名
参数格式
返回值
com.example.notepad/channel
addNote
{title: string, content: string, time: string}
bool(是否成功)
getAllNotes
无参数
List<Map>(笔记列表)
updateNote
{index: int, title: string, content: string, time: string}
bool(是否成功)
deleteNote
{index: int}
bool(是否成功)
2. 鸿蒙端:实现本地存储与通信接口
基于鸿蒙Preferences实现轻量数据存储,封装通信监听逻辑:
步骤1:创建笔记存储服务(NoteStorage.ets)
import dataPreferences from '@ohos.data.preferences';

// 单例模式:确保存储实例唯一
export class NoteStorage {
  private static instance: NoteStorage;
  private preferences: dataPreferences.Preferences | null = null;

  // 初始化存储(应用启动时调用)
  async init() {
    this.preferences = await dataPreferences.getPreferences(this.context, 'note_storage');
  }

  // 添加笔记
  async addNote(note: {title: string, content: string, time: string}): Promise<boolean> {
    if (!this.preferences) return false;
    // 获取现有笔记列表
    let notes = await this.getNotes();
    notes.push(note);
    // 存储到Preferences
    await this.preferences.put('notes', JSON.stringify(notes));
    await this.preferences.flush();
    return true;
  }

  // 获取所有笔记
  async getNotes(): Promise<Array<{title: string, content: string, time: string}>> {
    if (!this.preferences) return [];
    const notesStr = await this.preferences.get('notes', '[]');
    return JSON.parse(notesStr as string);
  }

  // 更新笔记
  async updateNote(index: number, note: {title: string, content: string, time: string}): Promise<boolean> {
    if (!this.preferences) return false;
    let notes = await this.getNotes();
    if (index < 0 || index >= notes.length) return false;
    notes[index] = note;
    await this.preferences.put('notes', JSON.stringify(notes));
    await this.preferences.flush();
    return true;
  }

  // 删除笔记
  async deleteNote(index: number): Promise<boolean> {
    if (!this.preferences) return false;
    let notes = await this.getNotes();
    if (index < 0 || index >= notes.length) return false;
    notes.splice(index, 1);
    await this.preferences.put('notes', JSON.stringify(notes));
    await this.preferences.flush();
    return true;
  }

  // 单例获取方法
  static getInstance(context): NoteStorage {
    if (!this.instance) {
      this.instance = new NoteStorage();
      this.instance.context = context;
    }
    return this.instance;
  }
}
步骤2:创建通信监听服务(NoteChannel.ets)
import { FlutterMethodChannel } from '@hmscore.flutter-ohos-adapter';
import { NoteStorage } from './NoteStorage';

export class NoteChannel {
  private static channel: FlutterMethodChannel;
  private static noteStorage: NoteStorage;

  // 初始化通道与存储
  static init(ability) {
    // 1. 初始化通信通道(与Flutter端名称一致)
    this.channel = new FlutterMethodChannel('com.example.notepad/channel');
    // 2. 初始化存储服务
    this.noteStorage = NoteStorage.getInstance(ability.context);
    this.noteStorage.init();
    // 3. 监听Flutter方法调用
    this.setMethodHandler();
  }

  // 方法调用处理逻辑
  private static setMethodHandler() {
    this.channel.setMethodCallHandler(async (method, params) => {
      switch (method) {
        case 'addNote':
          return this.noteStorage.addNote(params);
        case 'getAllNotes':
          return this.noteStorage.getNotes();
        case 'updateNote':
          return this.noteStorage.updateNote(params.index, params.note);
        case 'deleteNote':
          return this.noteStorage.deleteNote(params.index);
        default:
          return Promise.reject('未实现的方法:' + method);
      }
    });
  }
}
步骤3:注册服务到Ability
修改`EntryAbility.ets`,添加通信服务初始化:
import Ability from '@ohos.application.Ability';
import { FlutterAbility } from '@flutter.notepad_module';
import { NoteChannel } from '../pages/NoteChannel'; // 引入通信服务

export default class EntryAbility extends Ability {
  onCreate(want, launchParam) {
    FlutterAbility.init(this.context);
    NoteChannel.init(this); // 初始化笔记通信服务
    super.onCreate(want, launchParam);
  }

  onDestroy() {
    FlutterAbility.destroy();
    super.onDestroy();
  }
}
3. Flutter端:实现UI与通信调用
基于Flutter实现笔记列表、编辑页面,通过MethodChannel调用鸿蒙原生接口。
步骤1:封装通信工具类(note_channel.dart)
import 'package:flutter/services.dart';

// 笔记数据模型
class Note {
  final String title;
  final String content;
  final String time;

  Note({
    required this.title,
    required this.content,
    required this.time,
  });

  // 转换为Map,用于传递给鸿蒙端
  Map<String, dynamic> toMap() {
    return {
      'title': title,
      'content': content,
      'time': time,
    };
  }

  // 从Map解析为Note对象
  static Note fromMap(Map<dynamic, dynamic> map) {
    return Note(
      title: map['title'] ?? '',
      content: map['content'] ?? '',
      time: map['time'] ?? '',
    );
  }
}

// 通信工具类
class NoteChannel {
  // 与鸿蒙端一致的通道名称
  static const _channel = MethodChannel('com.example.notepad/channel');

  // 单例模式
  static final NoteChannel _instance = NoteChannel._internal();
  factory NoteChannel() => _instance;
  NoteChannel._internal();

  // 1. 添加笔记
  Future<bool> addNote(Note note) async {
    try {
      return await _channel.invokeMethod(
        'addNote',
        note.toMap(),
      ) as bool;
    } on PlatformException catch (e) {
      print('添加笔记失败:${e.message}');
      return false;
    }
  }

  // 2. 获取所有笔记
  Future<List<Note>> getAllNotes() async {
    try {
      final List<dynamic> result = await _channel.invokeMethod('getAllNotes');
      return result.map((e) => Note.fromMap(e)).toList();
    } on PlatformException catch (e) {
      print('获取笔记失败:${e.message}');
      return [];
    }
  }

  // 3. 更新笔记
  Future<bool> updateNote(int index, Note note) async {
    try {
      return await _channel.invokeMethod(
        'updateNote',
        {'index': index, 'note': note.toMap()},
      ) as bool;
    } on PlatformException catch (e) {
      print('更新笔记失败:${e.message}');
      return false;
    }
  }

  // 4. 删除笔记
  Future<bool> deleteNote(int index) async {
    try {
      return await _channel.invokeMethod(
        'deleteNote',
        {'index': index},
      ) as bool;
    } on PlatformException catch (e) {
      print('删除笔记失败:${e.message}');
      return false;
    }
  }
}
步骤2:实现笔记列表页面(main.dart)
import 'package:flutter/material.dart';
import 'package:intl/intl.dart';
import 'note_channel.dart';

void main() {
  runApp(const MyApp());
}

class MyApp extends StatelessWidget {
  const MyApp({super.key});

  @override
  Widget build(BuildContext context) {
    return MaterialApp(
      title: '鸿蒙记事本',
      theme: ThemeData(primarySwatch: Colors.blue),
      routes: {
        '/': (context) => const NoteListPage(),
        '/edit': (context) => const NoteEditPage(),
      },
      initialRoute: '/',
    );
  }
}

// 笔记列表页面
class NoteListPage extends StatefulWidget {
  const NoteListPage({super.key});

  @override
  State<NoteListPage> createState() => _NoteListPageState();
}

class _NoteListPageState extends State<NoteListPage> {
  final NoteChannel _noteChannel = NoteChannel();
  List<Note> _notes = [];
  bool _isLoading = true;

  // 加载笔记列表
  Future<void> _loadNotes() async {
    setState(() => _isLoading = true);
    final notes = await _noteChannel.getAllNotes();
    setState(() {
      _notes = notes;
      _isLoading = false;
    });
  }

  // 跳转到编辑页面(新建/修改)
  void _gotoEditPage({Note? note, int? index}) {
    Navigator.pushNamed(
      context,
      '/edit',
      arguments: {'note': note, 'index': index},
    ).then((value) {
      // 编辑完成后刷新列表
      if (value == true) _loadNotes();
    });
  }

  // 删除笔记
  Future<void> _deleteNote(int index) async {
    final success = await _noteChannel.deleteNote(index);
    if (success) {
      ScaffoldMessenger.of(context).showSnackBar(
        const SnackBar(content: Text('删除成功')),
      );
      _loadNotes();
    } else {
      ScaffoldMessenger.of(context).showSnackBar(
        const SnackBar(content: Text('删除失败')),
      );
    }
  }

  @override
  void initState() {
    super.initState();
    _loadNotes(); // 页面初始化时加载笔记
  }

  @override
  Widget build(BuildContext context) {
    return Scaffold(
      appBar: AppBar(title: const Text('我的笔记')),
      body: _buildBody(),
      floatingActionButton: FloatingActionButton(
        onPressed: () => _gotoEditPage(), // 新建笔记
        child: const Icon(Icons.add),
      ),
    );
  }

  // 构建列表内容
  Widget _buildBody() {
    if (_isLoading) {
      return const Center(child: CircularProgressIndicator());
    }
    if (_notes.isEmpty) {
      return const Center(child: Text('暂无笔记,点击右下角添加'));
    }
    return ListView.builder(
      itemCount: _notes.length,
      itemBuilder: (context, index) {
        final note = _notes[index];
        return ListTile(
          title: Text(
            note.title,
            maxLines: 1,
            overflow: TextOverflow.ellipsis,
            style: const TextStyle(fontSize: 18),
          ),
          subtitle: Column(
            crossAxisAlignment: CrossAxisAlignment.start,
            children: [
              Text(
                note.content,
                maxLines: 2,
                overflow: TextOverflow.ellipsis,
              ),
              Text(
                note.time,
                style: const TextStyle(color: Colors.grey, fontSize: 12),
              ),
            ],
          ),
          onTap: () => _gotoEditPage(note: note, index: index), // 编辑笔记
          onLongPress: () => _deleteNote(index), // 长按删除
        );
      },
    );
  }
}
步骤3:实现笔记编辑页面(note_edit_page.dart)
import 'package:flutter/material.dart';
import 'package:intl/intl.dart';
import 'note_channel.dart';

class NoteEditPage extends StatefulWidget {
  const NoteEditPage({super.key});

  @override
  State<NoteEditPage> createState() => _NoteEditPageState();
}

class _NoteEditPageState extends State<NoteEditPage> {
  final NoteChannel _noteChannel = NoteChannel();
  final TextEditingController _titleController = TextEditingController();
  final TextEditingController _contentController = TextEditingController();
  Note? _editNote;
  int? _editIndex;

  // 保存笔记(新建/更新)
  Future<void> _saveNote() async {
    final title = _titleController.text.trim();
    final content = _contentController.text.trim();
    if (title.isEmpty) {
      ScaffoldMessenger.of(context).showSnackBar(
        const SnackBar(content: Text('标题不能为空')),
      );
      return;
    }
    // 获取当前时间(格式化)
    final time = DateFormat('yyyy-MM-dd HH:mm').format(DateTime.now());
    final note = Note(title: title, content: content, time: time);

    bool success;
    if (_editNote != null && _editIndex != null) {
      // 更新现有笔记
      success = await _noteChannel.updateNote(_editIndex!, note);
    } else {
      // 新建笔记
      success = await _noteChannel.addNote(note);
    }

    if (success) {
      Navigator.pop(context, true); // 返回列表页并刷新
    } else {
      ScaffoldMessenger.of(context).showSnackBar(
        const SnackBar(content: Text('保存失败,请重试')),
      );
    }
  }

  // 初始化编辑数据
  void _initEditData() {
    final args = ModalRoute.of(context)?.settings.arguments as Map?;
    if (args != null) {
      _editNote = args['note'] as Note?;
      _editIndex = args['index'] as int?;
      if (_editNote != null) {
        _titleController.text = _editNote!.title;
        _contentController.text = _editNote!.content;
      }
    }
  }

  @override
  void initState() {
    super.initState();
    _initEditData();
  }

  @override
  Widget build(BuildContext context) {
    return Scaffold(
      appBar: AppBar(
        title: Text(_editNote == null ? '新建笔记' : '编辑笔记'),
        actions: [
          TextButton(
            onPressed: _saveNote,
            child: const Text(
              '保存',
              style: TextStyle(color: Colors.white, fontSize: 16),
            ),
          )
        ],
      ),
      body: Padding(
        padding: const EdgeInsets.all(16.0),
        child: Column(
          children: [
            // 标题输入框
            TextField(
              controller: _titleController,
              decoration: const InputDecoration(
                hintText: '请输入笔记标题',
                border: InputBorder.none,
                hintStyle: TextStyle(fontSize: 20),
              ),
              style: const TextStyle(fontSize: 20, fontWeight: FontWeight.w500),
              maxLines: 1,
            ),
            const Divider(height: 1),
            // 内容输入框
            Expanded(
              child: TextField(
                controller: _contentController,
                decoration: const InputDecoration(
                  hintText: '请输入笔记内容',
                  border: InputBorder.none,
                  hintStyle: TextStyle(color: Colors.grey),
                ),
                style: const TextStyle(fontSize: 16),
                maxLines: null,
                expands: true,
              ),
            ),
          ],
        ),
      ),
    );
  }

  @override
  void dispose() {
    // 释放资源
    _titleController.dispose();
    _contentController.dispose();
    super.dispose();
  }
}
三、权限配置与调试运行
1. 配置鸿蒙应用权限
Preferences存储需要“文件访问权限”,在鸿蒙工程`module.json5`中添加配置:
// entry/src/main/module.json5
{
  "module": {
    "abilities": [
      {
        "name": ".EntryAbility",
        "permissions": [
          "ohos.permission.READ_USER_STORAGE",
          "ohos.permission.WRITE_USER_STORAGE"
        ],
        "skills": [
          {
            "entities": ["entity.system.home"],
            "actions": ["action.system.home"]
          }
        ]
      }
    ],
    "minAPIVersion": 9,
    "targetAPIVersion": 10
  }
}
2. 调试运行步骤
-
在DevEco Studio中,连接鸿蒙模拟器或真机(确保已开启开发者模式与USB调试);
-
选择“entry”模块作为启动模块,点击“Run”按钮(或快捷键Shift+F10);
-
首次运行会自动编译Flutter代码与鸿蒙工程,若提示“权限申请”,在设备上点击“允许”;
-
调试技巧: Flutter代码调试:在VS Code中打开Flutter模块,通过“Flutter Attach”连接运行中的应用;
-
鸿蒙代码调试:在DevEco Studio中设置断点,通过“Debug”模式运行,查看日志面板;
-
通信问题排查:统一使用`print`(Flutter)和`console.log`(鸿蒙)打印日志,在DevEco Studio日志面板查看。
-
添加笔记搜索:Flutter端实现搜索框,鸿蒙端添加按标题筛选的接口;
-
分布式同步:基于鸿蒙分布式数据库,实现多设备笔记同步;
-
在DevEco Studio中,选择“Build→Build APP(s)”;
-
选择“Release”模式,配置签名证书(需在华为开发者联盟申请);
-
等待编译完成,在`entry/build/outputs/default`目录下获取`.app`安装包;
-
上架华为应用市场:按要求填写应用信息,上传`.app`包提交审核。
-
跨端通信规范化:统一通道与参数格式,避免交互混乱;
-
数据存储本地化:利用鸿蒙Preferences确保数据稳定性;
-
工程结构清晰:Flutter与鸿蒙职责分离,便于维护扩展。
-
富文本编辑:集成Flutter富文本插件(如`flutter_quill`),支持字体样式、图片插入;
-
深色模式:通过MediaQuery获取鸿蒙系统主题,实现明暗主题自动切换。

社区规范:仅讨论OpenHarmony相关问题。
更多推荐
 26
26 0
0- 0


 已为社区贡献10条内容

所有评论(0)