OpenHarmony SystemUI 3.2Release签名和编译
一、环境
IDE版本:DevEco Studio 3.1Release(3.1.0.500)
SDK版本:3.2.14.5 Full-SDK
设备:RK3568 3.2release(3.2.15.2)
二、实现步骤
1、gitee下载系统应用代码
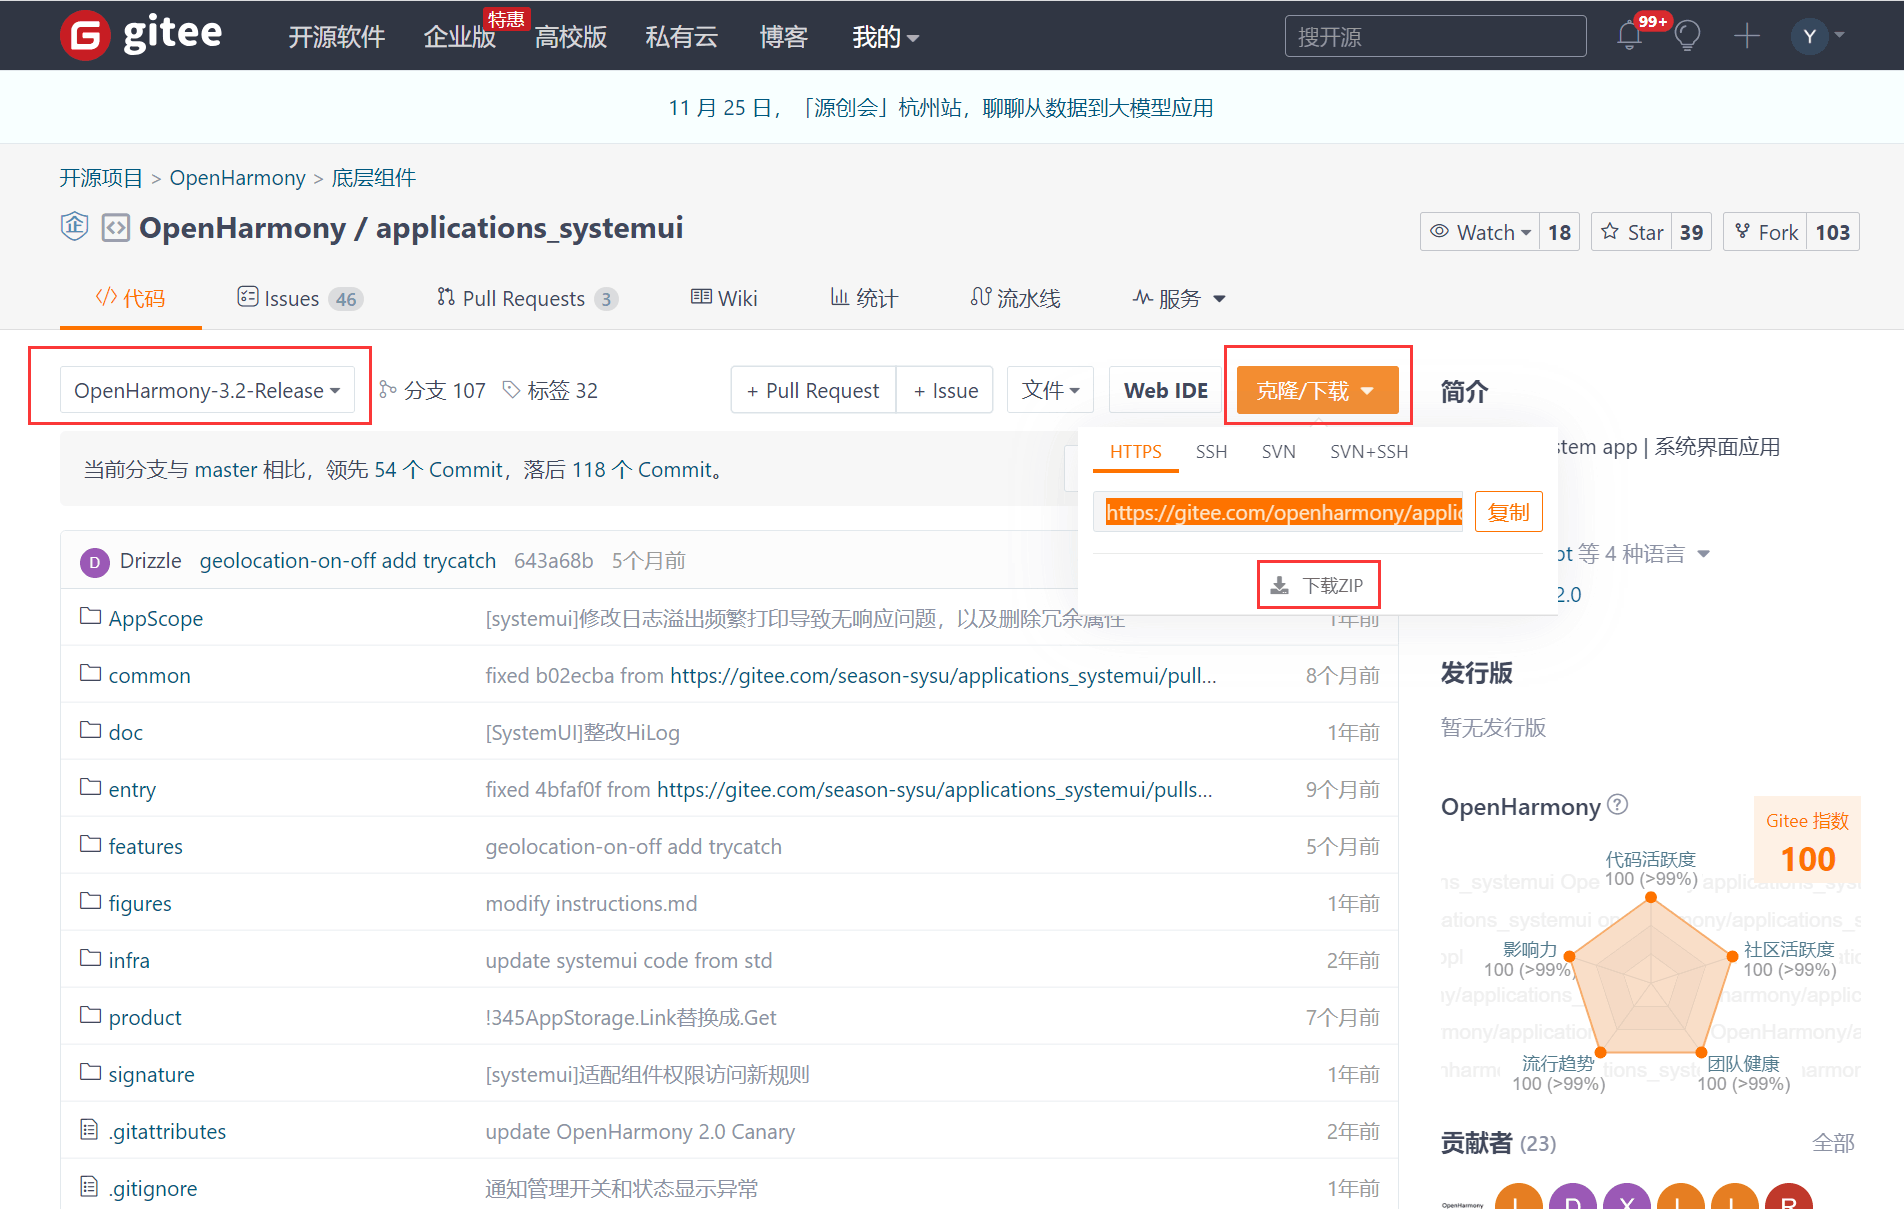
链接:https://gitee.com/openharmony/applications_systemui/tree/OpenHarmony-3.2-Release/
选择OpenHarmony-3.2-Release分支,点击克隆/下载 --> 下载ZIP;
注意:下载ZIP可以直接下载OpenHarmony-3.2-Release分支的,如果是复制链接在本地文件夹中通过git clone命令下载的话,下载的就是master分支,需要自己手动切到OpenHarmony-3.2-Release分支,因为复制的链接就是master分支,而不是OpenHarmony-3.2-Release分支。
2、适配
Deveco打开下载好的systemui工程,会自动提示是否要升级工程
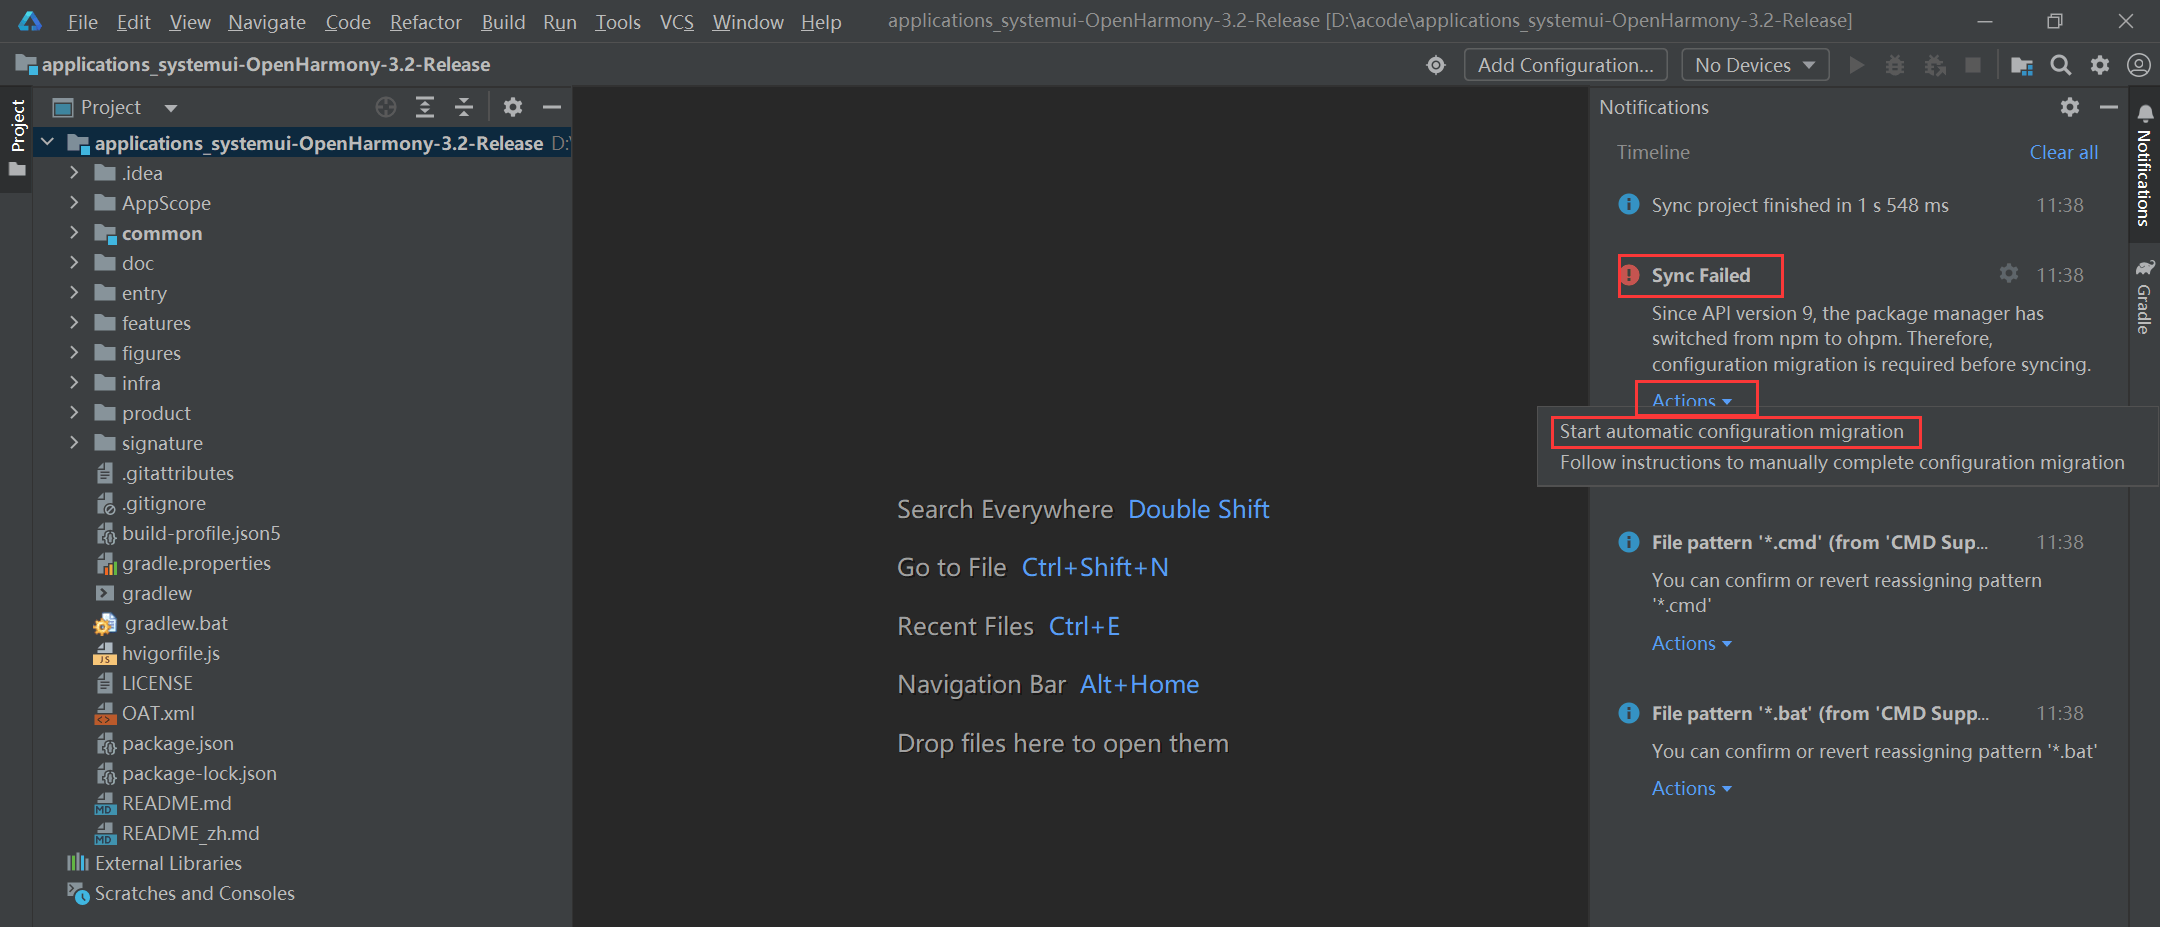
点击Start automatic configuration migration->Migrate->OK->Finish
Deveco报错ERROR: 'entryModules' must be configured for a feature module.必须要在build-profile.json5文件中设置“entryModules”
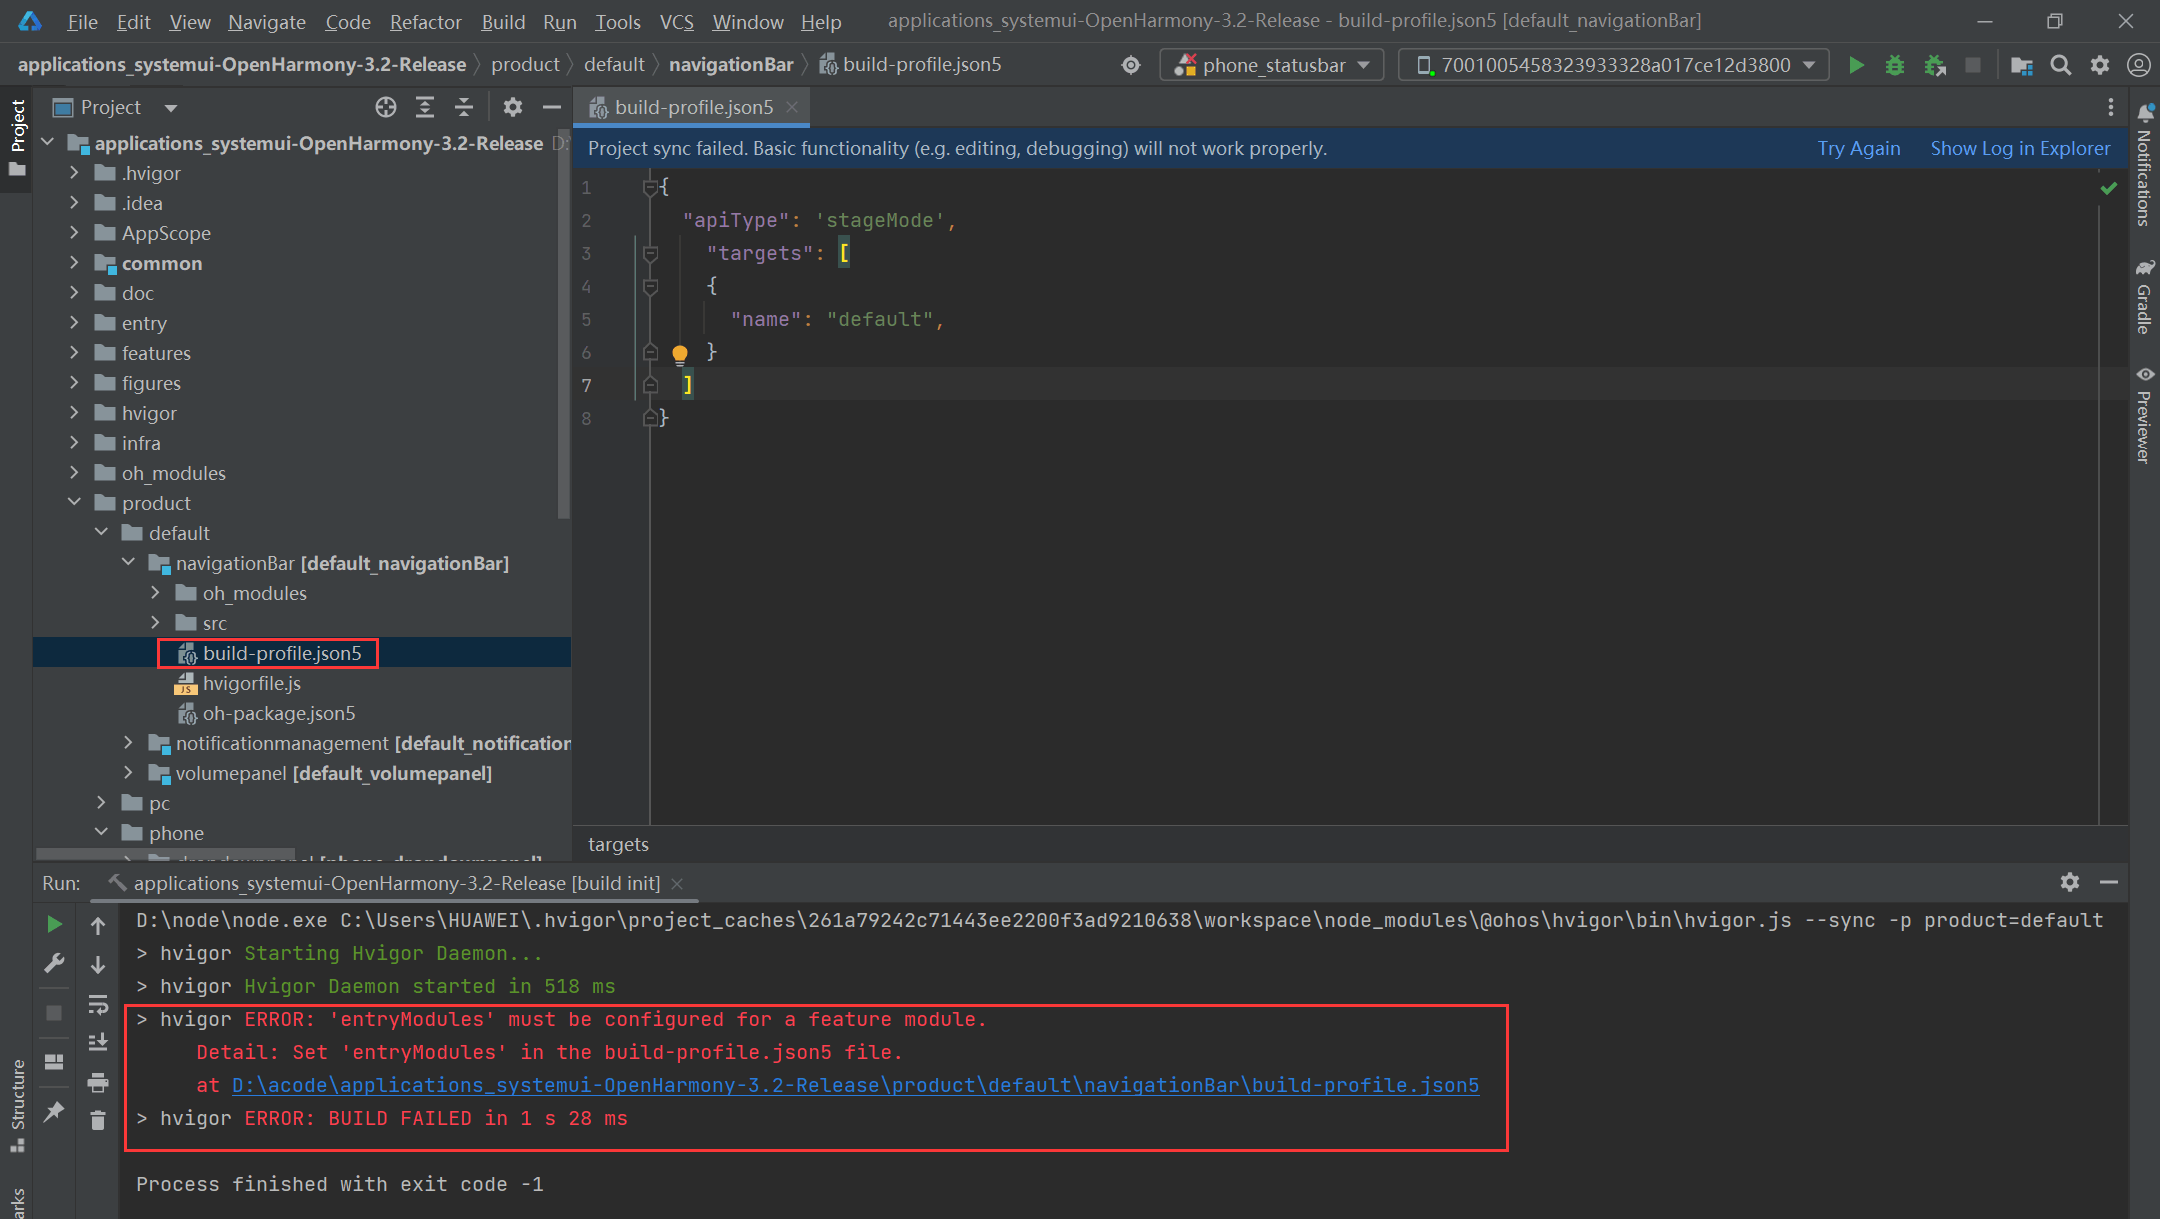
添加下面的代码到D:\acode\applications_systemui-OpenHarmony-3.2-Release\product\default\navigationBar\build-profile.json5文件中,并点击右上角的Sync Now同步工程
"entryModules": [
    "phone_entry"
  ]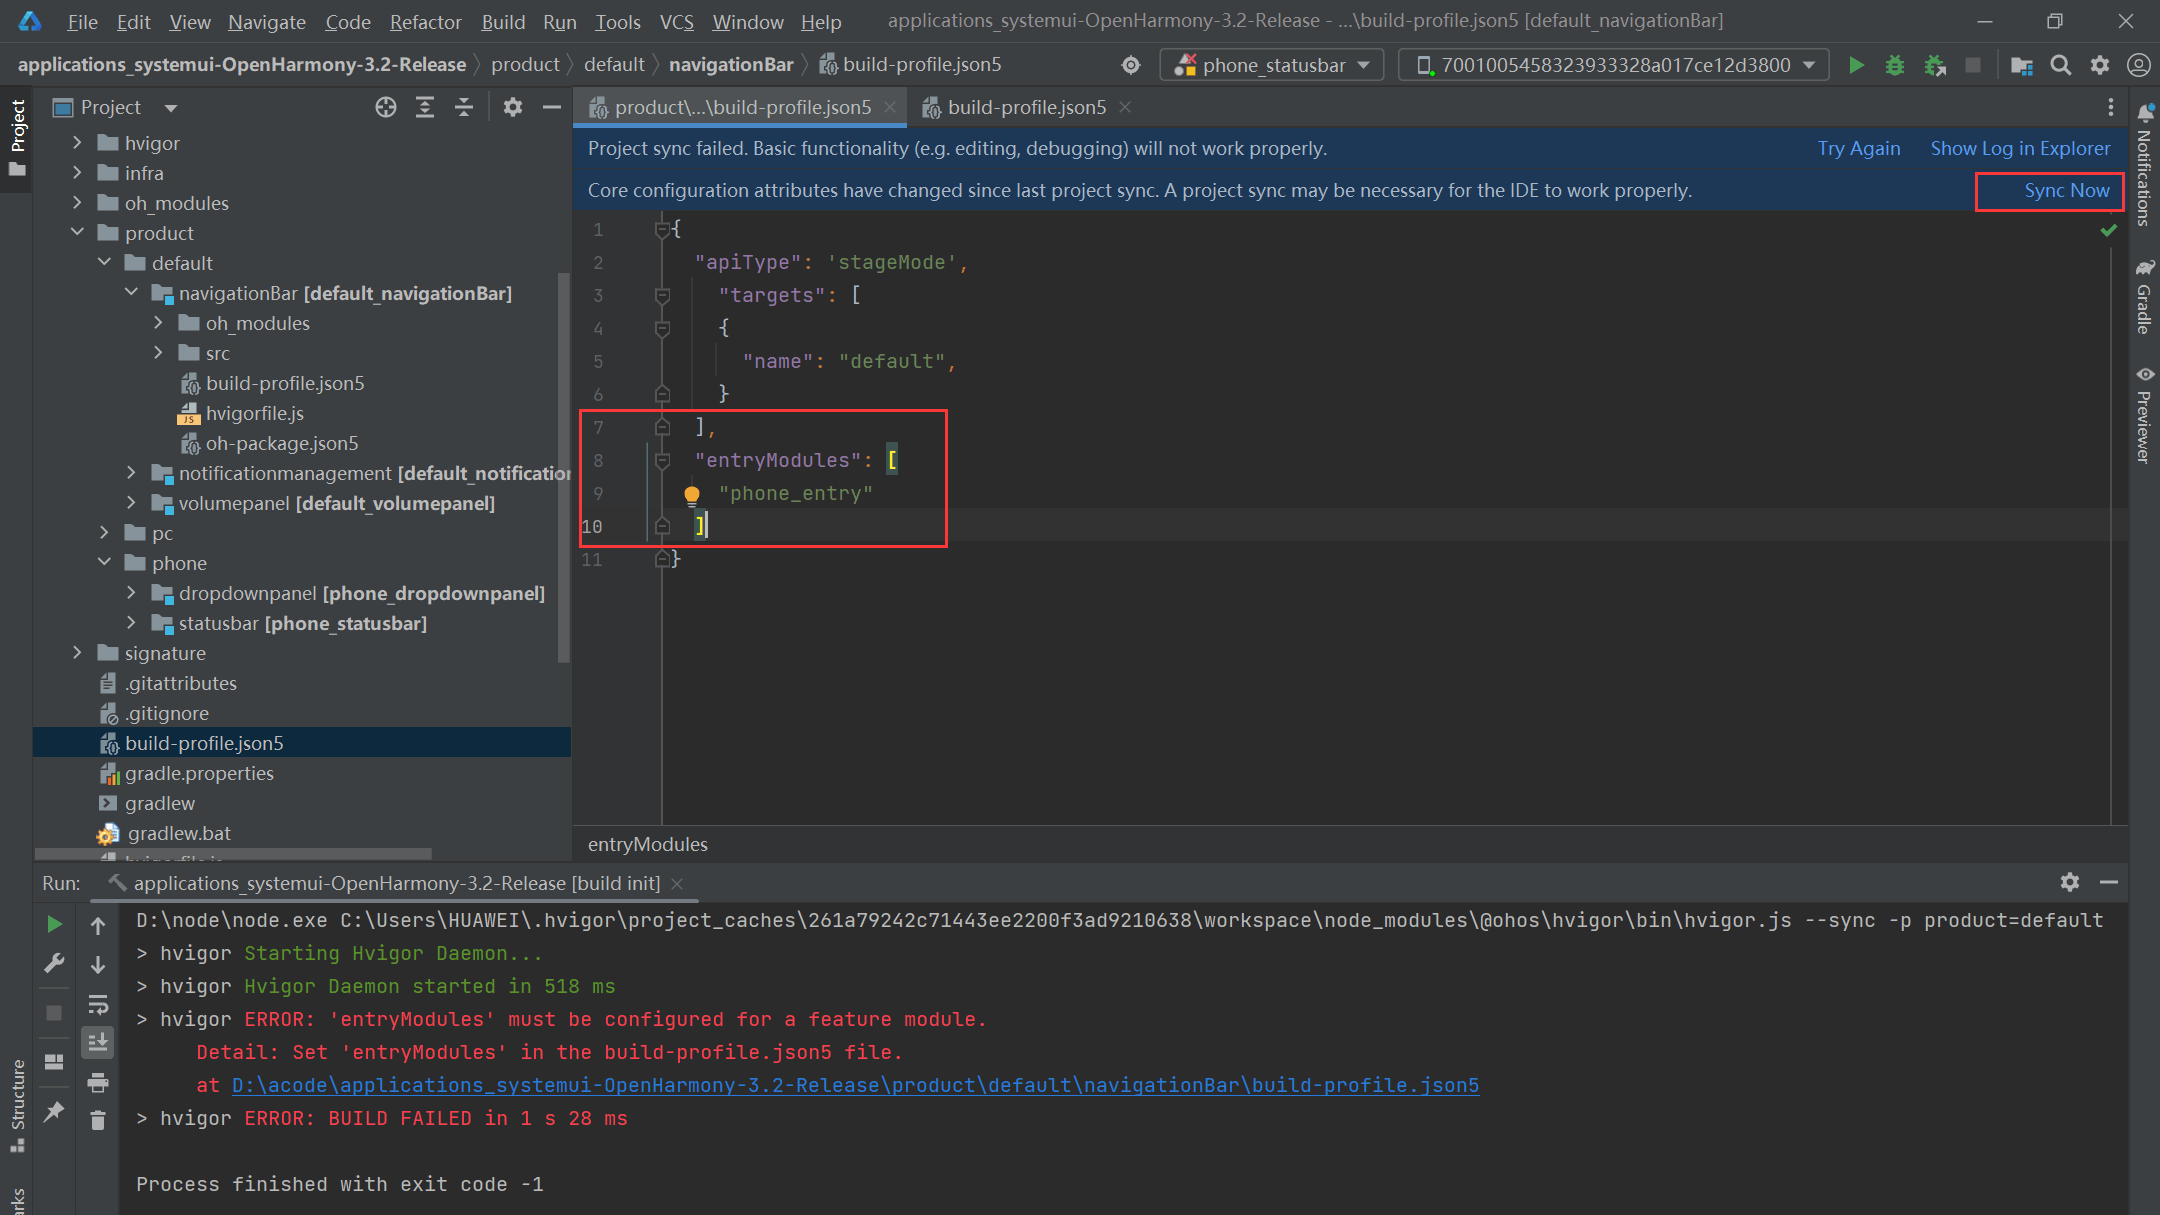
这里的"entryModules"的值其实就是根目录下build-profile.json5文件中的modules的name值
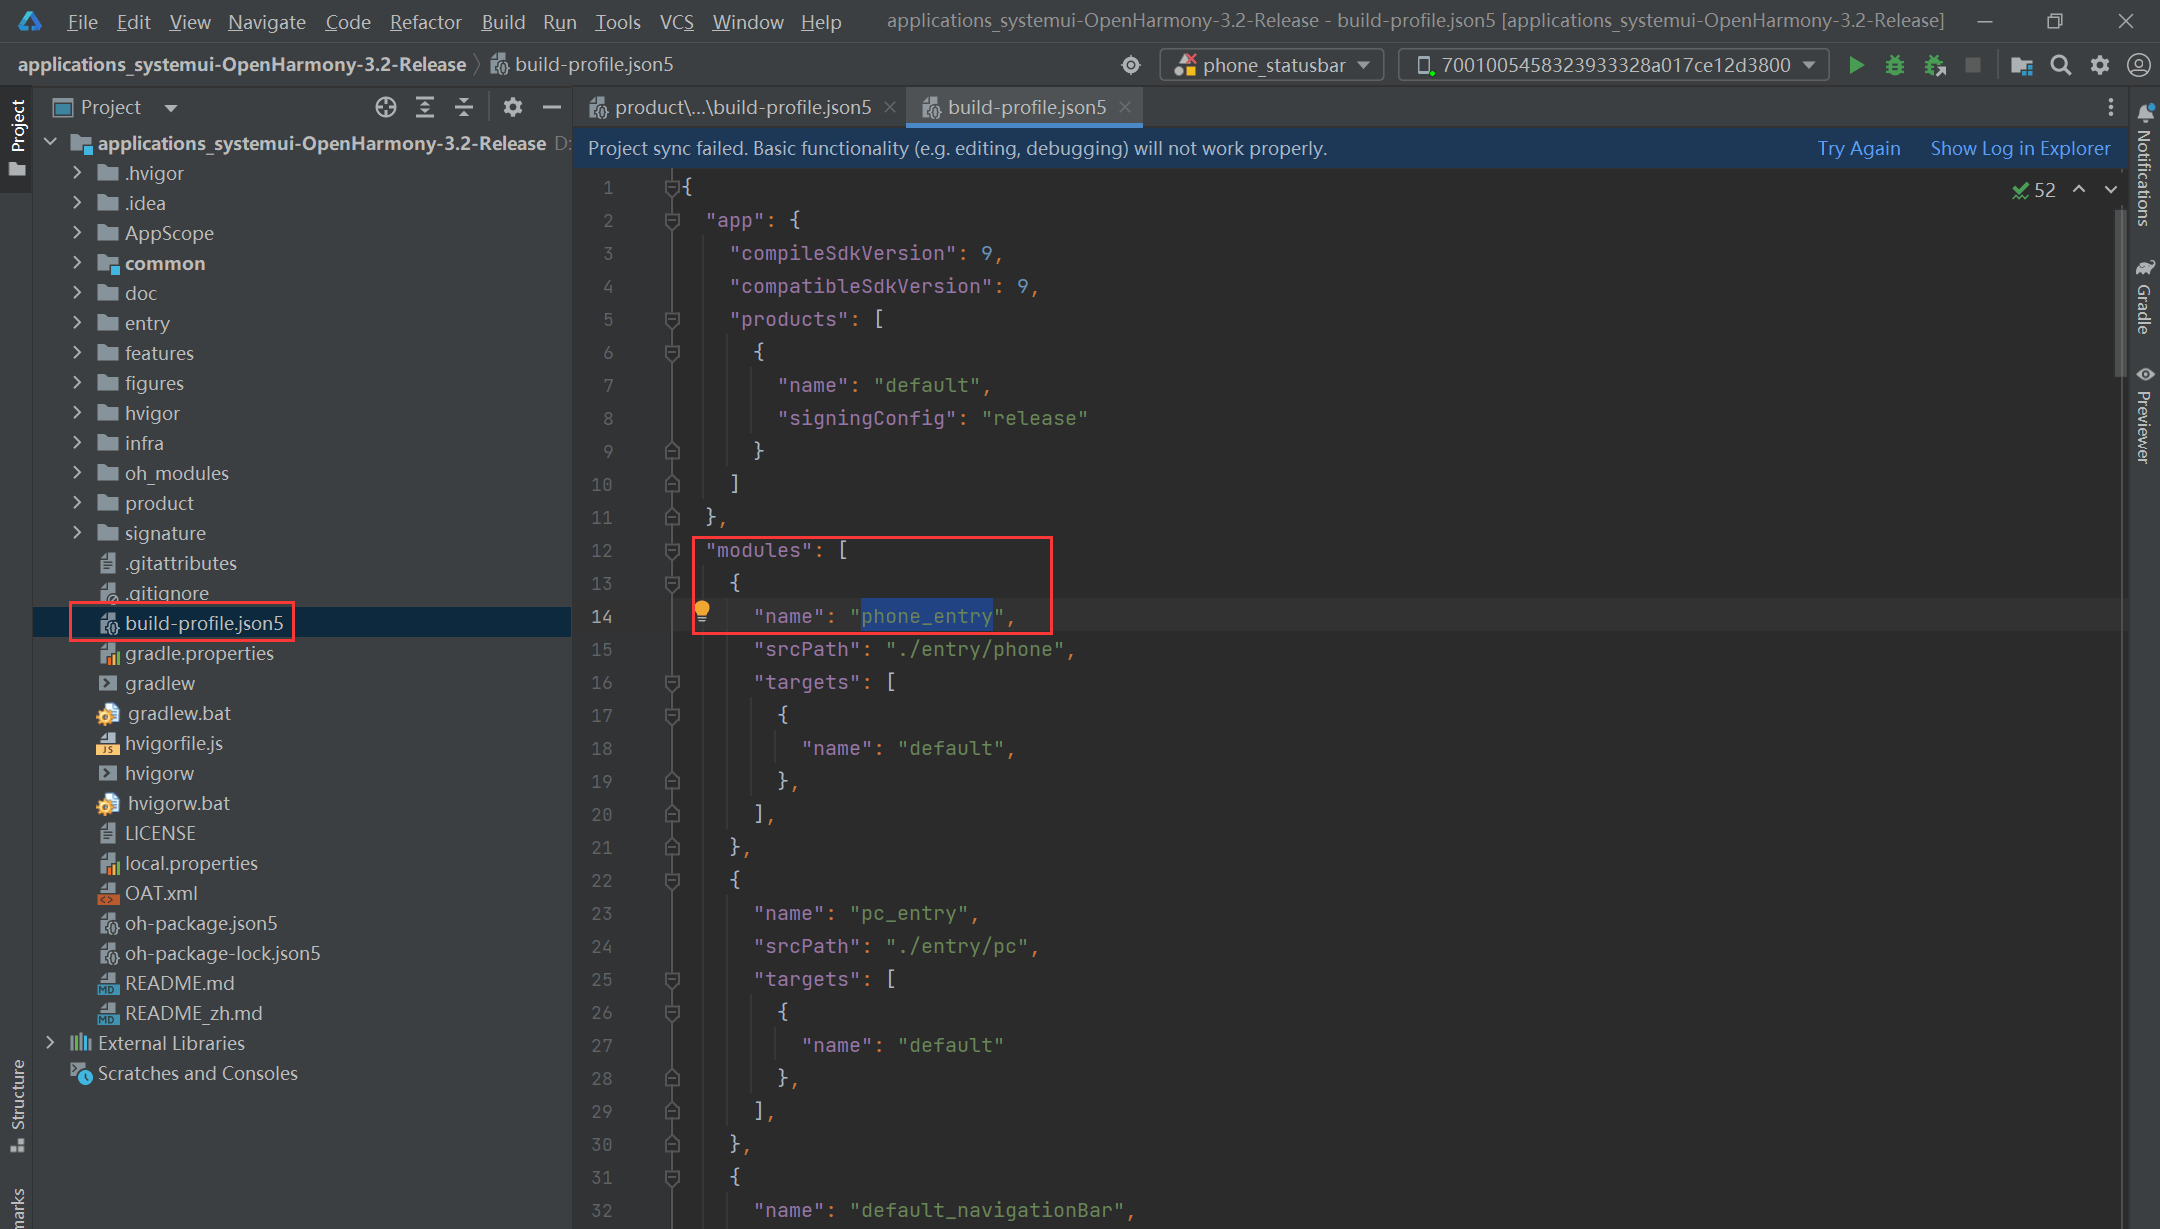
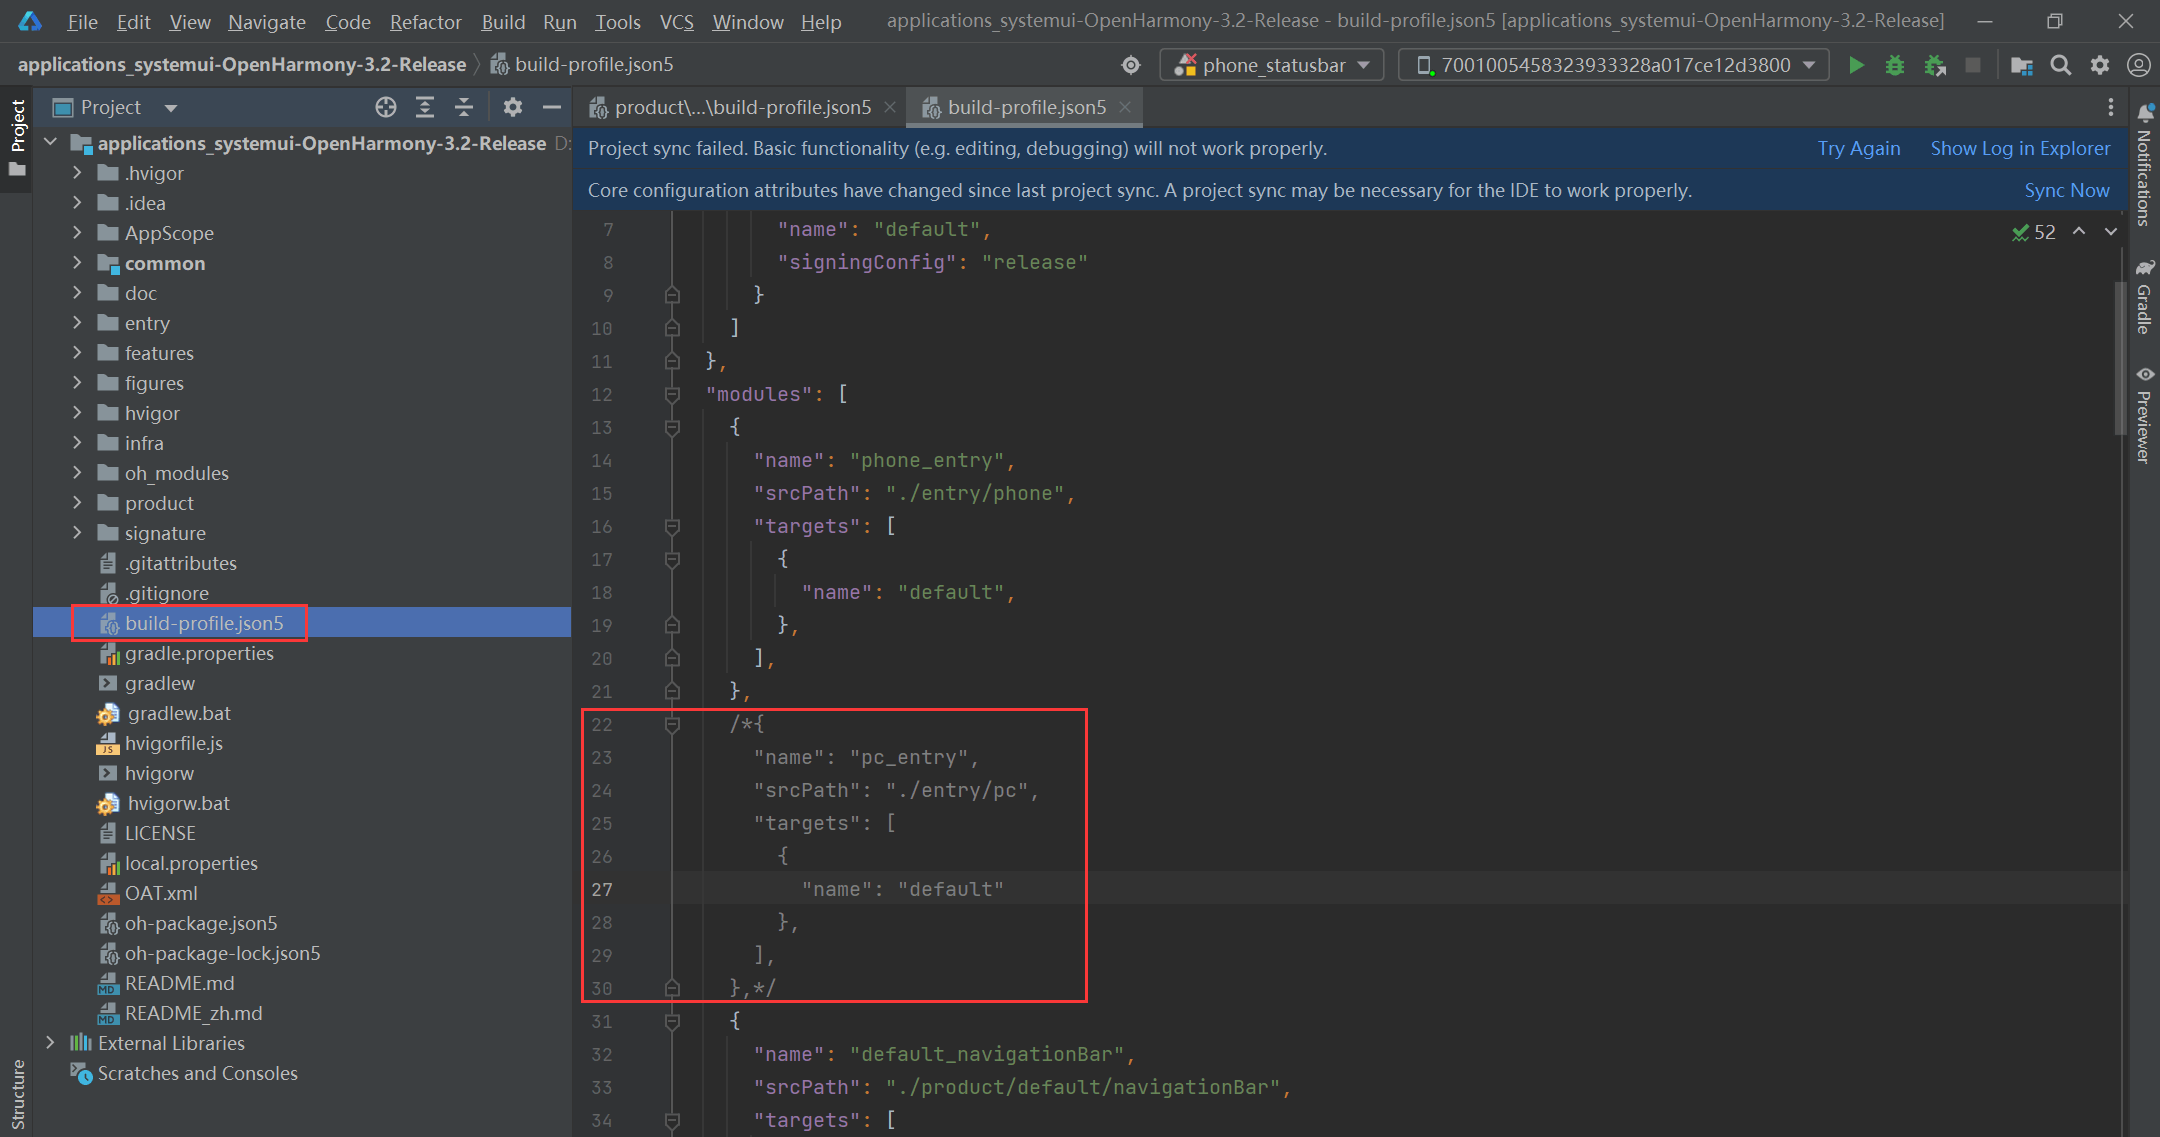
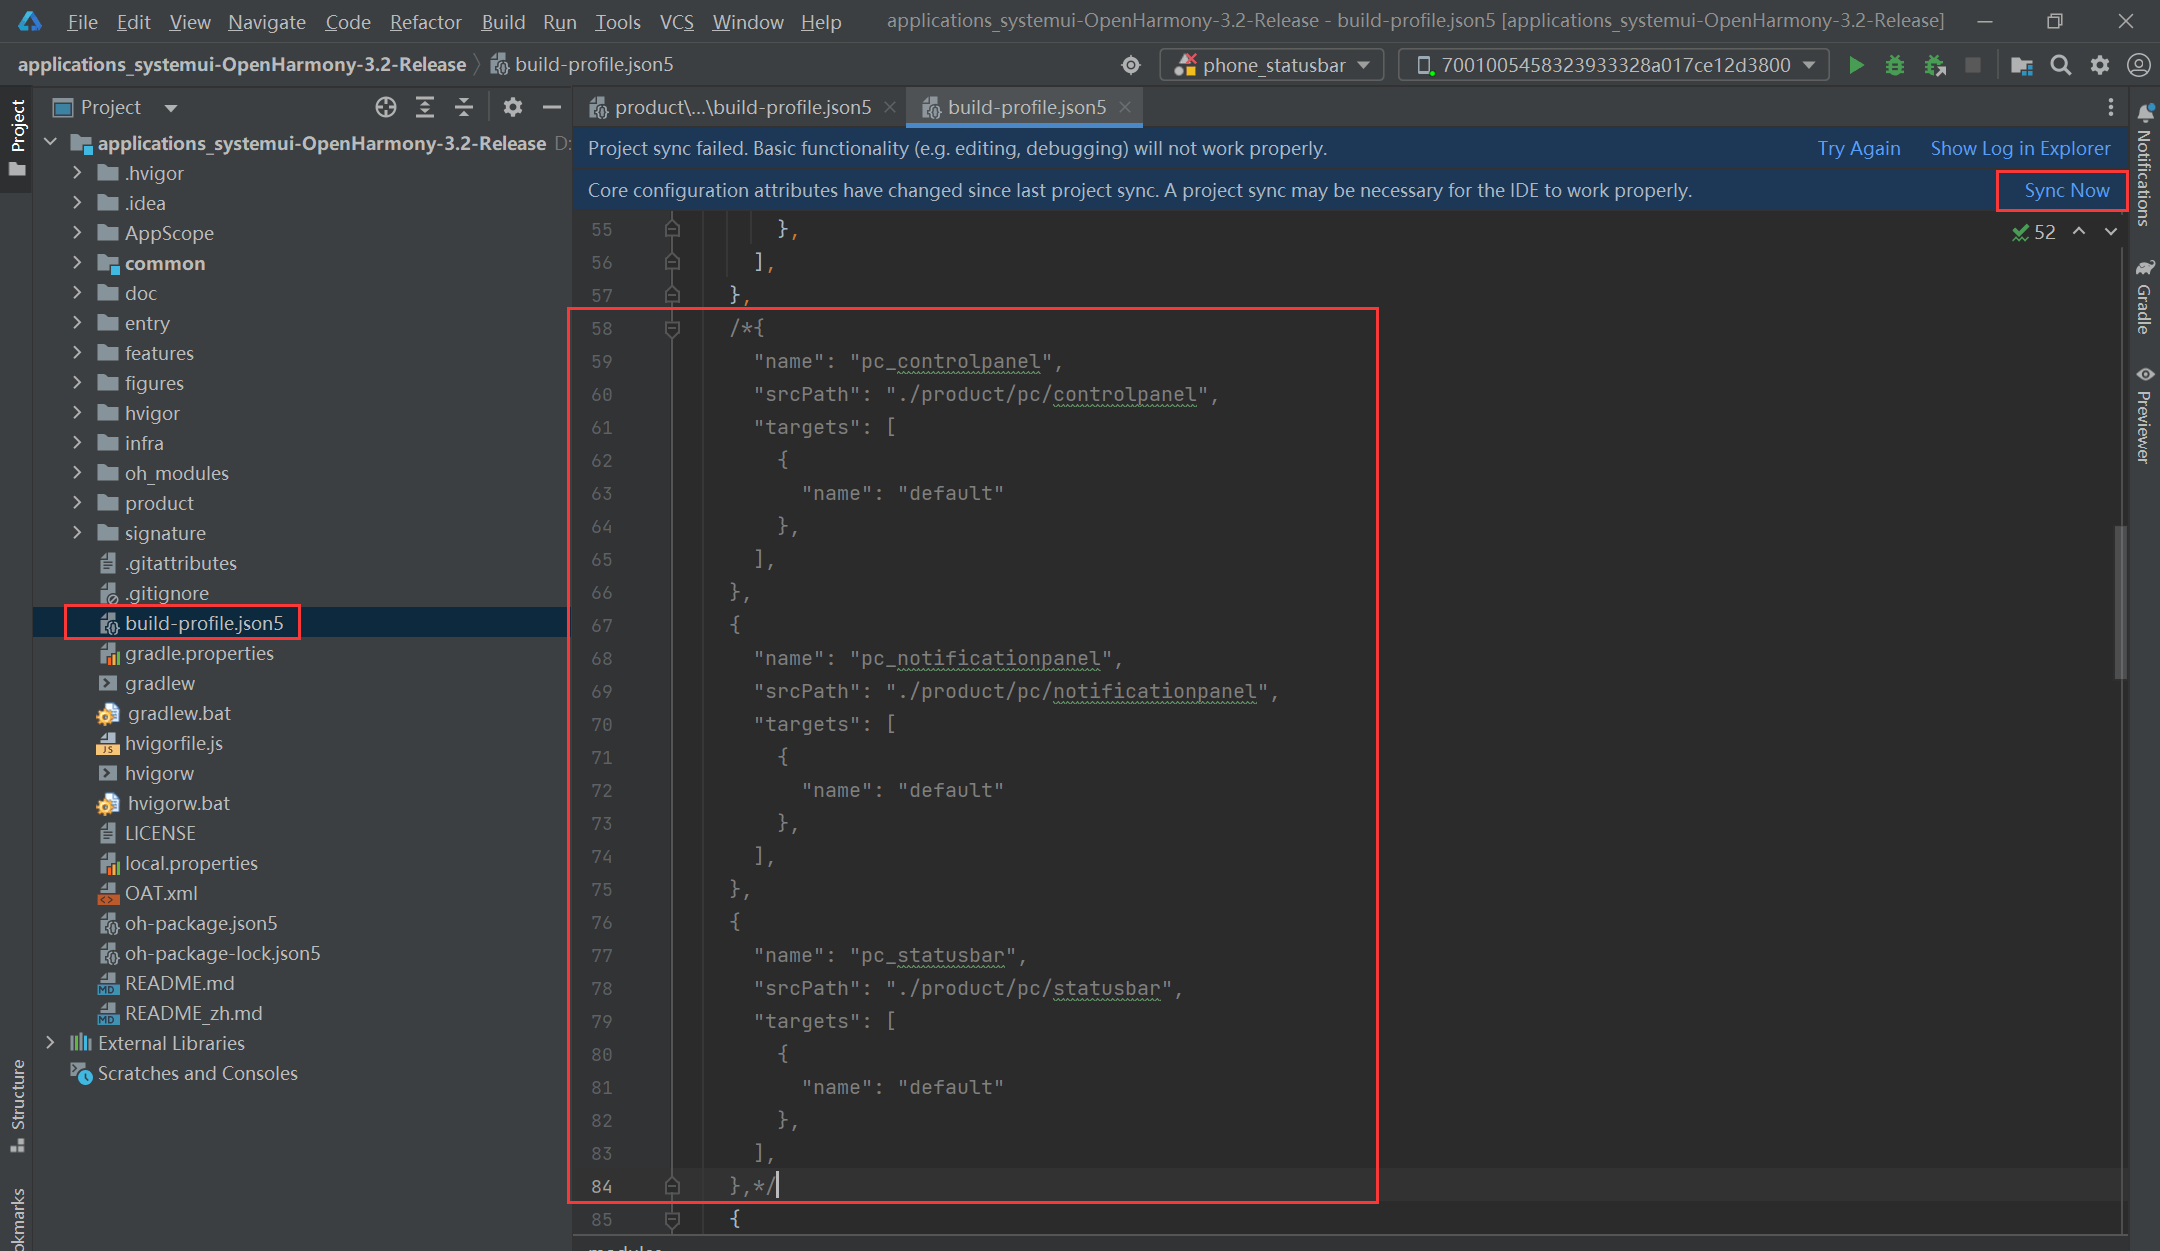
在这里要说一下,要将根目录下build-profile.json5文件中有关pc的配置都注释掉,因为现在演示的是phone的systemui,关于pc的配置一共有两个地方,注释掉后点击Sync Now同步工程;
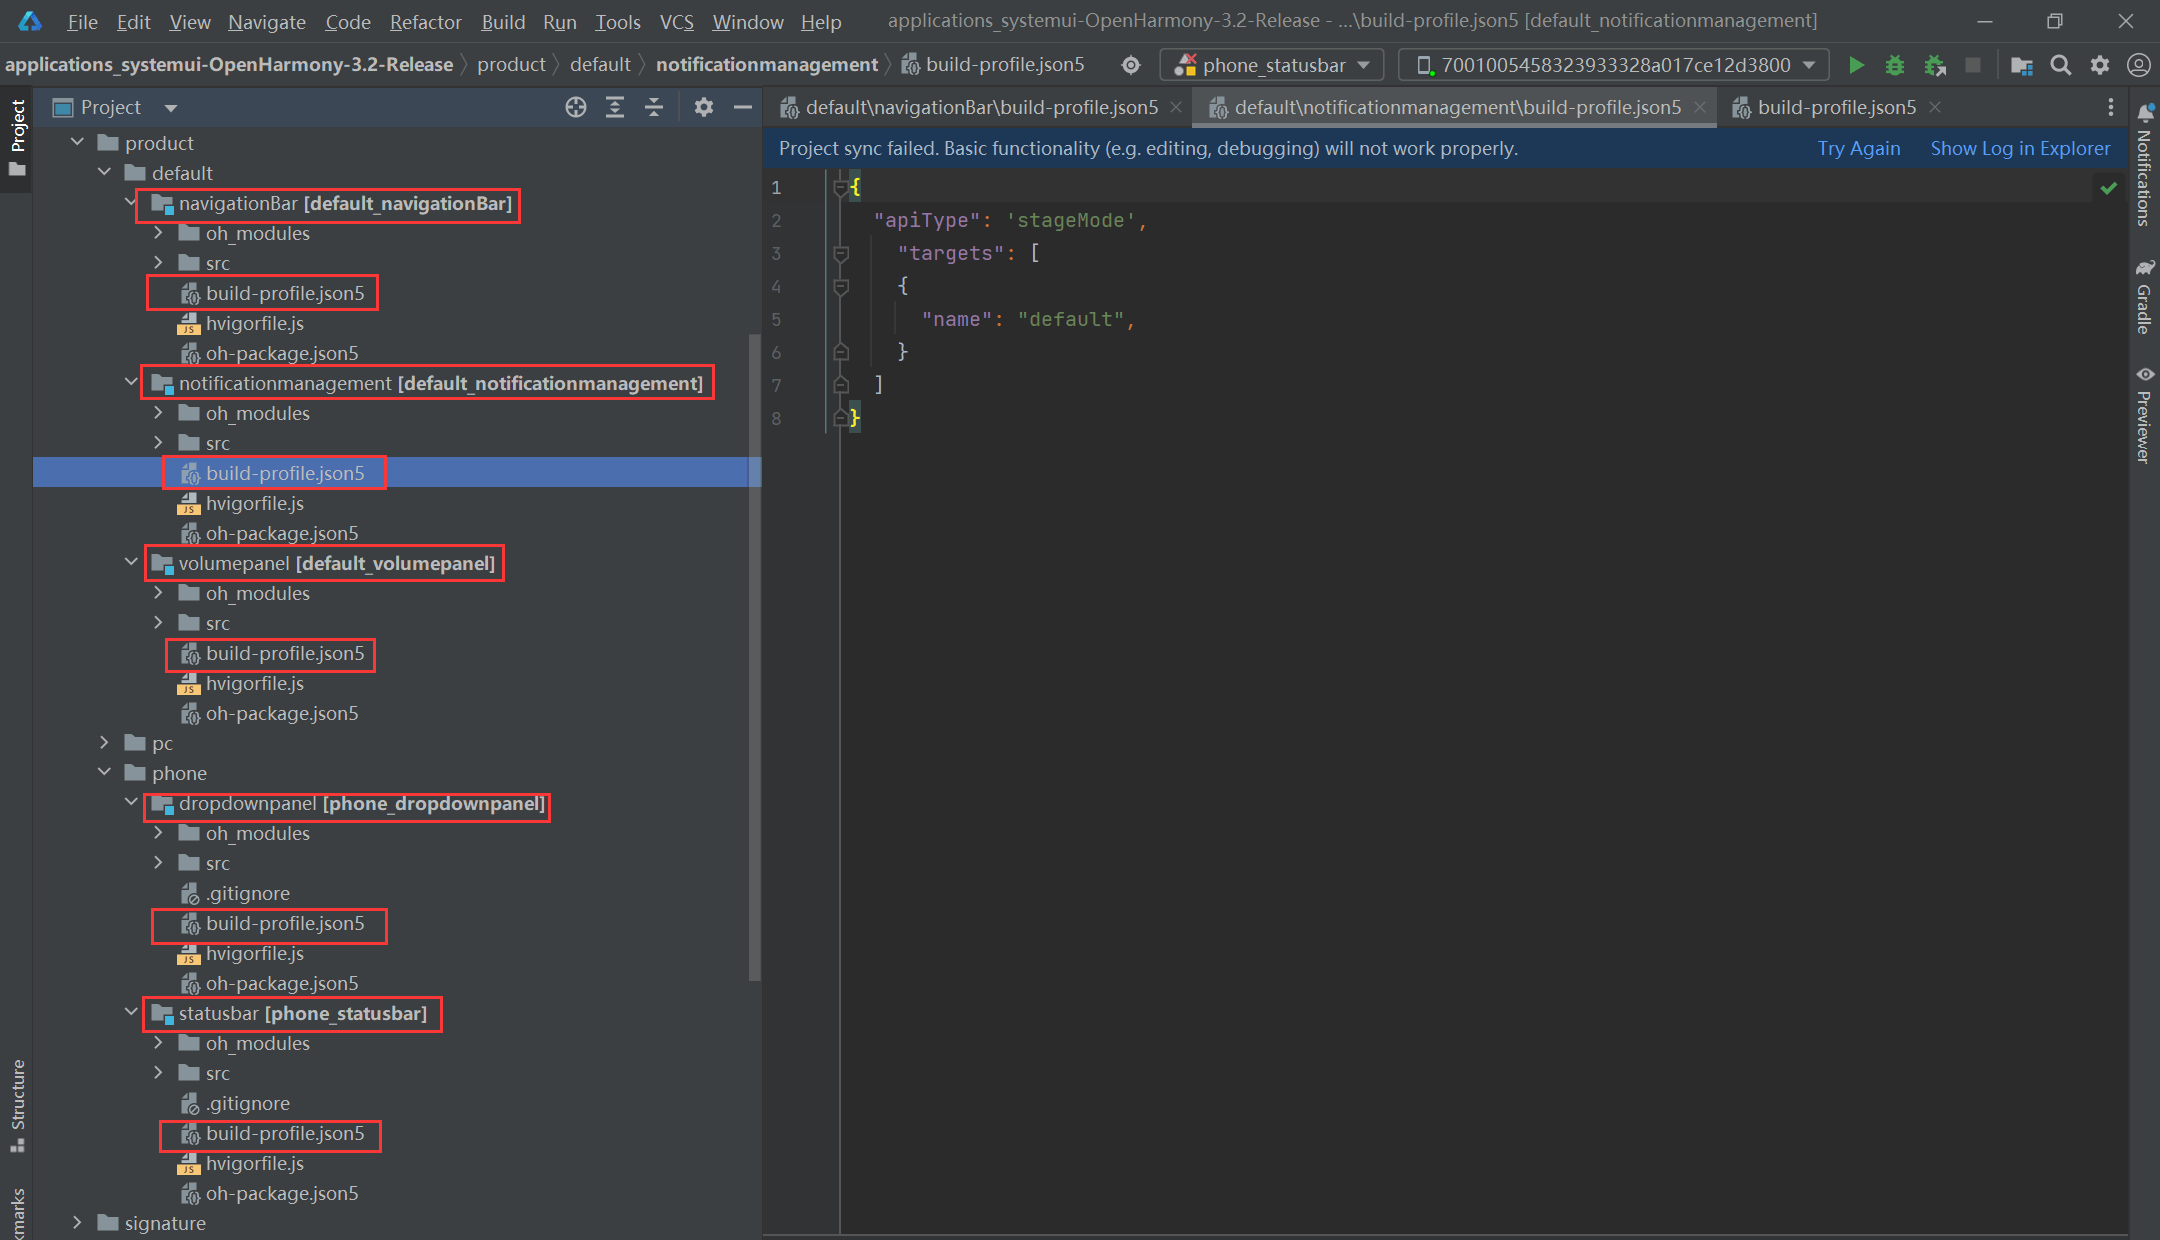
要在product/default目录下的notificationmanagement、volumepanel目录中的build-profile.json5文件和product/phone目录下的dropdownpanel、statusbar目录中的build-profile.json5文件中添加上面相同的代码,并点击右上角的Sync Now同步工程,一共需要修改5个build-profile.json5文件
"entryModules": [
    "phone_entry"
  ]
3、下载缺失的签名文件
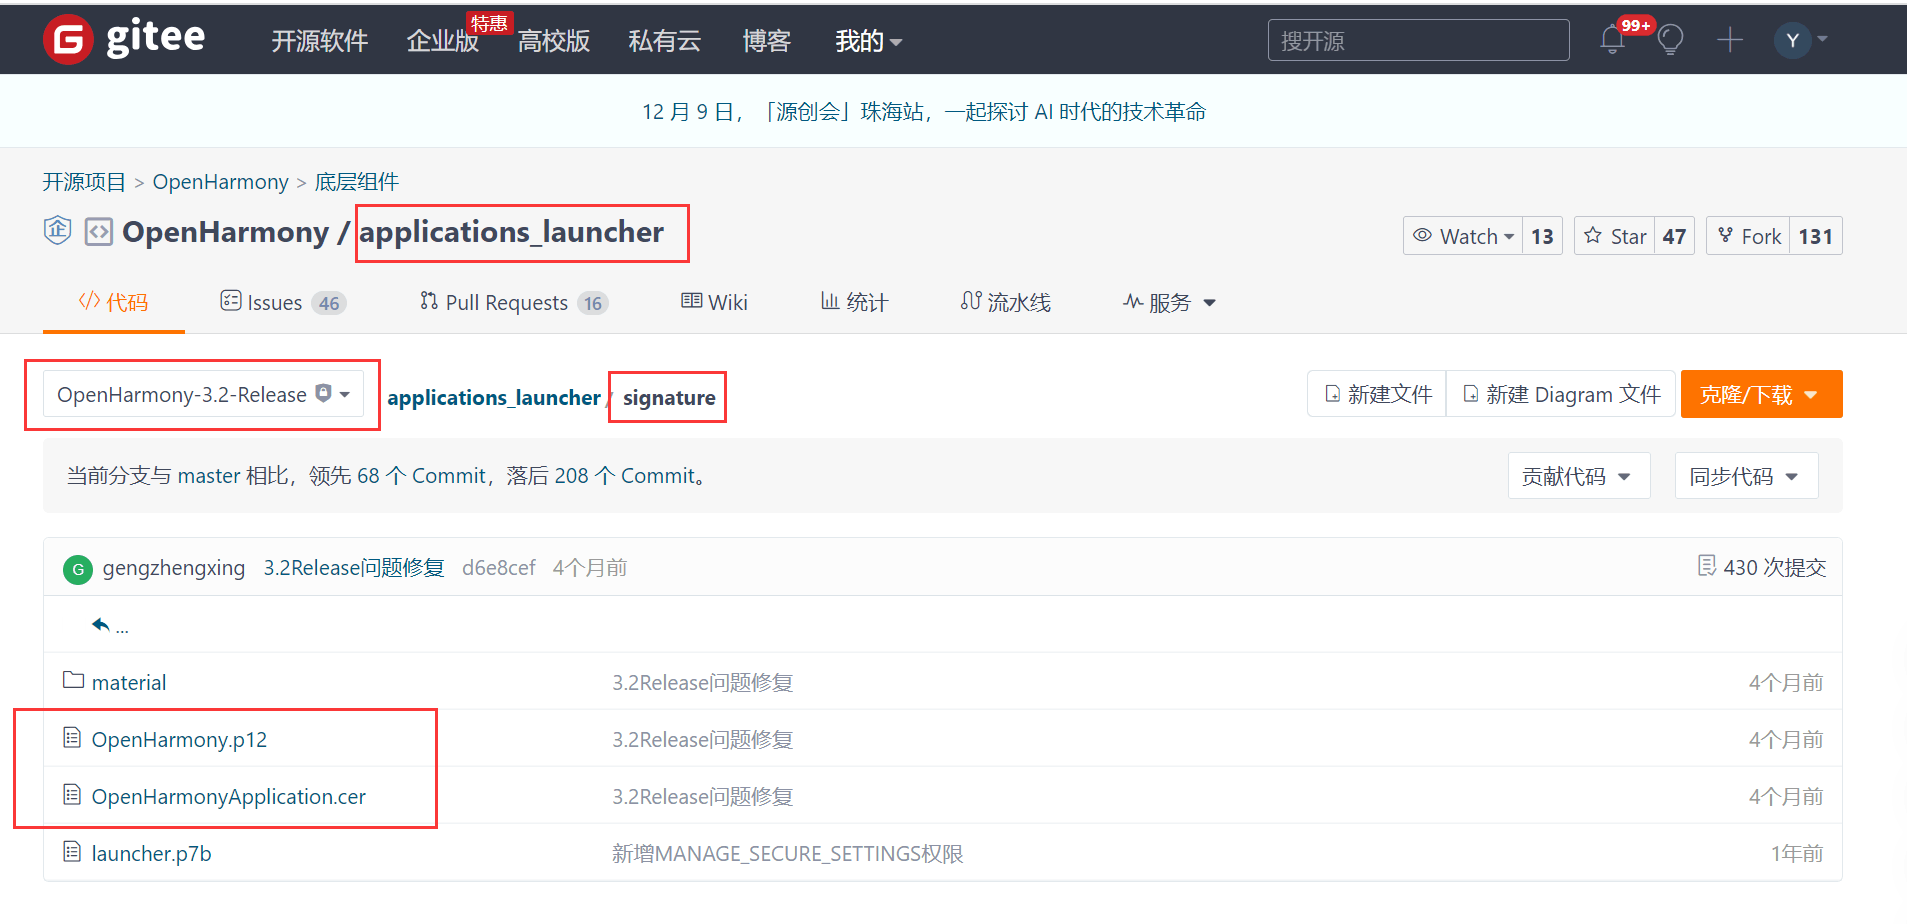
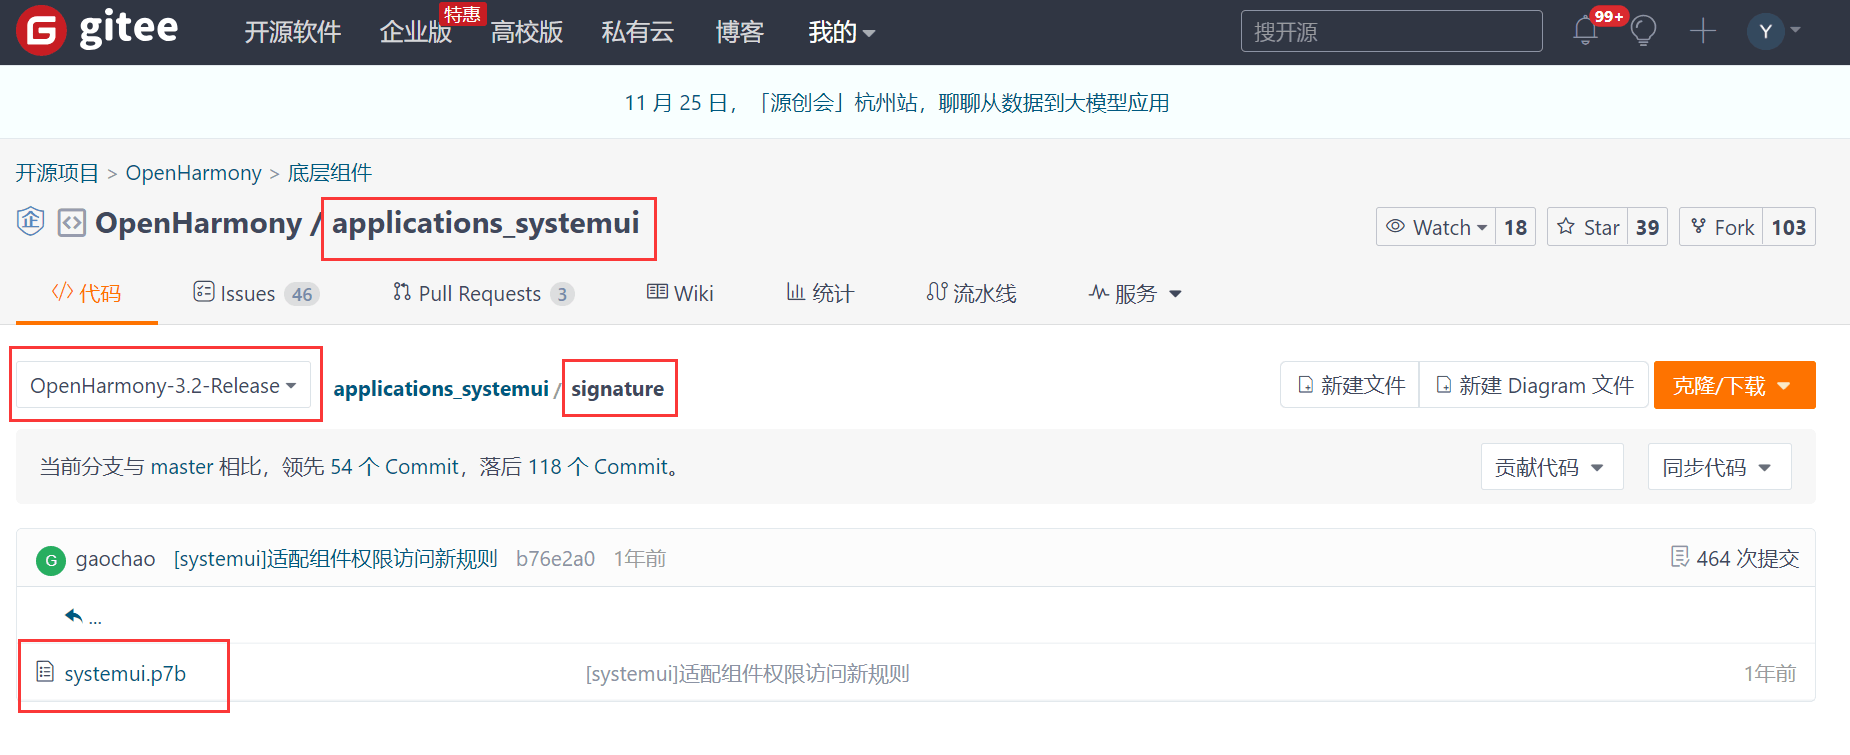
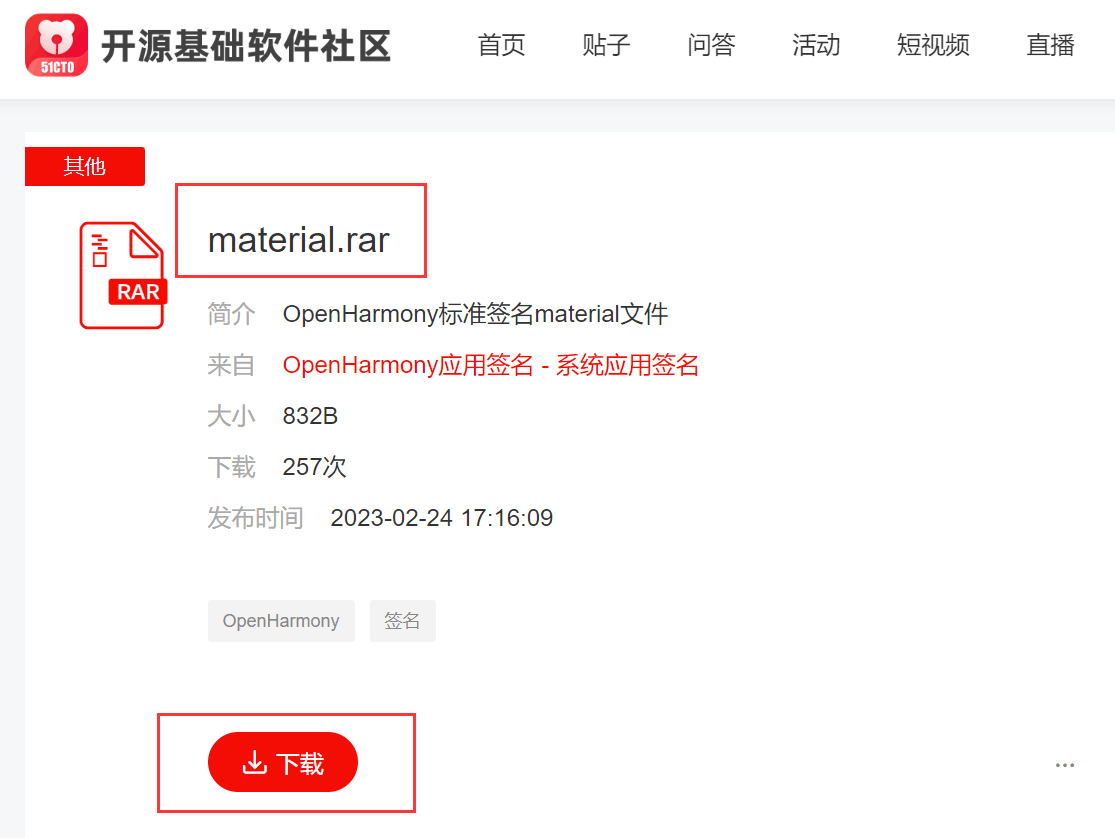
部分系统应用的signature目录下只有p7b文件,缺少material目录、OpenHarmony.p12文件、OpenHarmonyApplication.cer文件,例如:systemui;这种情况下,可以下载launcher(链接:https://gitee.com/openharmony/applications_launcher/tree/OpenHarmony-3.2-Release/signature)中的OpenHarmony.p12文件、OpenHarmonyApplication.cer文件使用,launcher下的material目录我这边用了会报错(当然你们也可以试试launcher下的material目录能不能用),下面提供另外一个下载位置(链接: https://ost.51cto.com/resource/2546?login=from_csdn)
launcher的signature目录
systemui的signature目录
material目录另一个下载路径,下载material目录并解压
4、签名
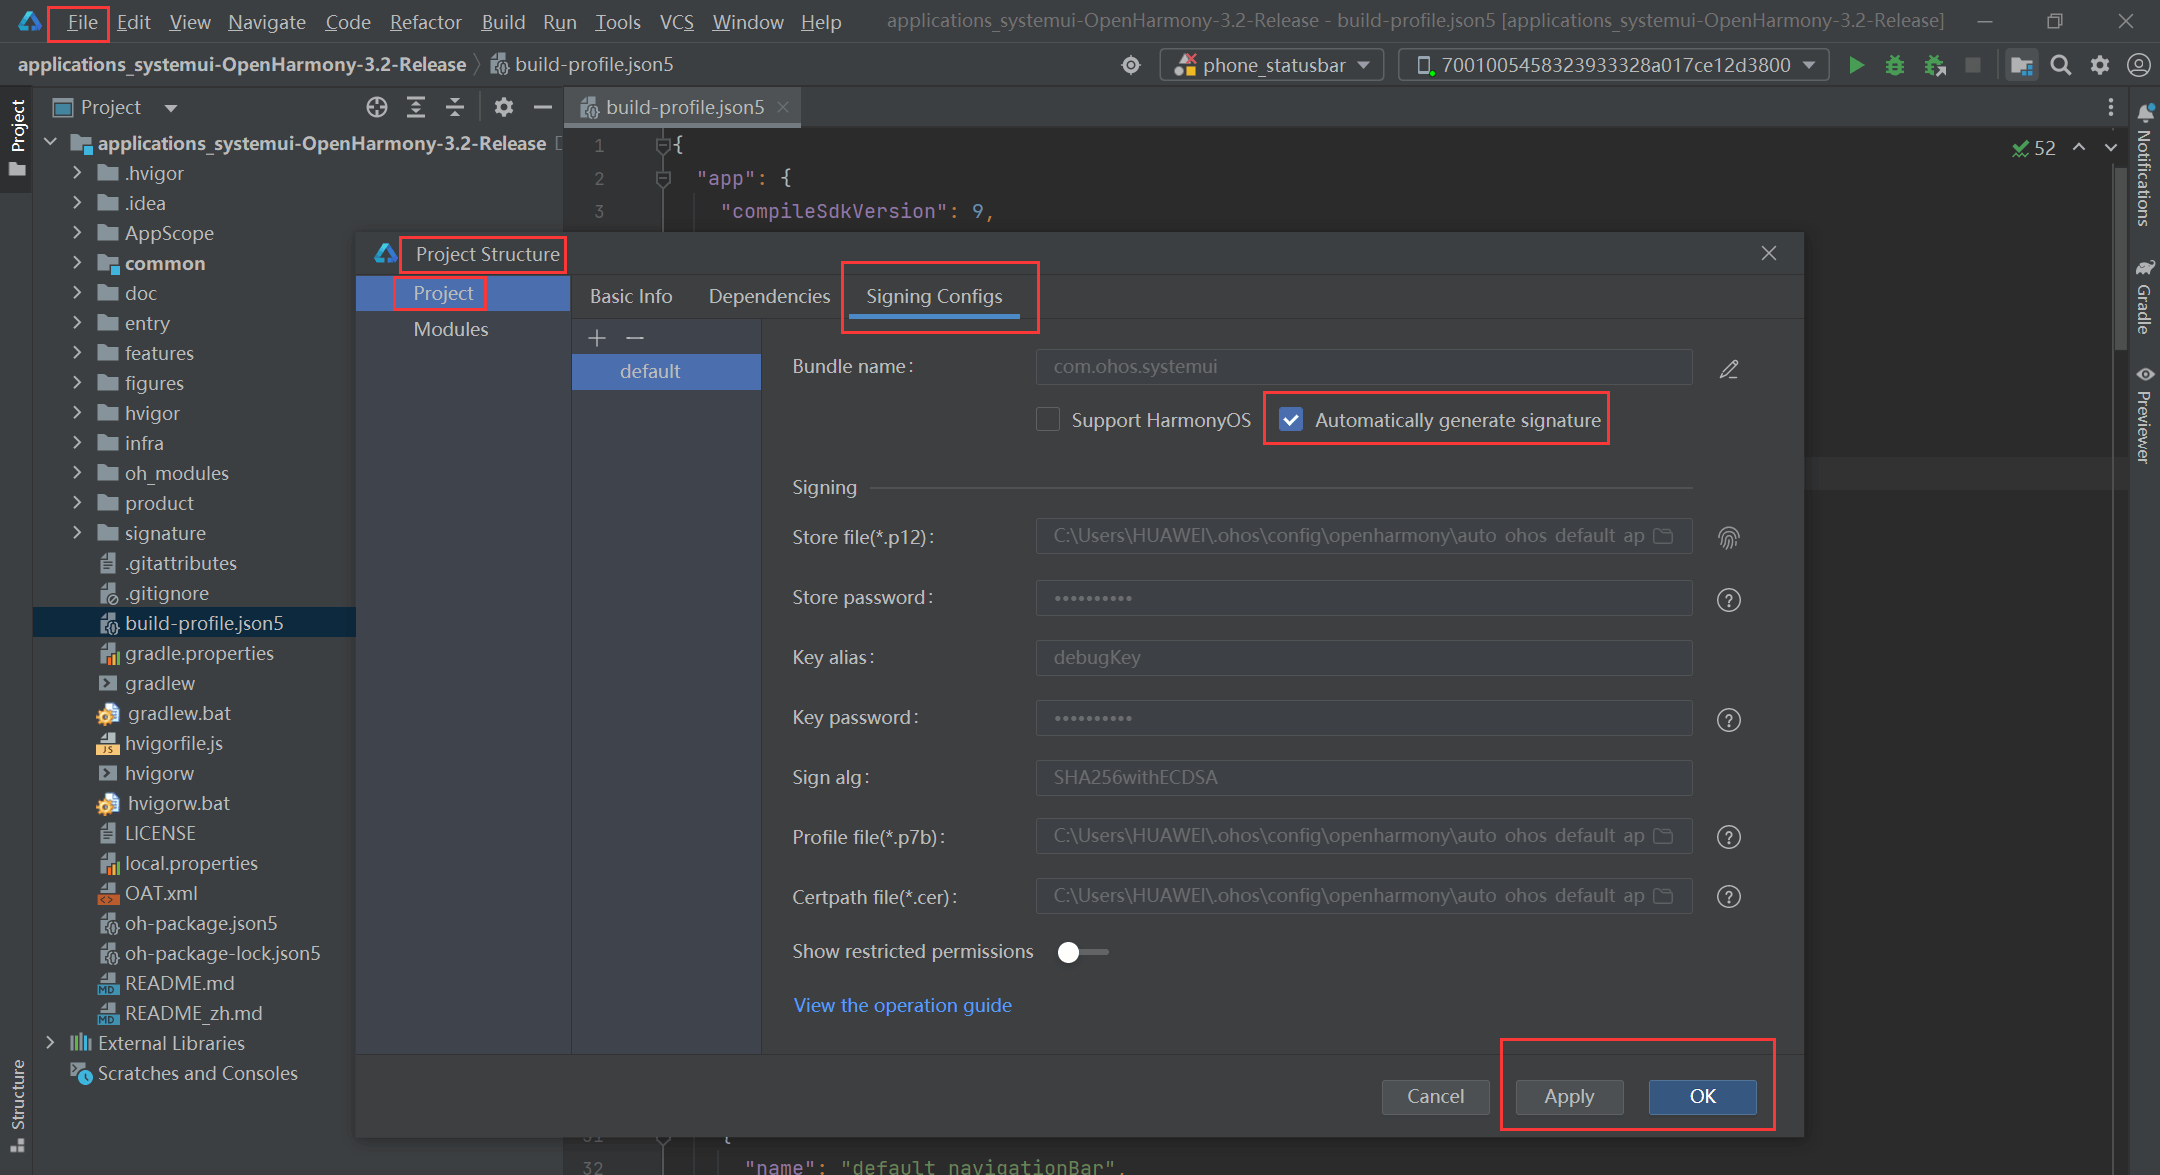
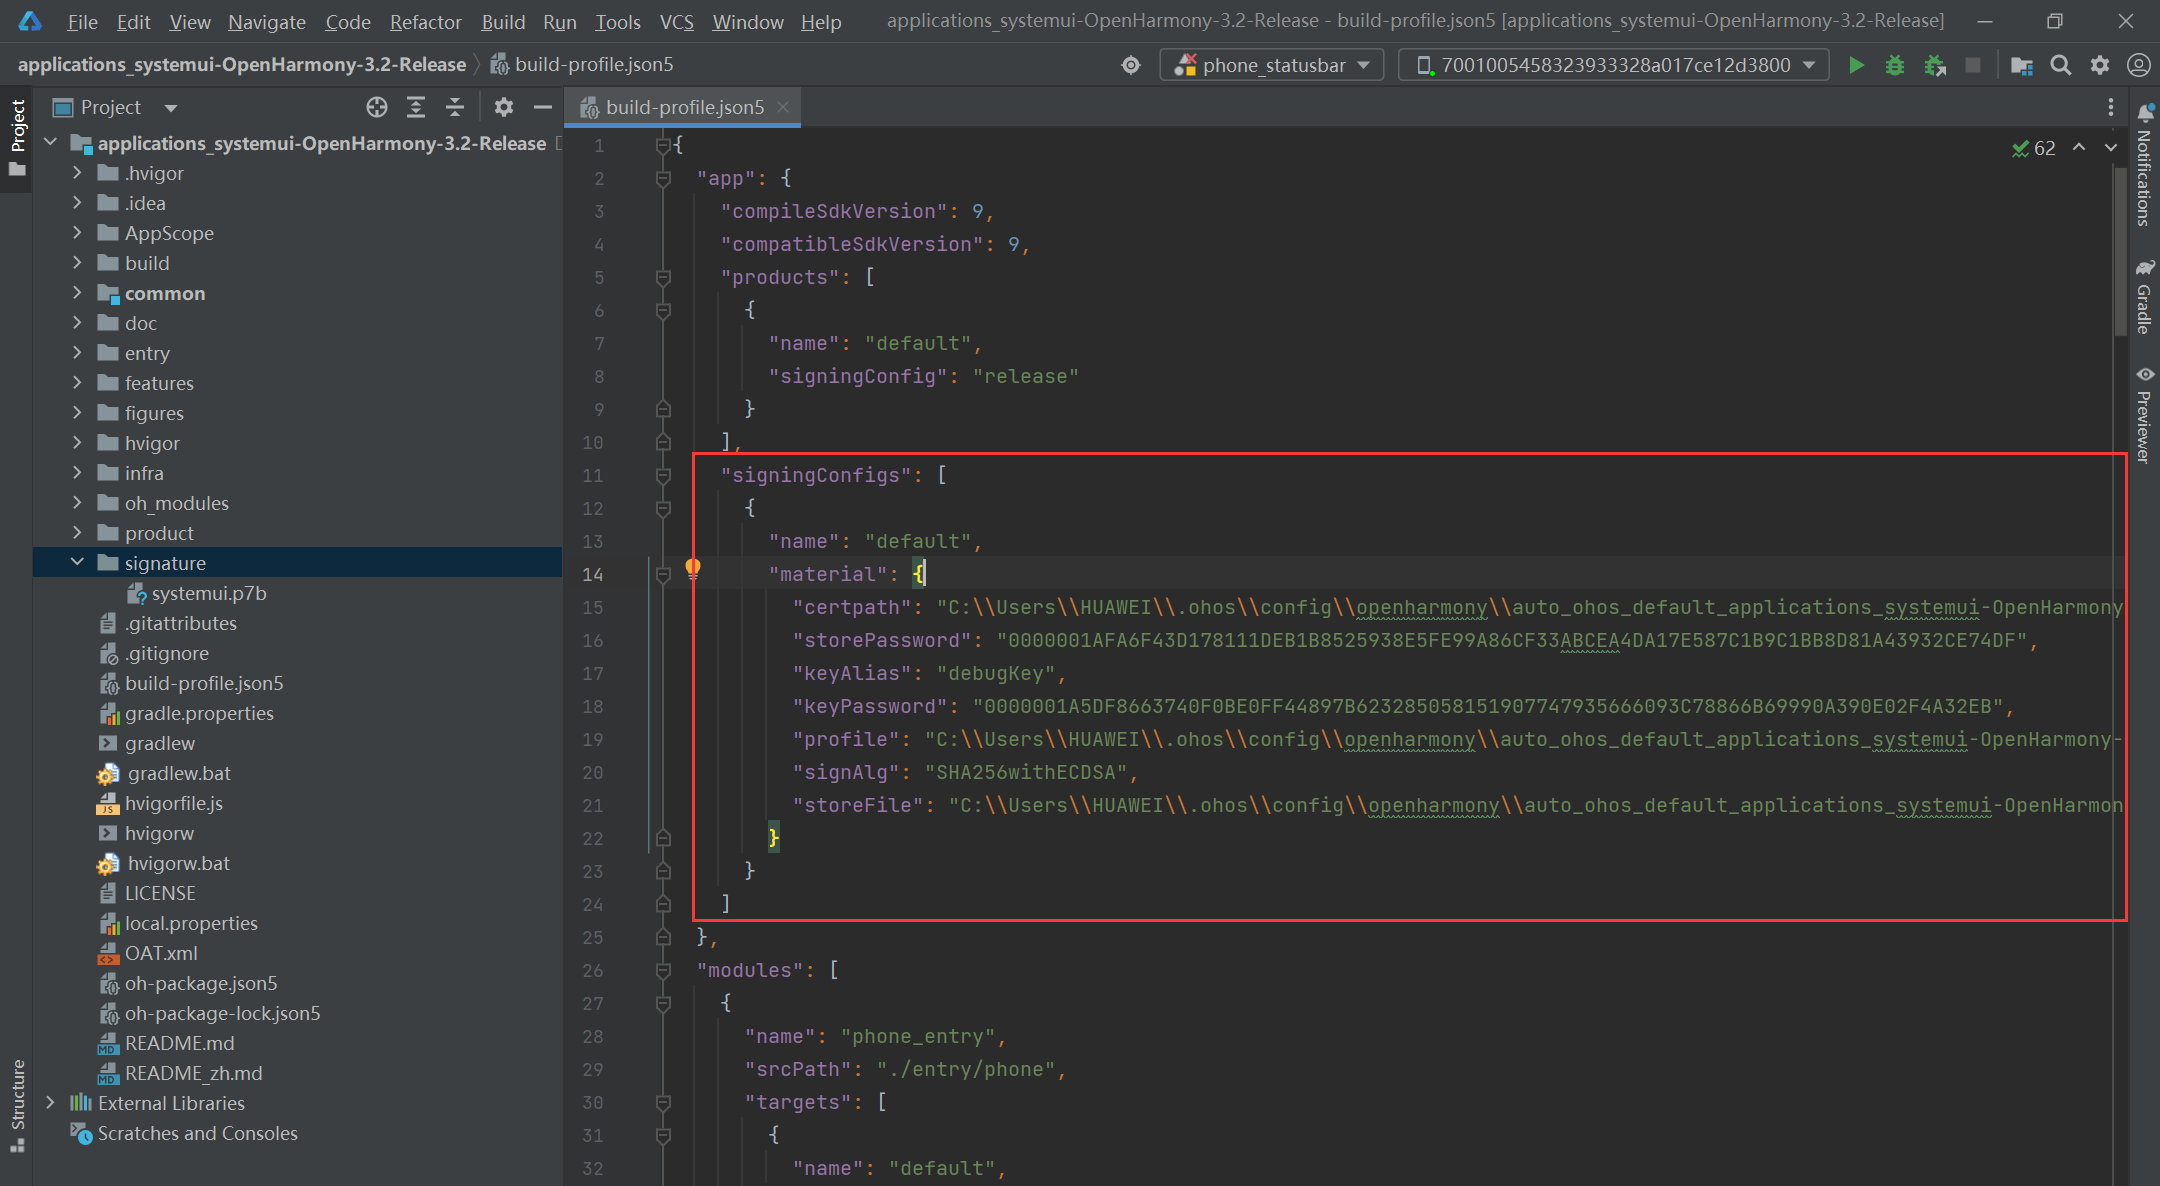
先进行自动签名,点击File -> Project Structure -> Signing Configs,勾选Automatically generate signature,点击Apply、OK,点击Sync Now同步工程;
在根目录的build-profile.json5文件中生成了signingConfigs签名
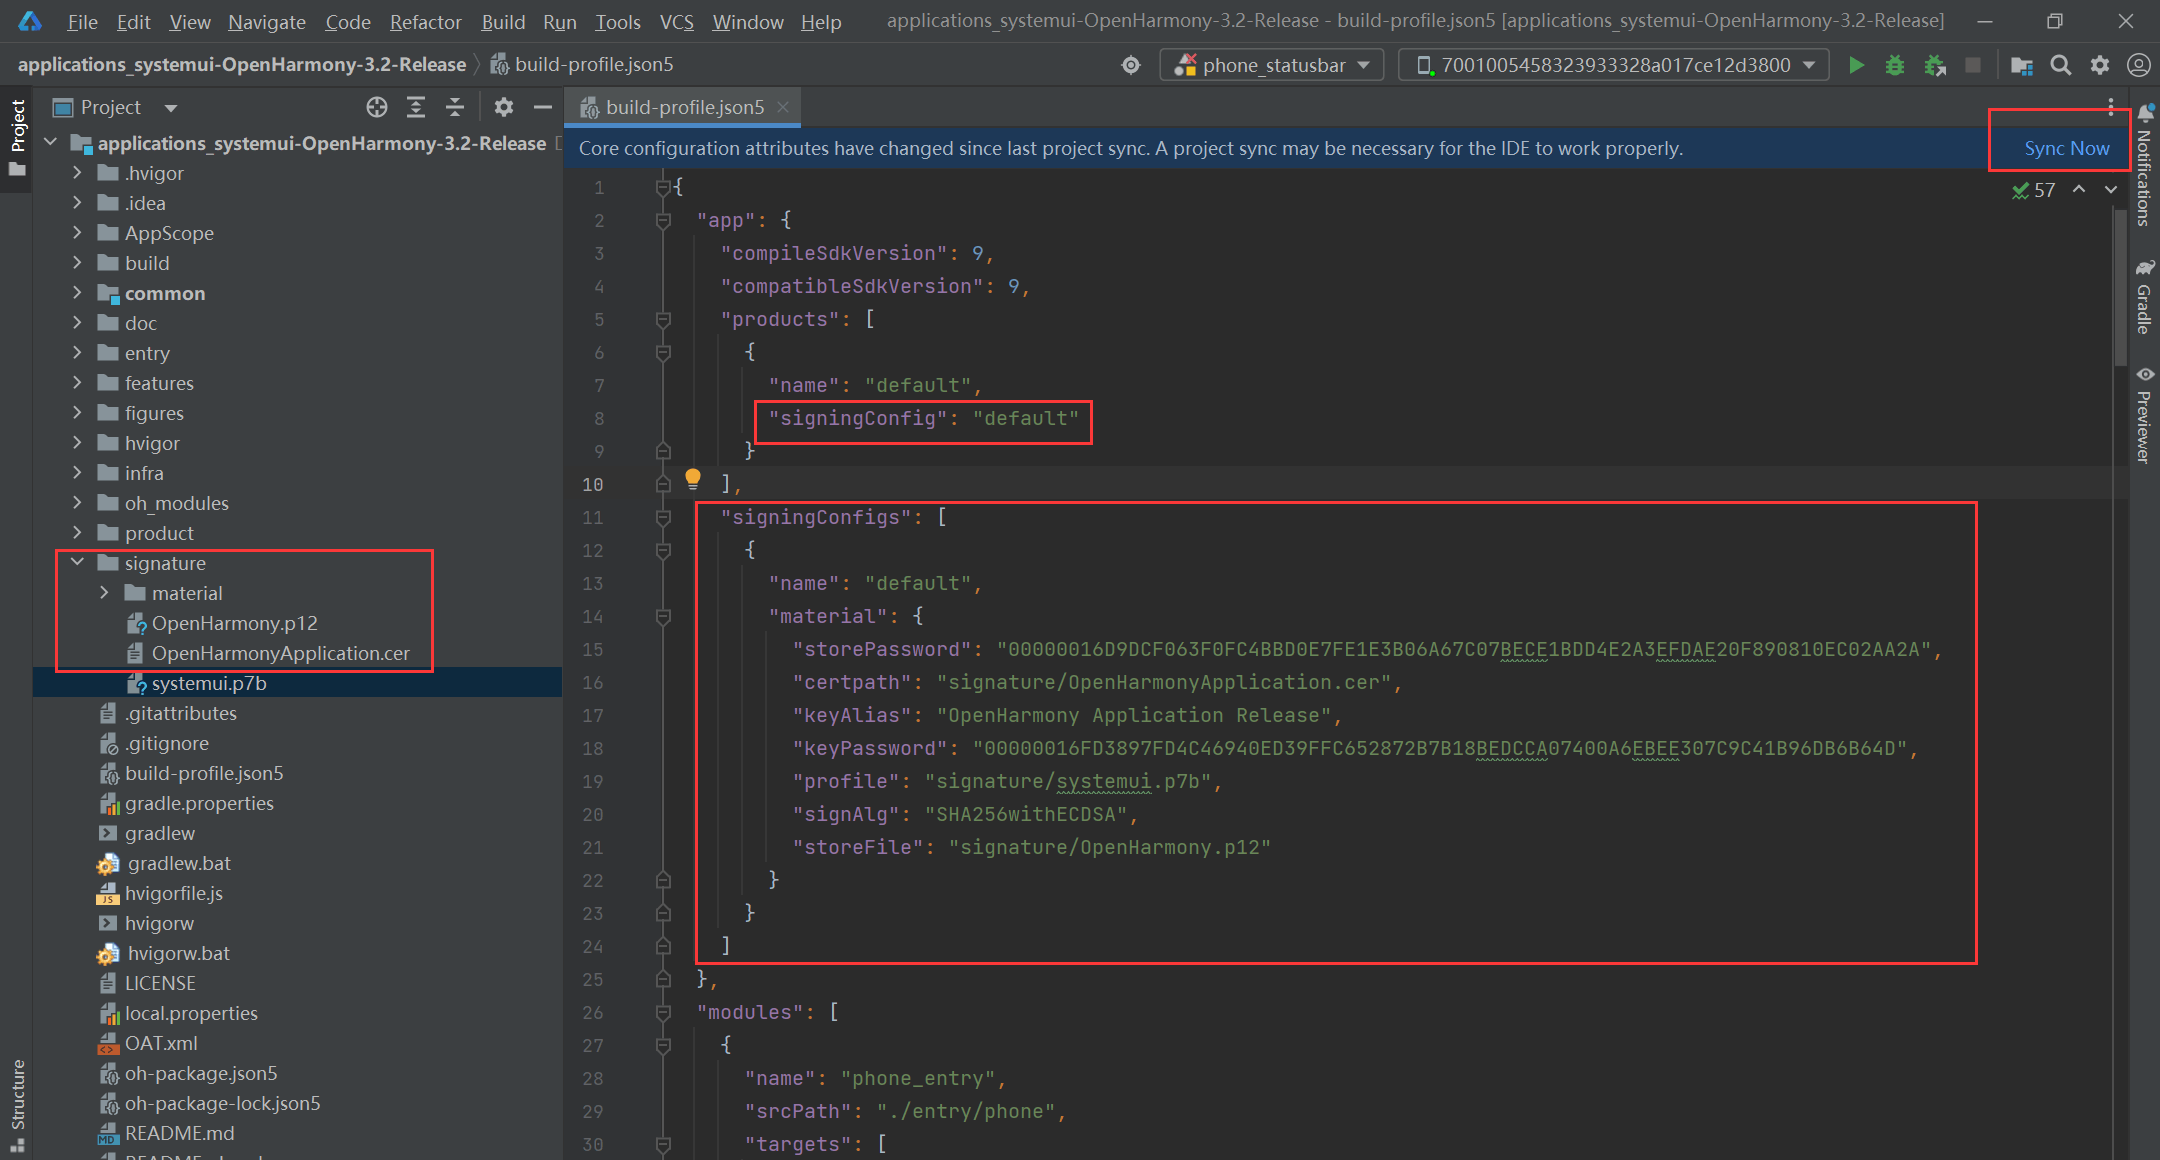
将第3步下载的material目录、OpenHarmony.p12文件、OpenHarmonyApplication.cer文件拷贝到signature目录下,将根目录的build-profile.json5下的"signingConfigs"修改为下面的内容,并将"products"的"signingConfig"的值修改成"default",点击Sync Now同步工程;
"products": [
      {
        "name": "default",
        "signingConfig": "default"
      }
    ],
"signingConfigs": [
      {
        "name": "default",
        "material": {
          "storePassword": "00000016D9DCF063F0FC4BBD0E7FE1E3B06A67C07BECE1BDD4E2A3EFDAE20F890810EC02AA2A",
          "certpath": "signature/OpenHarmonyApplication.cer",
          "keyAlias": "OpenHarmony Application Release",
          "keyPassword": "00000016FD3897FD4C46940ED39FFC652872B7B18BEDCCA07400A6EBEE307C9C41B96DB6B64D",
          "profile": "signature/systemui.p7b",
          "signAlg": "SHA256withECDSA",
          "storeFile": "signature/OpenHarmony.p12"
        }
      }
    ]
5、编译安装
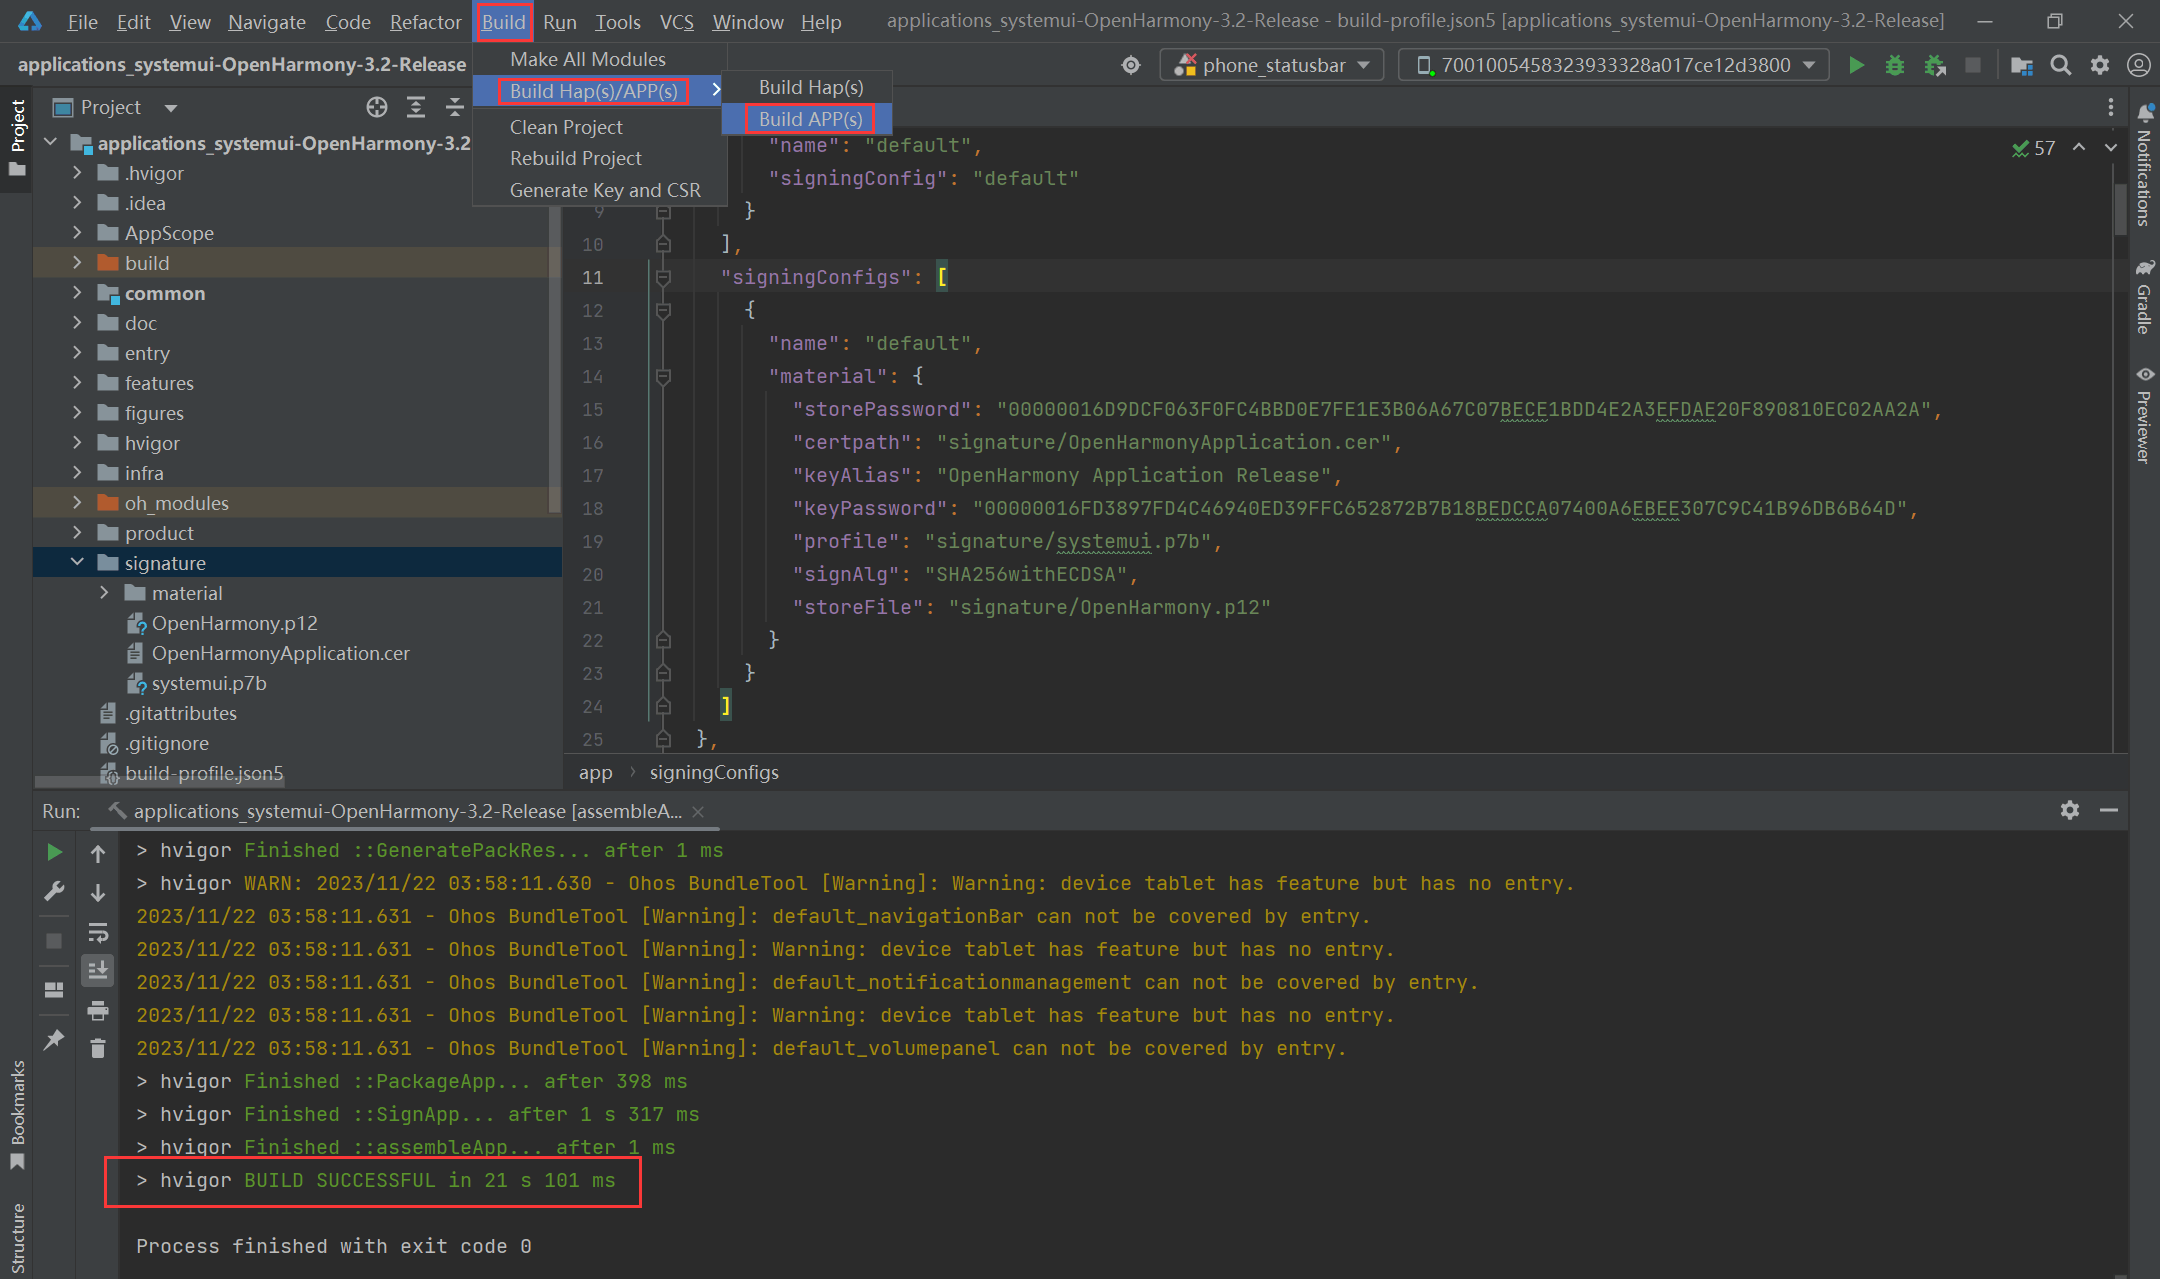
点击File -> Sync and Refresh Project刷新项目,点击Build -> Build Hap(s)/APP(s) -> Build APP(s)构建SystemUI工程HAP包
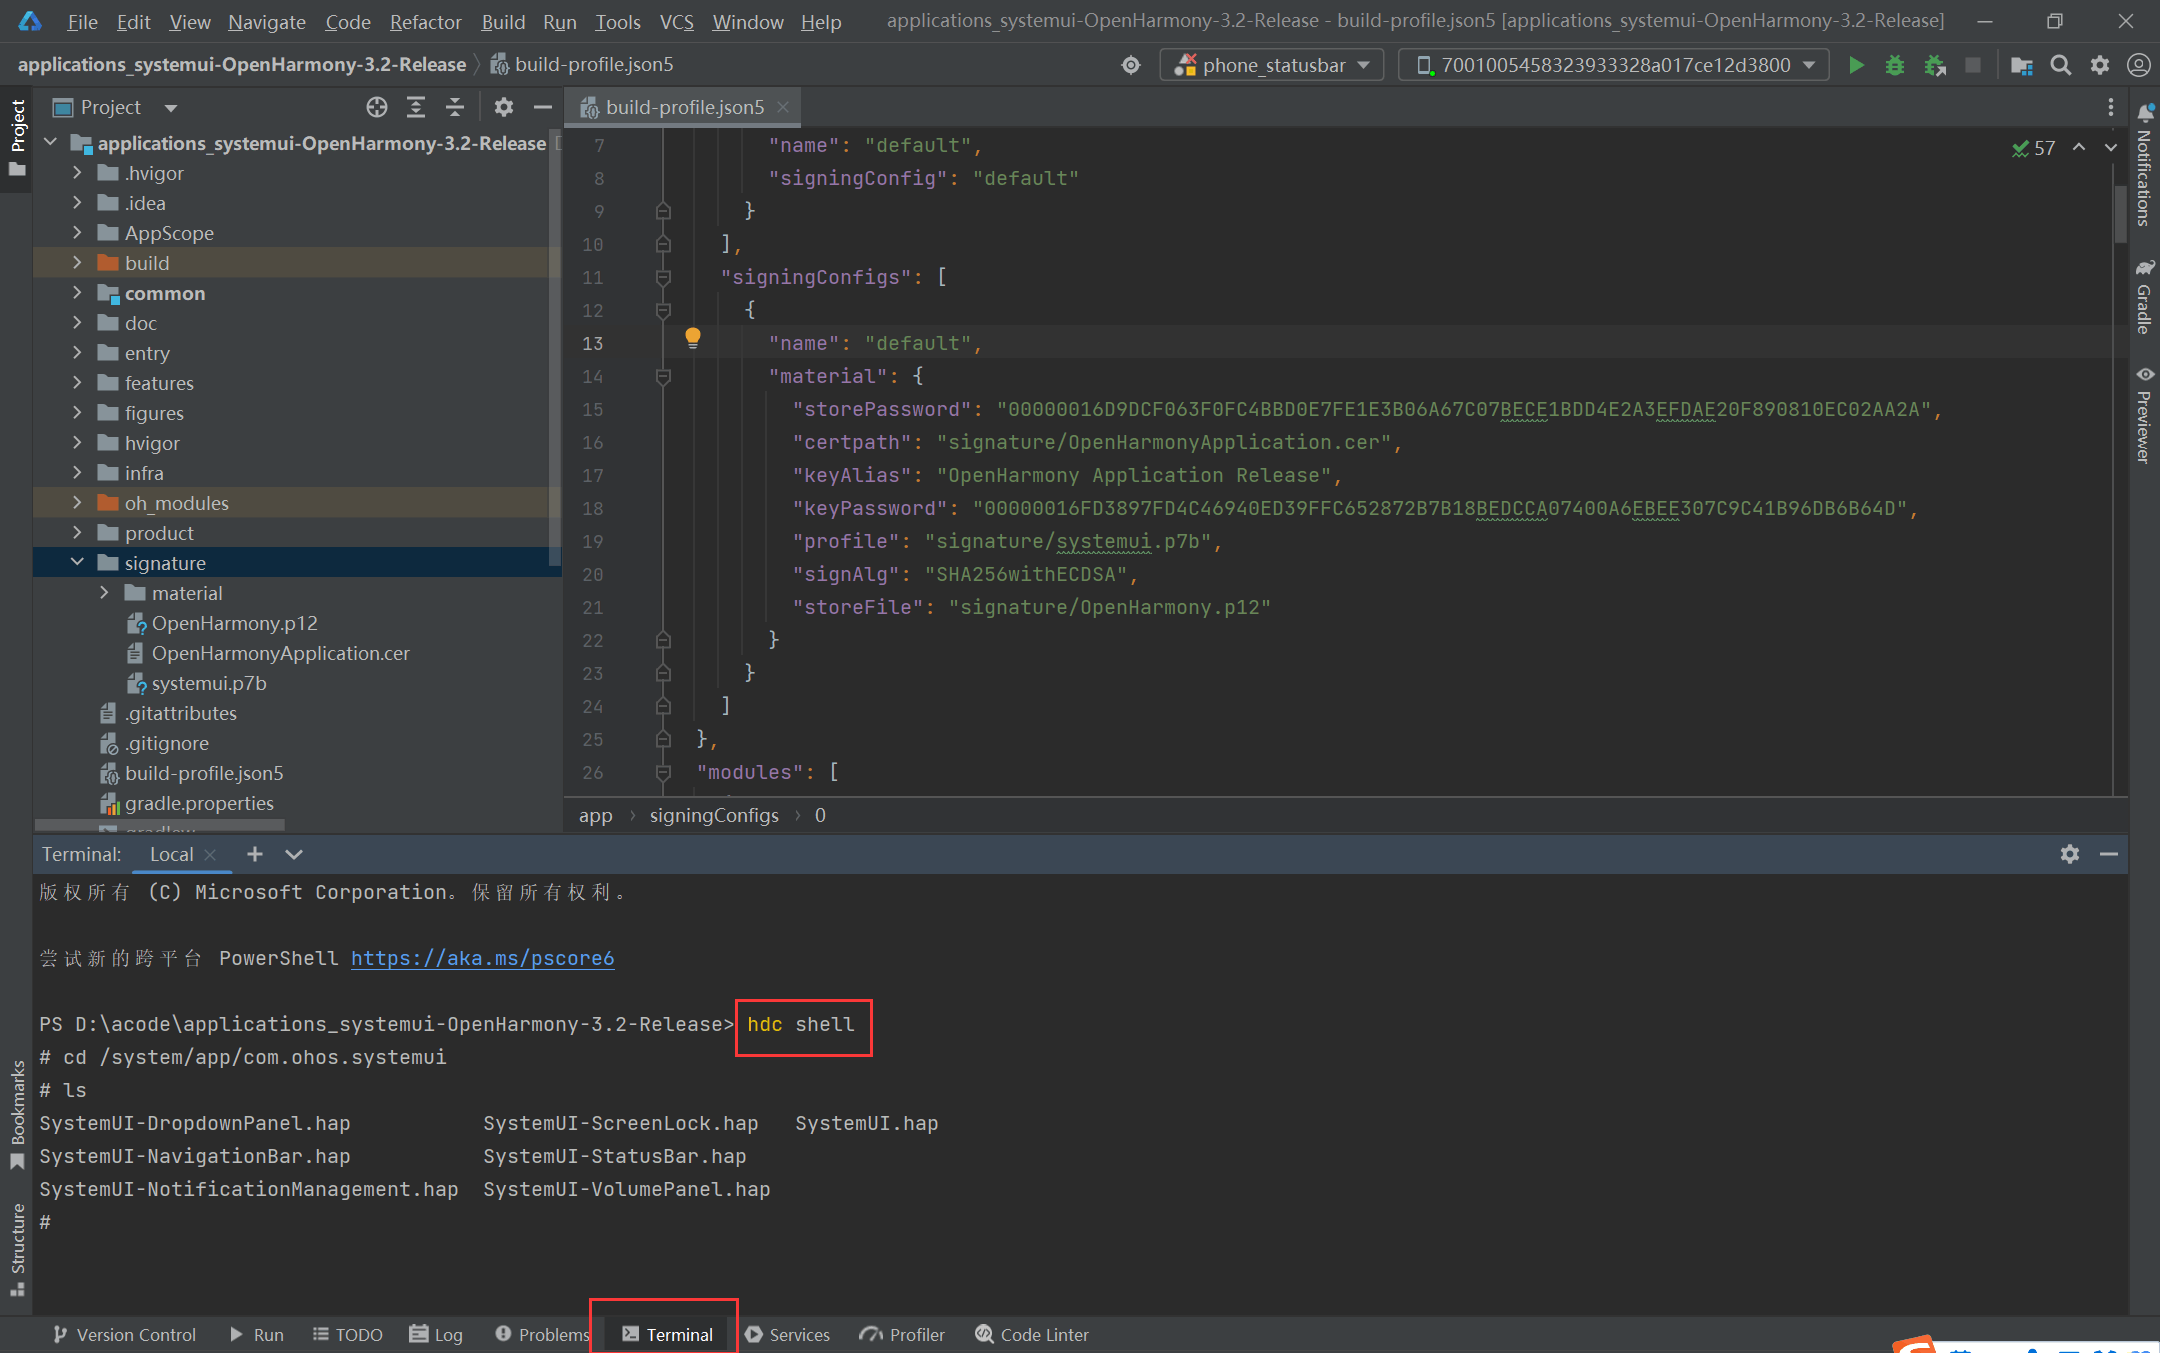
点击Terminal,输入hdc shell,进入/system/app/com.ohos.systemui,有7个hap文件;
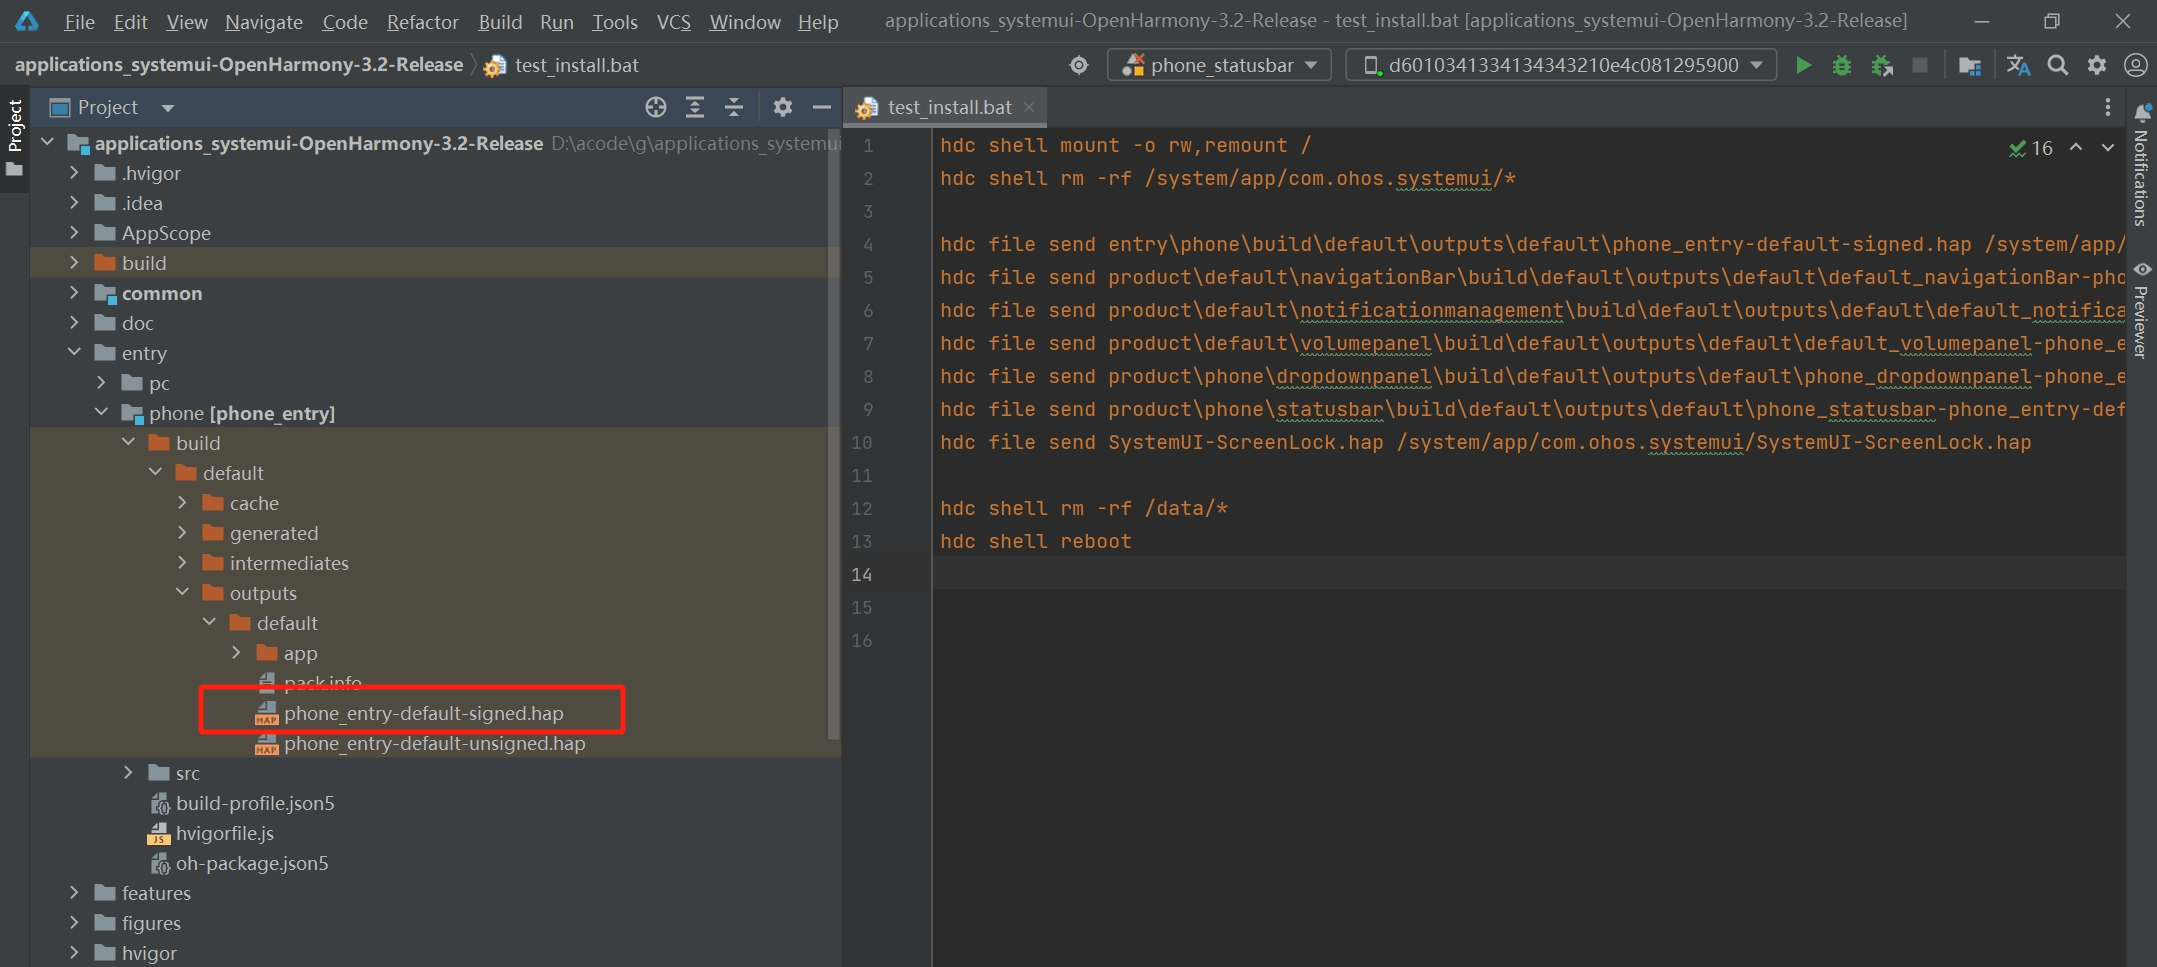
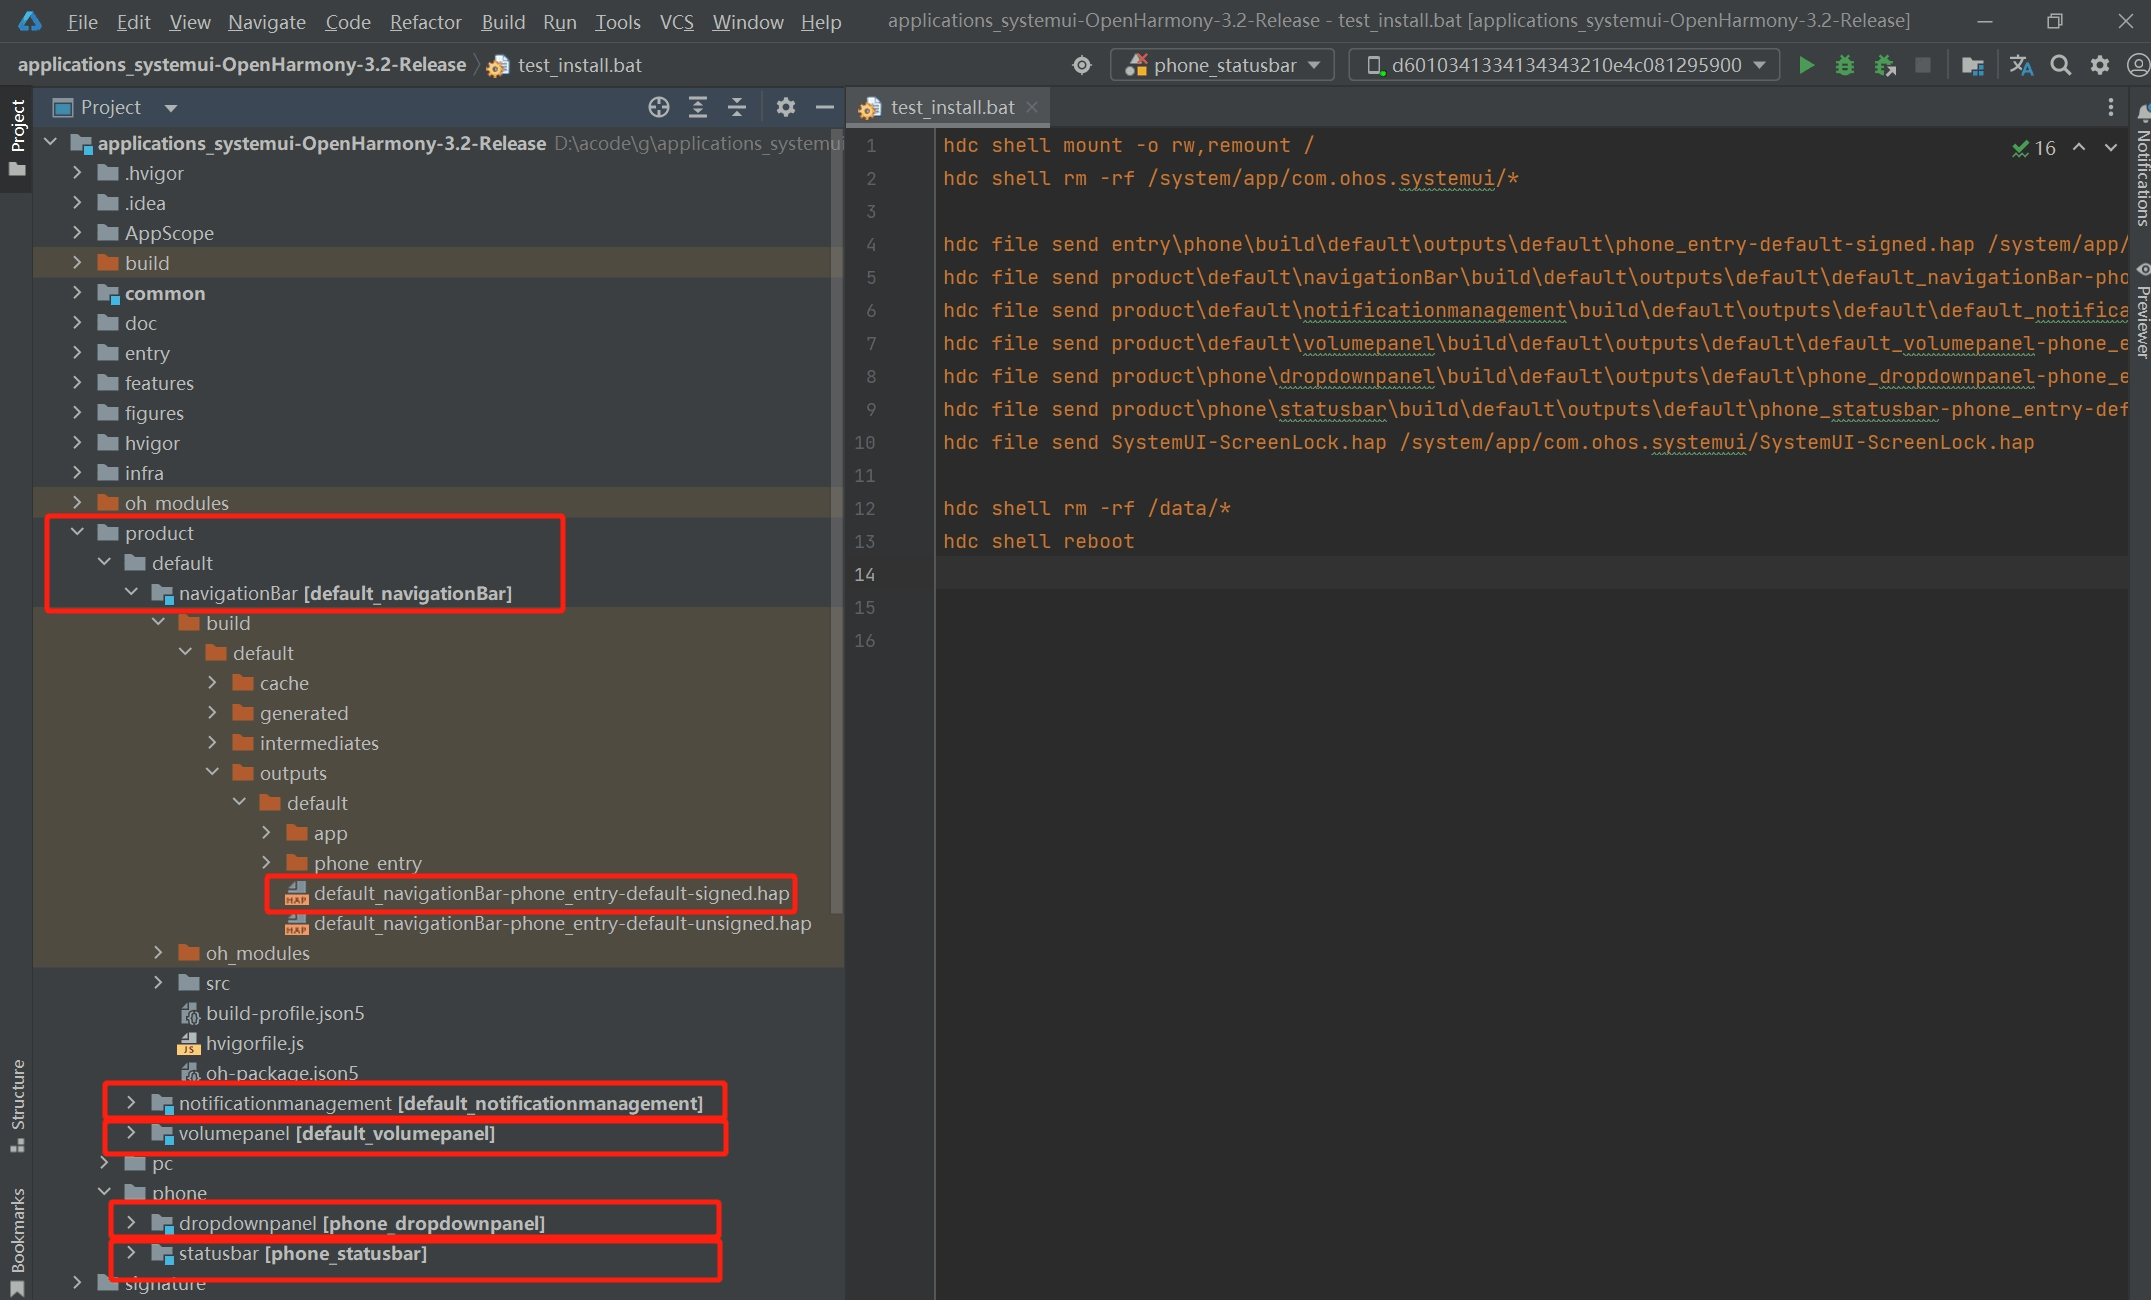
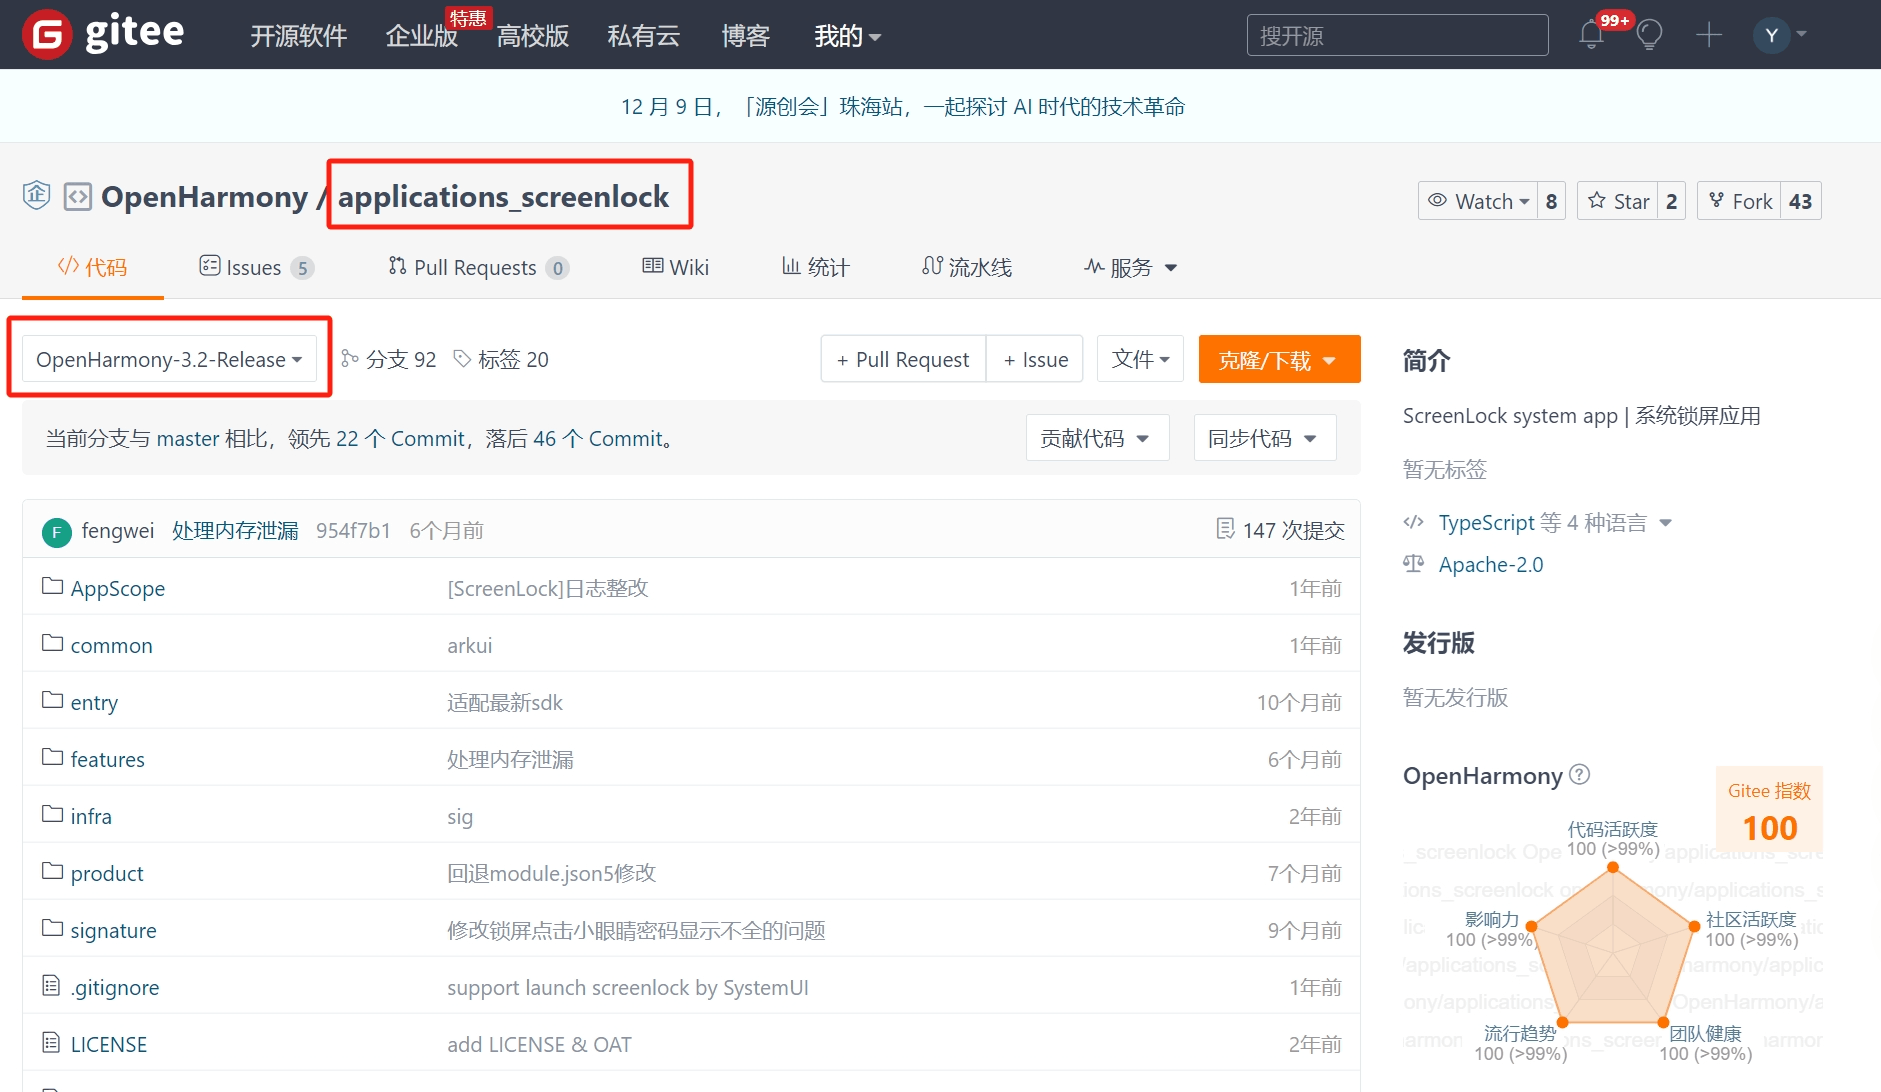
但是systemui下面只有6个hap包,位置如下图所示,缺少锁屏的SystemUI-ScreenLock.hap,需要在gitee下载applications_screenlock自己编译后放到systemui工程的目录下,下载链接: https://gitee.com/openharmony/applications_screenlock/tree/OpenHarmony-3.2-Release/
6个hap包位置
gitee上的applications_screenlock
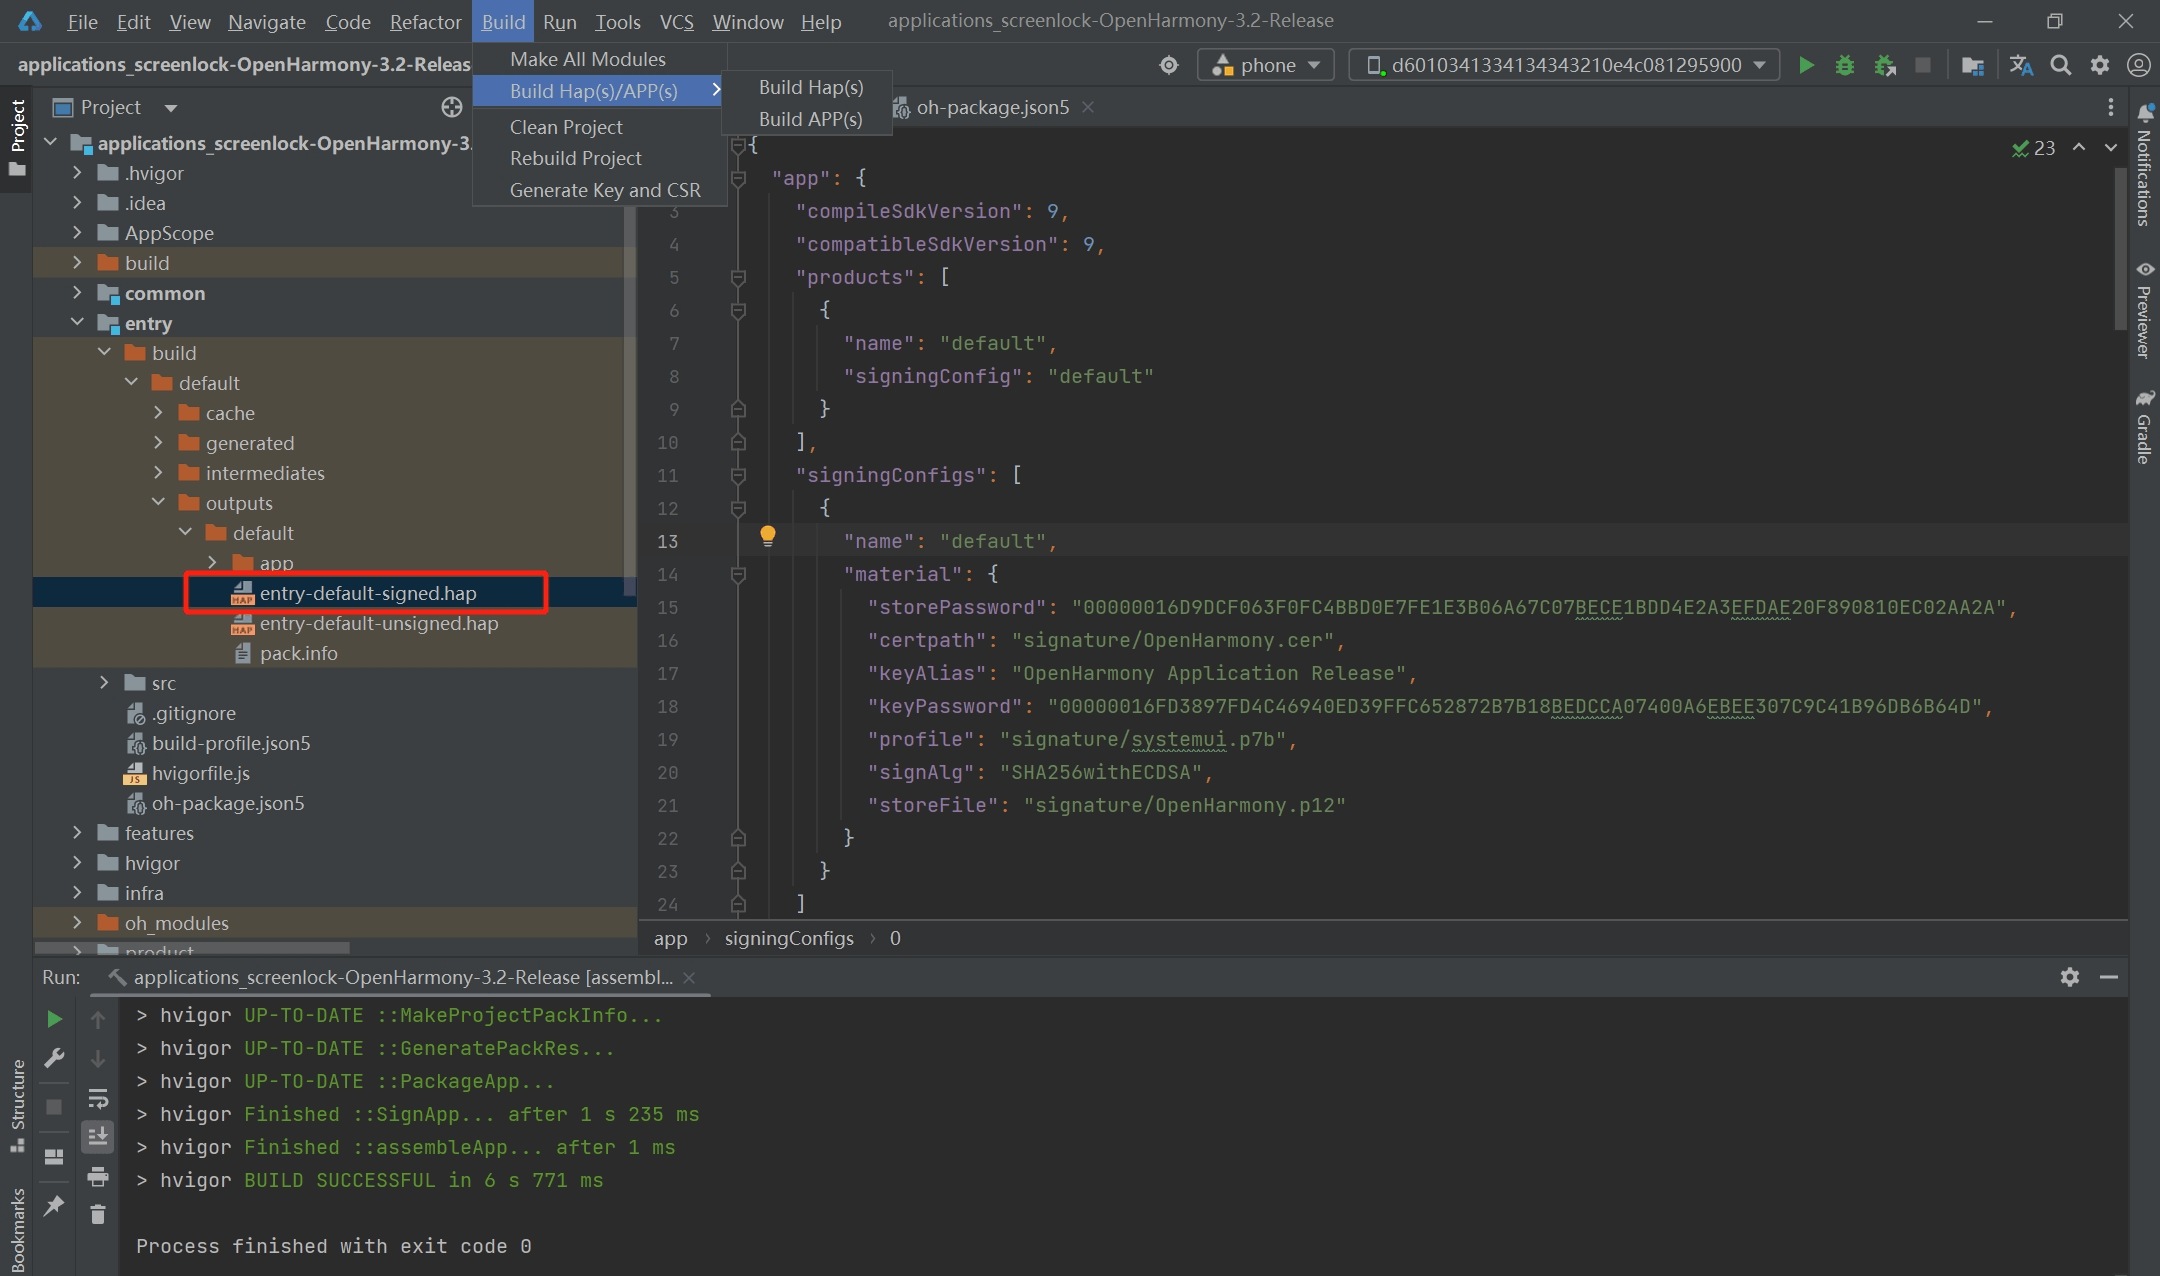
applications_screenlock签名编译,和上面systemui一样配置签名,然后编译Build -> Build Hap(s)/APP(s) -> Build APP(s),然后把编译出来的hap包(如下图所示的entry-default-signed.hap)复制改名放到systemui目录下
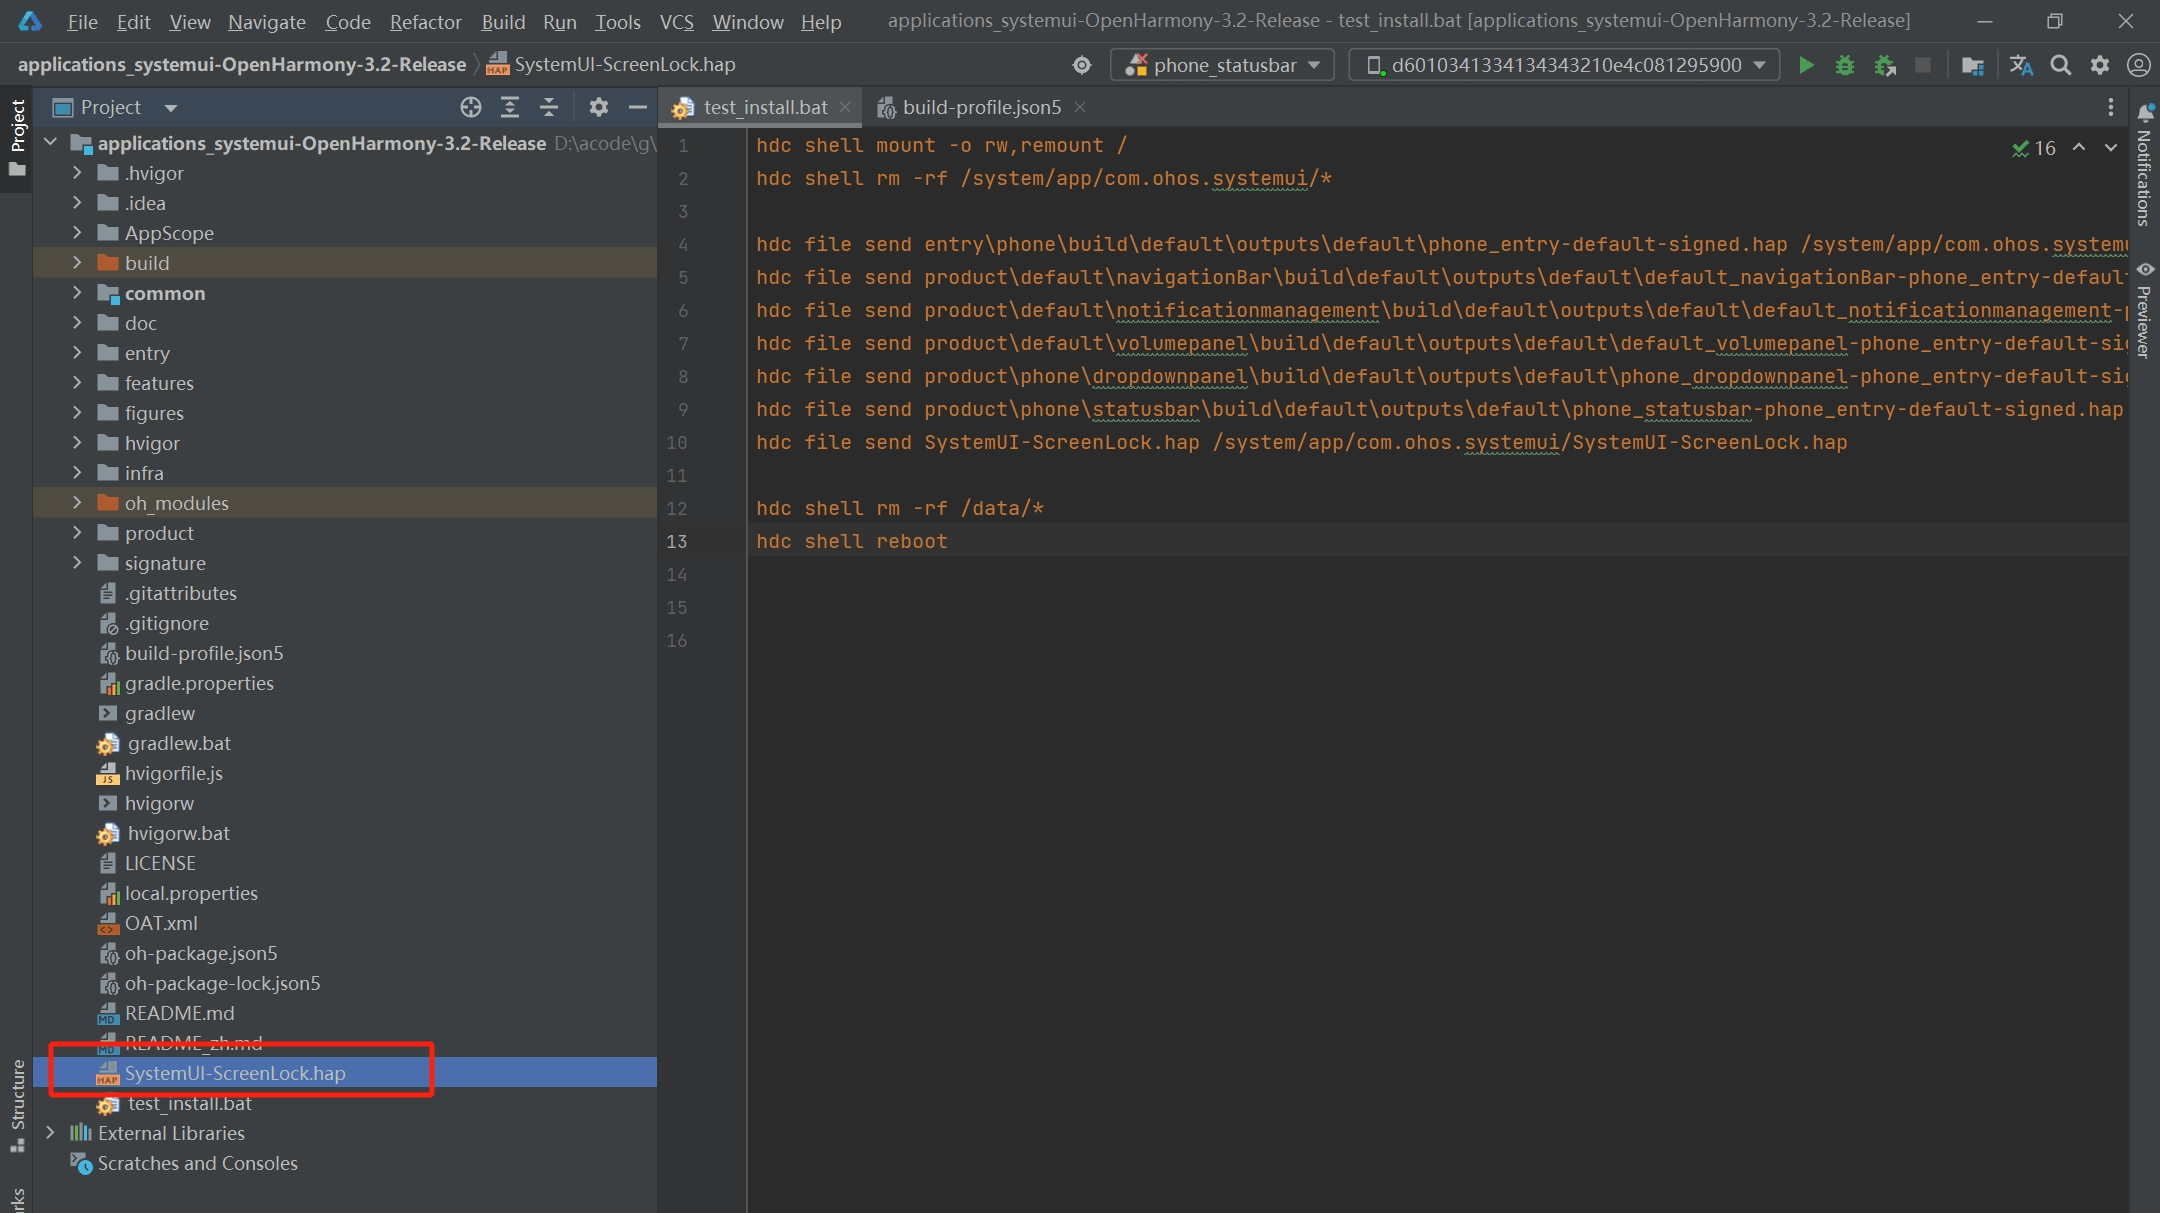
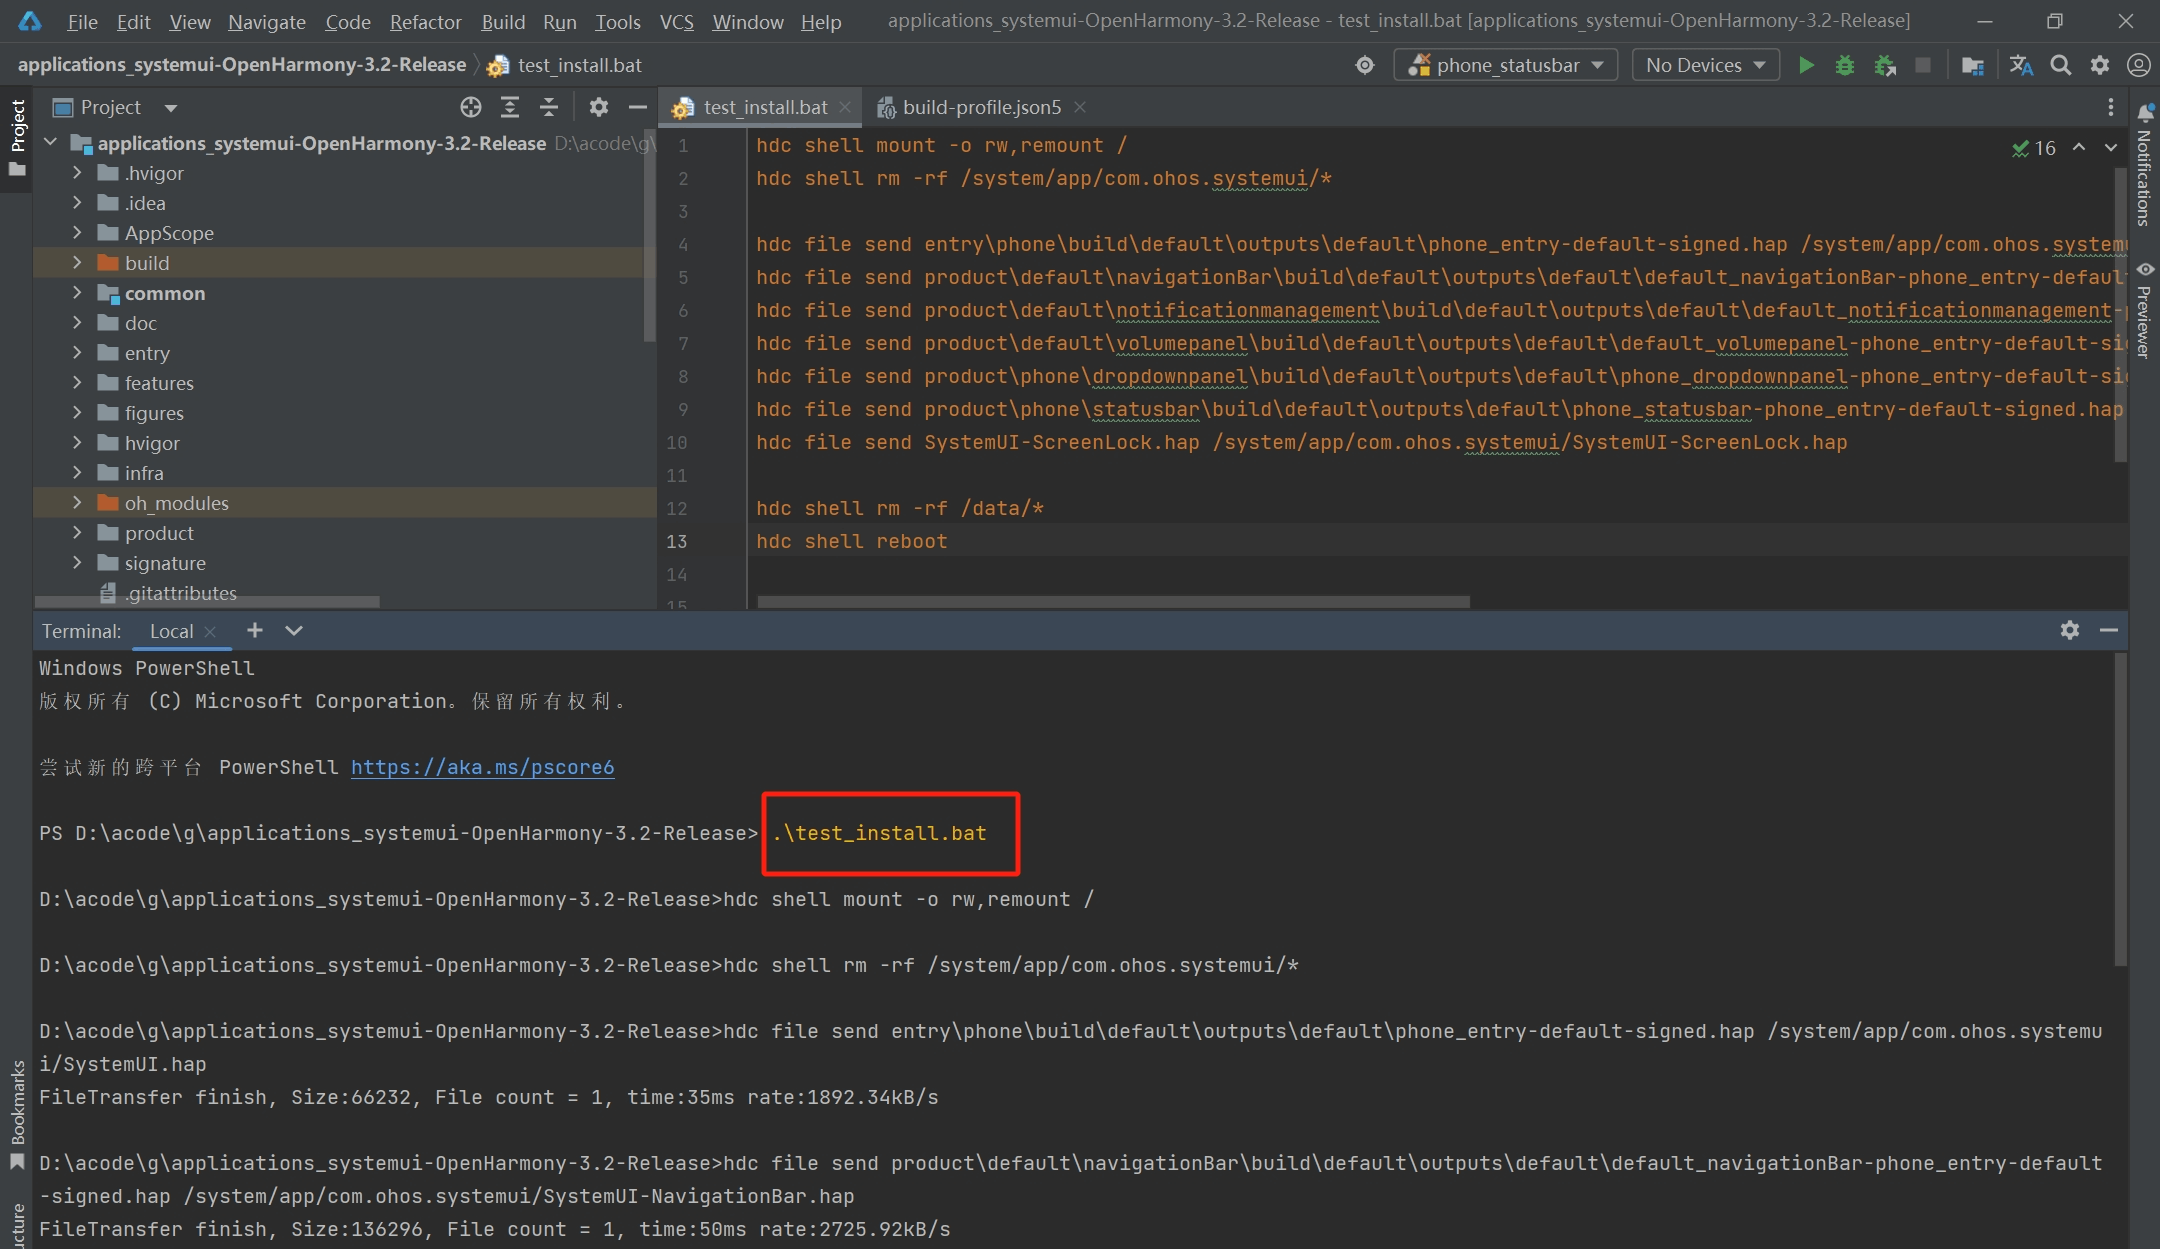
新建test_install.bat文件并执行,终端输入".\test_install.bat"执行自动化脚本
test_install.bat
hdc shell mount -o rw,remount /
hdc shell rm -rf /system/app/com.ohos.systemui/*

hdc file send entry\phone\build\default\outputs\default\phone_entry-default-signed.hap /system/app/com.ohos.systemui/SystemUI.hap
hdc file send product\default\navigationBar\build\default\outputs\default\default_navigationBar-phone_entry-default-signed.hap /system/app/com.ohos.systemui/SystemUI-NavigationBar.hap
hdc file send product\default\notificationmanagement\build\default\outputs\default\default_notificationmanagement-phone_entry-default-signed.hap /system/app/com.ohos.systemui/SystemUI-NotificationManagement.hap
hdc file send product\default\volumepanel\build\default\outputs\default\default_volumepanel-phone_entry-default-signed.hap /system/app/com.ohos.systemui/SystemUI-VolumePanel.hap
hdc file send product\phone\dropdownpanel\build\default\outputs\default\phone_dropdownpanel-phone_entry-default-signed.hap /system/app/com.ohos.systemui/SystemUI-DropdownPanel.hap
hdc file send product\phone\statusbar\build\default\outputs\default\phone_statusbar-phone_entry-default-signed.hap /system/app/com.ohos.systemui/SystemUI-StatusBar.hap
hdc file send SystemUI-ScreenLock.hap /system/app/com.ohos.systemui/SystemUI-ScreenLock.hap

hdc shell rm -rf /data/*
hdc shell reboot
hdc shell mount -o rw,remount / //表示获取读写权限
hdc shell rm -rf /system/app/com.ohos.systemui/* //删除7个hap包
hdc file send (local_file_path) (mobile_path) //上传替换文件到设备,local_file_path是systemui中的文件,mobile_path是开发板上面的文件,文件的位置如上图
hdc shell rm -rf /data/* //删除开发板下的data数据
hdc shell reboot //重启
终端输入".\test_install.bat"执行自动化脚本,等待重启,重启之后就成功了。
更多推荐
 已为社区贡献5条内容


所有评论(0)