HarmonyOs DevEco Studio小技巧34--传值通信的方式
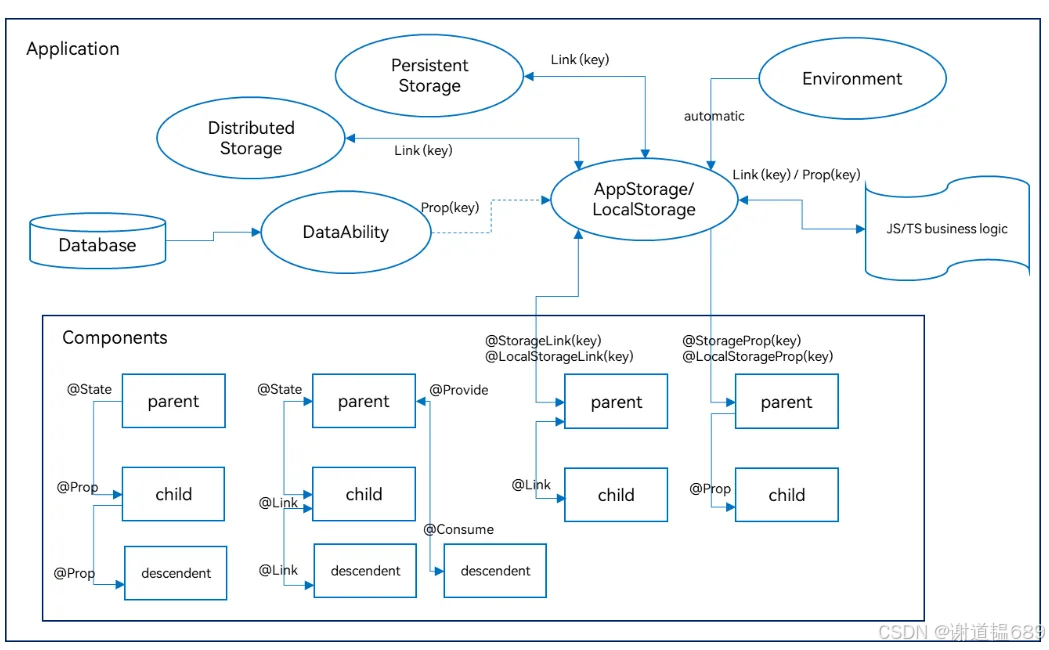
ArkUI提供了多种【装饰器】,通过使用这些装饰器,状态变量不仅可以观察在组件内的改变,还可以在不同组件层级间传递,比如父子组件、跨组件层级,也可以观察全局范围内的变化。
ArkUI提供了多种【装饰器】,通过使用这些装饰器,状态变量不仅可以观察在组件内的改变,还可以在不同组件层级间传递,比如父子组件、跨组件层级,也可以观察全局范围内的变化。根据状态变量的影响范围,将所有的装饰器可以大致分为:
- 管理组件拥有状态的装饰器:组件级别的状态管理,可以观察组件内变化,和不同组件层级的变化,但需要唯一观察同一个组件树上,即同一个页面内。
- 管理应用拥有状态的装饰器:应用级别的状态管理,可以观察不同页面,甚至不同UIAbility的状态变化,是应用内全局的状态管理。
父子组件通信
@State -- @Prop
@State
- 含义及作用:
- 在 ArkTS 中,
@State是用于在组件内部定义状态变量的注解。被标注为@State的变量具有响应式特性,即当该变量的值发生变化时,与之相关联的 UI 部分会自动更新,以反映最新的数据状态。这使得开发者无需手动去操作 DOM 或者重新渲染整个组件来更新界面,提高了开发效率和代码的可维护性。
- 在 ArkTS 中,
- 示例:
@Entry
@Component
struct MsgTest {
  // 使用 @State 注解定义一个状态变量 count,并初始化为0
  @State count: number = 0;

  build() {
    Column({ space: 20 }) {
      Row() {
        // 使用 Text 组件显示当前的 count 值
        Text("Parent Count: ");
        Counter() {
          Text(this.count.toString());
        }
        .onInc(() => {
          this.count++;
        })
        .onDec(() => {
          this.count--;
        });
      }

      // 使用 ChildComponent 组件,并将 count 作为属性传递给它
      ChildComponent({ count: this.count });
    }
    .width("100%")
    .height("100%");
  }
}
在上述
ParentComponent中,通过@State定义了count状态变量。当点击按钮调用incrementCount方法时,count的值会增加。这个变化会自动触发与之相关联的 UI 更新(在这个例子中,虽然没有直接展示 UI 更新效果,但如果在ChildComponent中使用了这个count值来展示,那么ChildComponent的展示内容也会相应更新)。@Prop
- 含义及作用:
@Prop是用于在子组件中接收父组件传递过来属性的注解。它规定了子组件可以从父组件获取哪些数据,并且一般情况下,子组件不能直接修改通过@Prop接收的属性值,保证了数据的单向流动,使得组件间的数据传递更加规范和可预测。
- 示例:
@Component
struct ChildComponent {
  @Prop count: number;
  build() {
    Row() {
      Text("Child Count: ");
      Counter() {
          Text(this.count.toString());
        }
        .onInc(() => {
          this.count++;
        })
        .onDec(() => {
          this.count--;
        });
    }
  }
}
在上述
ChildComponent中,通过@Prop声明了count属性,用于接收从ParentComponent传递过来的count值。子组件只能使用这个值来进行展示等操作,不能直接修改它。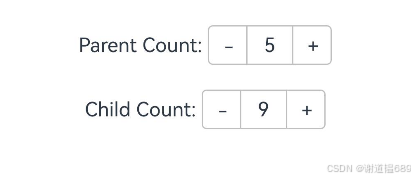
@State -- @Link
@Link
- 含义及作用:
@Link在 ArkTS 中是一种用于建立双向数据绑定的机制。与@Prop不同,通过@Link绑定的数据,子组件不仅可以获取父组件传递的值,还可以在一定条件下修改这个值,并且父组件能实时感知到子组件对该值的修改,从而实现父子组件间数据的双向流动。不过,使用@Link时需要注意数据的一致性和可能引发的副作用,要确保修改数据的逻辑是合理且符合预期的。
- 示例:
@Component
struct ChildComponent {
  @Link count: number;
  build() {
    Row() {
      Text("Child Count: ");
      Counter() {
          Text(this.count.toString());
        }
        .onInc(() => {
          this.count++;
        })
        .onDec(() => {
          this.count--;
        });
    }
  }
}
在上述示例中,
ParentComponent通过@State定义了count状态变量并传递给ChildComponent。ChildComponent使用@Link接收这个count值,这样在子组件中点击按钮调用incrementCountInChild方法增加count的值时,不仅子组件中显示的count值会改变,而且父组件中的count状态变量也会实时更新。当在父组件中点击查看按钮时,就能看到被子组件修改后的count值。
@ObjectLink -- @Observed
@ObjectLink
- 含义及作用:
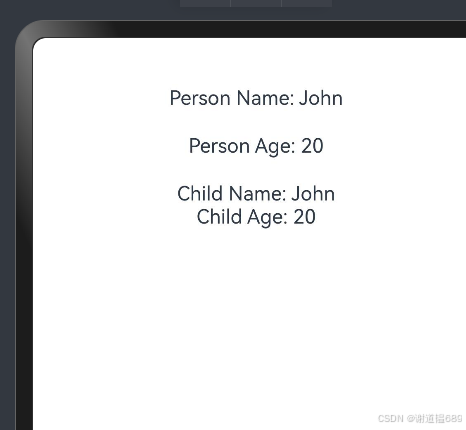
@ObjectLink主要用于在父子组件之间建立对对象的关联,使得子组件能够与父组件中的某个对象建立一种响应式的联系。当父组件中的该对象发生变化时,子组件能够自动感知到这些变化并相应地更新视图,无需子组件手动去监听和处理对象的每一个属性变化。这种机制在处理复杂对象数据结构的场景下非常有用,可以简化父子组件间关于对象数据的通信和同步操作。
@Observed
- 含义及作用:
@Observed通常与对象的可观察性相关。当一个对象被标注为@Observed时,意味着这个对象的属性变化可以被相关组件(如父子组件)所观察到。它可以配合@ObjectLink等机制使用,使得组件能够更精准地感知到对象属性的变化情况,从而实现更高效的组件间通信和数据同步。在一些场景下,通过@Observed可以对对象的访问和修改进行更精细的控制,确保数据的一致性和组件间的正确交互。
- 示例:
@Observed
class Person {
  name: string;
  age: number;

  constructor(name: string, age: number) {
    this.name = name;
    this.age = age;
  }
}

@Entry
@Component
struct MsgTest {
  // 使用 @State 注解定义一个状态变量 count,并初始化为0
  @State person: Person = new Person('John', 18);

  updatePersonAge() {
    this.person.age++;
  }

  build() {
    Column({ space: 20 }) {
      Text("Person Name: " + this.person.name);
      Text("Person Age: " + this.person.age)
        .onClick(() => {
          this.updatePersonAge();
        })
      // 使用 ChildComponent 组件,并将 count 作为属性传递给它
      ChildComponent({ person: this.person })
    }
    .width("100%")
    .height("100%");
  }
}

@Component
struct ChildComponent {
  @ObjectLink person: Person;

  build() {
    Column() {
      Text("Child Name: " + this.person.name);
      Text("Child Age: " + this.person.age)
        .onClick(() => {
          this.person.age--;
        })
    }
  }
}
@Provide -- @Consume
1. 基本原理
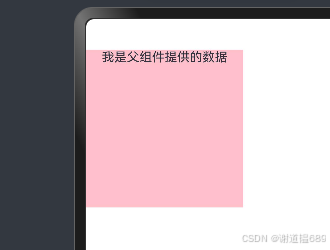
Provide/Consume是基于依赖注入(Dependency Injection)的一种数据共享和传递方式。它允许在组件层级结构中,父组件提供(@Provide)某些数据或功能,子组件在其作用域内通过消费(@Consume)的方式获取并使用这些提供的内容,从而实现不同层级组件之间的数据交互和共享。
@Provide变量装饰器允许装饰的变量类型
Object、class、string、number、boolean、enum类型,以及这些类型的数组。
支持Date类型。
API11及以上支持Map、Set类型。
支持ArkUI框架定义的联合类型Length、ResourceStr、ResourceColor类型。
必须指定类型。
@Provide变量的@Consume变量的类型必须相同。
支持类型的场景请参考观察变化。
不支持any。
API11及以上支持上述支持类型的联合类型,比如string | number, string | undefined 或者 ClassA | null,示例见@Provide_and_Consume支持联合类型实例。
2. 实现方式及示例
@Entry
@Component
struct ParentComponent {
  // 使用 @Provide 装饰器提供一个字符串数据
  @Provide sharedString: string = "我是父组件提供的数据";


  build() {
    Column() {
      // 包含子组件
      ChildComponent();
    }
  }
}

@Component
struct ChildComponent {
  // 使用 @Consume 装饰器获取父组件提供的字符串数据
  @Consume('sharedString') consumedString: string;


  build() {
    // 可以使用获取到的数据和函数
    Column() {
      Text(this.consumedString)
        .fontSize(16);
    }
    .backgroundColor(Color.Pink)
    .width(200)
    .aspectRatio(1)
  }
} 
emitter/eventHub
emitter:
本模块提供了在同一进程不同线程间,或同一进程同一线程内,发送和处理事件的能力,包括持续订阅事件、单次订阅事件、取消订阅事件,以及发送事件到事件队列的能力。
这里略过,后面会写一篇详细的讲这两个东西
实现方式及示例
import { emitter } from '@kit.BasicServicesKit';
@Entry
@Component
struct MsgTest {
// 使用 @State 注解定义一个状态变量 count,并初始化为0
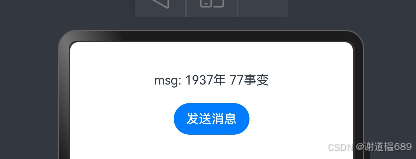
@State msg: string = '1937年 77事变';
SendMsg() {
// 监听名为 "msg" 的事件,并在接收到事件时更新 count 的值
emitter.on("msg", (data) => {
this.msg = data.data?.msg;
});
}
build() {
Column({ space: 20 }) {
Text("msg: " + this.msg)
// 使用 ChildComponent 组件,并将 count 作为属性传递给它
ChildComponent({SendMsg: () => {
this.SendMsg()
}})
}
.width("100%")
.height("100%");
}
}
@Component
struct ChildComponent {
SendMsg = () => {}
build() {
Column() {
Button("发送消息")
.onClick(() => {
emitter.emit("msg", {
data: {
msg: "勿忘国耻,振兴中华"
}
})
//模拟发送消息
this.SendMsg()
})
}
}
}

模拟器能用,预览器用不了
eventHub:
EventHub模块提供了事件中心,提供订阅、取消订阅、触发事件的能力。
实现方式及示例
@Entry
@Component
struct MsgTest {
// 使用 @State 注解定义一个状态变量 count,并初始化为0
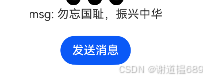
@State msg: string = '1937年 77事变';
SendMsg() {
// 监听名为 "msg" 的事件,并在接收到事件时更新 count 的值
getContext().eventHub.on("msg", (data:object) => {
this.msg = data["msg"]
});
}
build() {
Column({ space: 20 }) {
Text("msg: " + this.msg)
// 使用 ChildComponent 组件,并将 count 作为属性传递给它
ChildComponent({SendMsg: () => {
this.SendMsg()
}})
}
.width("100%")
.height("100%");
}
}
@Component
struct ChildComponent {
SendMsg = () => {}
build() {
Column() {
Button("发送消息")
.onClick(() => {
getContext().eventHub.emit("msg",
{
msg: "勿忘国耻,振兴中华"
}
)
//模拟发送消息
this.SendMsg()
})
}
}
}

controller的传值
父组件new Controller 传递给子组件,调用这个controller的方法,可以传递参数
实现方式及示例
@Entry
@Component
struct MsgTest {
// 使用 @State 注解定义一个状态变量 count,并初始化为0
@State
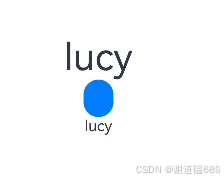
name: string = "lucy"
controller: ChildController = new ChildController()
build() {
Column() {
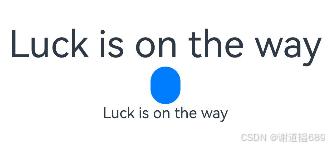
Text(this.name)
.fontSize(40)
Button("")
.onClick(() => {
this.name = "Luck is on the way"
this.controller.transName(this.name)
})
ChildComponent({name:this.name, controller: this.controller })
}
.height('100%')
.width('100%')
}
}
@Component
struct ChildComponent {
@State
name: string = ""
controller: ChildController = new ChildController()
aboutToAppear(): void {
// 改写原来的空函数
this.controller.transName = (name: string) => {
this.name = name
}
}
build() {
Text(this.name)
}
}
class ChildController {
transName: (name: string) => void = () => {
}
}
子传父通信
回调函数
- 基本原理:
- 子组件在某个特定事件发生或数据变化时,调用父组件传递过来的函数,将数据作为参数传递给父组件,从而实现数据向父组件的传递。
- 示例代码及流程:
@Entry
@Component
struct MsgTest {
// 使用 @State 注解定义一个状态变量 count,并初始化为0
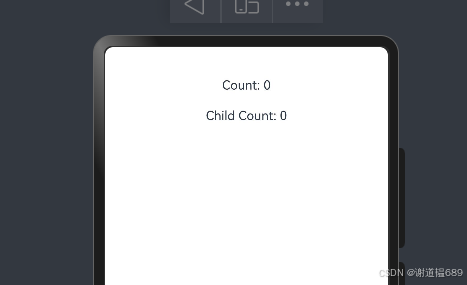
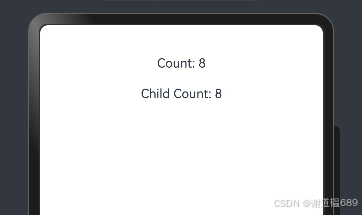
@State count: number = 0;
build() {
Column({ space: 20 }) {
Text("Count: " + this.count)
// 使用 ChildComponent 组件,并将 count 作为属性传递给它
ChildComponent({count:this.count,AddFn:()=>{
this.count++
} })
}
.width("100%")
.height("100%");
}
}
@Component
struct ChildComponent {
// 使用 @Prop 注解定义一个状态变量 count,并初始化为0
@Prop count: number = 0;
AddFn=() => {}
build() {
Column() {
Text("Child Count: " + this.count)
.onClick(() => {
this.AddFn()
})
}
}
}如果你们不太懂什么回调函数,可以后台私信我,一般有时间都会回消息的
@Provide -- @Consume(有就不演示了)
emitter/eventHub
AppStorage
1. 实现原理
- AppStorage 是一种全局数据存储方式。父组件可以将数据存储到 AppStorage 中,子组件通过 @StorageLink 装饰器与 AppStorage 中的特定数据建立链接,从而可以读取该数据。当子组件对链接的数据进行修改时,AppStorage 中的数据会被更新,其他与该数据有链接的组件(包括父组件)也能感知到这种变化,进而实现子组件向父组件的数据传递。
2. 示例代码
@Entry
@Component
struct MsgTest {
  @StorageLink('parentData')
  msg: string = ""

  aboutToAppear(): void {
    AppStorage.setOrCreate('parentData', '当幸福来敲门');
    this.msg = AppStorage.get('parentData') as string
  }

  build() {
    Column({ space: 15 }) {
      Text(this.msg)
        .fontSize(40)
      ChildComponent()
    }
    .height('100%')
    .width('100%')
  }
}

@Component
struct ChildComponent {
  @StorageLink('parentData')
  msg: string = ""
  @State private childData: string = '肖申克的救赎';
  build() {
    Column() {
      Text(this.msg)
      Button("按钮")
        .onClick(() => {
          AppStorage.set('parentData', this.childData);
        })
    }
  }
}


跨代通信
@State -- @Prop
emitter/eventHub
@Provide -- @Consume
AppStorage
页面传值
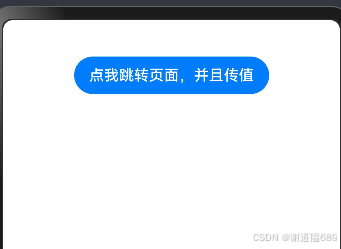
router
通过不同的uri访问不同的页面
页面一
import { router } from '@kit.ArkUI'

@Entry
@Component
struct MsgTest {


  build() {
    Column({ space: 15 }) {
      Button("点我跳转页面,并且传值")
        .onClick(() => {
            router.pushUrl({
              url:'pages/MsgTest2',
              params:{
                name:'张三'
              }
            })
        })
    }
    .height('100%')
    .width('100%')
  }
}
页面二
import { router } from '@kit.ArkUI';

interface name {
  name: string
}
@Entry
@Component
struct MsgTest2 {
  @State message: string = 'Hello World';

  aboutToAppear(): void {
    this.message = (router.getParams() as name).name;
  }

  build() {
    RelativeContainer() {
      Text(this.message)
        .id('MsgTest2HelloWorld')
        .fontSize(50)
        .fontWeight(FontWeight.Bold)
        .alignRules({
          center: { anchor: '__container__', align: VerticalAlign.Center },
          middle: { anchor: '__container__', align: HorizontalAlign.Center }
        })
    }
    .height('100%')
    .width('100%')
  }
}

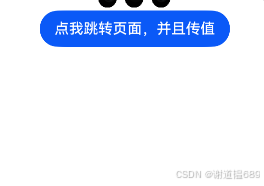
Navigaiton(华为推荐)
Navigation组件是路由导航的根视图容器,一般作为Page页面的根容器使用,其内部默认包含了标题栏、内容区和工具栏,其中内容区默认首页显示导航内容(Navigation的子组件)或非首页显示(NavDestination的子组件),首页和非首页通过路由进行切换。
- 根组件必须被Navigation包裹
- 必须绑定NavStackPath
- 子组件必须被NavDestination包裹
- 必须有一个全局的builder来渲染子组件
- 需要在项目的module.json5中配置一个routerMap的json文件
- routerMap文件中配置三个内容-name-builder-文件路径
第一个页面
import { Person } from './msgTestTo'

@Entry
@Component
struct MsgTest {
  @Provide
  stackPath: NavPathStack = new NavPathStack()

  build() {
    //一定记得加控制器
    Navigation(this.stackPath) {
      Button("点我跳转页面,并且传值")
        .onClick(() => {
          this.stackPath.pushPath({
            name: 'msg',
            param: {
              name: '张三',
              age: 18,
            } as Person
          })
        })
    }
    .height('100%')
    .width('100%')
  }
}
第二个页面
@Component
export  struct msgTestTo {
  @Consume
  stackPath: NavPathStack

  @State name: string = "John"
  @State age: number = 30
build() {
  NavDestination() {
    Text(this.name)
    Text(this.age.toString())
  }
  .onWillAppear(() => {
    const params = this.stackPath.getParamByName("msg") as Person[]
    this.name = params[params.length - 1].name
    this.age = params[params.length - 1].age
  })
}
}


export interface Person {
  name: string
  age: number
}

@Builder
export function msgTestToBuilder() {
  msgTestTo()
}
配置
{
  "routerMap": [
    {
      "name": "msg",
      "buildFunction": "msgTestToBuilder",
      "pageSourceFile": "src/main/ets/pages/msgTestTo.ets"
    }
  ]
}
emitter/eventHub
AppStorage
Ability传值
startAbility
定义启动Ability参数,可以作为入参,调用startAbility启动指定的Ability。
属性
系统能力:以下各项对应的系统能力均为SystemCapability.Ability.AbilityRuntime.FAModel
| 名称 | 类型 | 必填 | 说明 |
|---|---|---|---|
| want | Want | 是 | 启动Ability的want信息。 |
| abilityStartSetting | { [key: string]: any } | 否 | 启动Ability的特殊属性,当开发者启动Ability时,该属性可以作为调用中的输入参数传递。 |
| abilityStartSettings11+ | Record<string, Object> | 否 | 启动Ability的特殊属性,当开发者启动Ability时,该属性可以作为调用中的输入参数传递。推荐使用该属性替代abilityStartSetting,设置该属性后,abilityStartSetting不再生效。 |
如果是同一个应用-emitter-AppStorage

社区规范:仅讨论OpenHarmony相关问题。
更多推荐
 36
36 0
0- 0


 已为社区贡献29条内容

所有评论(0)