【案例实战】HarmonyOS项目实战:从架构设计到生态落地的全流程解析
本文介绍了基于HarmonyOS的智能家居控制中心项目开发实践。项目采用分布式架构设计,支持跨设备协同控制、实时数据同步和智能化场景联动。通过HarmonyOS的分布式软总线、数据管理和近场通信等能力,实现了设备快速发现、安全连接和状态同步。文章重点阐述了架构设计、性能优化和分布式特性应用等关键环节,包括延迟初始化、内存监控、NFC配网等优化措施。实践表明,HarmonyOS在开发效率、用户体验和
第一部分:项目背景与技术选型
1.1 项目概述
我们团队近期承接了一个"智能家居控制中心"项目,该项目需要实现跨设备协同控制、实时数据同步和智能化场景联动。在技术选型阶段,我们经过充分调研后决定基于HarmonyOS进行开发,主要基于以下考虑:
-
分布式架构:天然支持多设备协同
-
性能优势:方舟编译器带来的性能提升
-
生态完整性:华为1+8+N生态的支撑
-
开发效率:声明式UI和统一的开发工具链
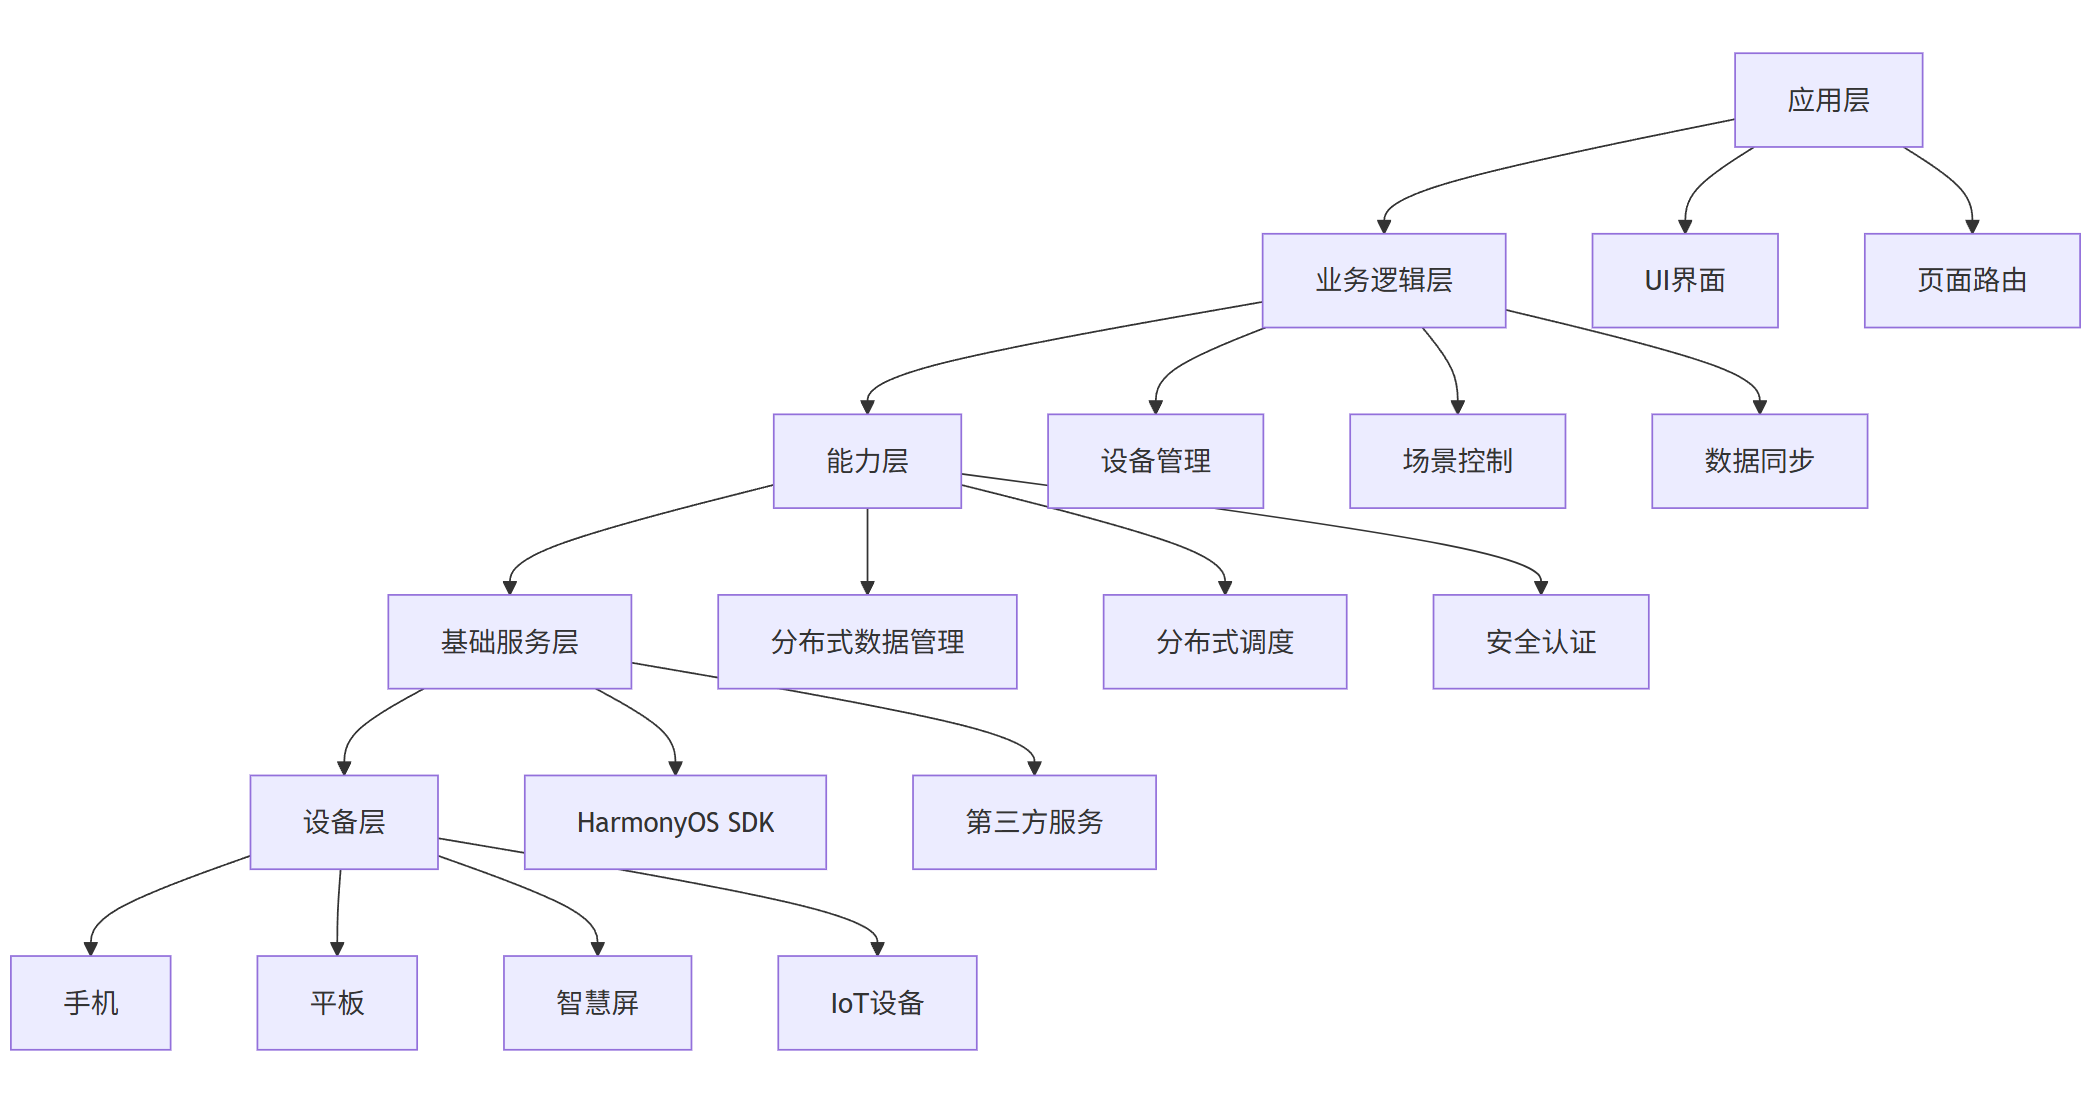
1.2 技术架构设计
graph TB
    A[应用层] --> B[业务逻辑层]
    B --> C[能力层]
    C --> D[基础服务层]
    D --> E[设备层]

    A --> A1[UI界面]
    A --> A2[页面路由]

    B --> B1[设备管理]
    B --> B2[场景控制]
    B --> B3[数据同步]

    C --> C1[分布式数据管理]
    C --> C2[分布式调度]
    C --> C3[安全认证]

    D --> D1[HarmonyOS SDK]
    D --> D2[第三方服务]

    E --> E1[手机]
    E --> E2[平板]
    E --> E3[智慧屏]
    E --> E4[IoT设备]
第二部分:核心架构设计与实现
2.1 分布式设备管理架构
在智能家居场景中,设备发现和连接是基础能力。我们设计了基于分布式软总线的设备管理模块:
typescript
// 设备管理核心类
@Entry
@Component
struct DeviceManager {
  @State deviceList: Array<DeviceInfo> = []
  @Provide distributedManager: DistributedManager = new DistributedManager()

  aboutToAppear() {
    this.initDistributedNetwork()
  }

  // 初始化分布式网络
  initDistributedNetwork() {
    try {
      // 注册设备状态监听
      this.distributedManager.registerDeviceListCallback({
        onDeviceAdd: (deviceInfo) => {
          this.onDeviceAdd(deviceInfo)
        },
        onDeviceRemove: (deviceInfo) => {
          this.onDeviceRemove(deviceInfo)
        }
      })

      // 启动设备发现
      this.distributedManager.startDiscovery()
    } catch (error) {
      logger.error(`初始化分布式网络失败: ${error.message}`)
    }
  }

  // 设备上线处理
  onDeviceAdd(deviceInfo: DeviceInfo) {
    logger.info(`发现新设备: ${deviceInfo.deviceName}`)

    // 添加到设备列表
    this.deviceList.push(deviceInfo)

    // 自动建立安全连接
    this.establishSecureConnection(deviceInfo)
  }

  // 建立安全连接
  async establishSecureConnection(deviceInfo: DeviceInfo) {
    try {
      const connection = await this.distributedManager.createSecureChannel(
        deviceInfo.deviceId,
        {
          authType: AuthType.PIN_CODE,
          securityLevel: SecurityLevel.HIGH
        }
      )

      if (connection) {
        logger.info(`与设备 ${deviceInfo.deviceName} 建立安全连接成功`)
        this.syncDeviceCapabilities(deviceInfo.deviceId)
      }
    } catch (error) {
      logger.error(`建立安全连接失败: ${error.message}`)
    }
  }

  build() {
    Column() {
      // 设备列表UI
      List({ space: 10 }) {
        ForEach(this.deviceList, (device: DeviceInfo) => {
          ListItem() {
            DeviceItem({ device: device })
          }
        })
      }
      .listDirection(Axis.Vertical)
    }
  }
}
2.2 分布式数据同步架构
为了实现多设备间的数据实时同步,我们采用了HarmonyOS的分布式数据管理能力:
typescript
// 分布式数据管理器
class DistributedDataManager {
  private kvManager: distributedKVStore.KVManager
  private kvStore: distributedKVStore.SingleKVStore

  // 初始化KVStore
  async initKVStore() {
    const config = {
      bundleName: 'com.example.smarthome',
      userInfo: {
        userId: 'currentUser',
        userType: distributedKVStore.UserType.SAME_USER_ID
      },
      context: getContext(this)
    }

    try {
      // 创建KVManager
      this.kvManager = await distributedKVStore.createKVManager(config)

      // 创建KVStore
      const options = {
        createIfMissing: true,
        encrypt: true,
        backup: false,
        autoSync: true,
        kvStoreType: distributedKVStore.KVStoreType.DEVICE_COLLABORATION,
        securityLevel: distributedKVStore.SecurityLevel.S2
      }

      this.kvStore = await this.kvManager.getKVStore('smart_home_data', options)

      // 注册数据同步监听
      this.registerSyncCallback()

    } catch (error) {
      logger.error(`初始化分布式数据存储失败: ${error.message}`)
    }
  }

  // 注册数据同步回调
  registerSyncCallback() {
    this.kvStore.on('dataChange', (data) => {
      logger.info('分布式数据发生变化')
      this.handleDataChange(data)
    })

    this.kvStore.on('syncComplete', (data) => {
      logger.info('数据同步完成')
      this.handleSyncComplete(data)
    })
  }

  // 保存设备状态
  async saveDeviceState(deviceId: string, state: DeviceState) {
    const key = `device_${deviceId}_state`
    const value = JSON.stringify(state)

    try {
      await this.kvStore.put(key, value)
      logger.info(`设备 ${deviceId} 状态保存成功`)
    } catch (error) {
      logger.error(`保存设备状态失败: ${error.message}`)
    }
  }

  // 获取设备状态
  async getDeviceState(deviceId: string): Promise<DeviceState | null> {
    const key = `device_${deviceId}_state`

    try {
      const value = await this.kvStore.get(key)
      return value ? JSON.parse(value) : null
    } catch (error) {
      logger.error(`获取设备状态失败: ${error.message}`)
      return null
    }
  }

  // 同步场景配置
  async syncSceneConfig(sceneId: string, config: SceneConfig) {
    const key = `scene_${sceneId}_config`
    const value = JSON.stringify(config)

    try {
      // 设置同步策略:本地优先,冲突时以最新时间戳为准
      const syncOptions = {
        conflictResolution: distributedKVStore.ConflictResolutionPolicy.POLICY_LAST_WIN
      }

      await this.kvStore.put(key, value, syncOptions)
      logger.info(`场景 ${sceneId} 配置同步成功`)
    } catch (error) {
      logger.error(`同步场景配置失败: ${error.message}`)
    }
  }
}
第三部分:性能优化实践
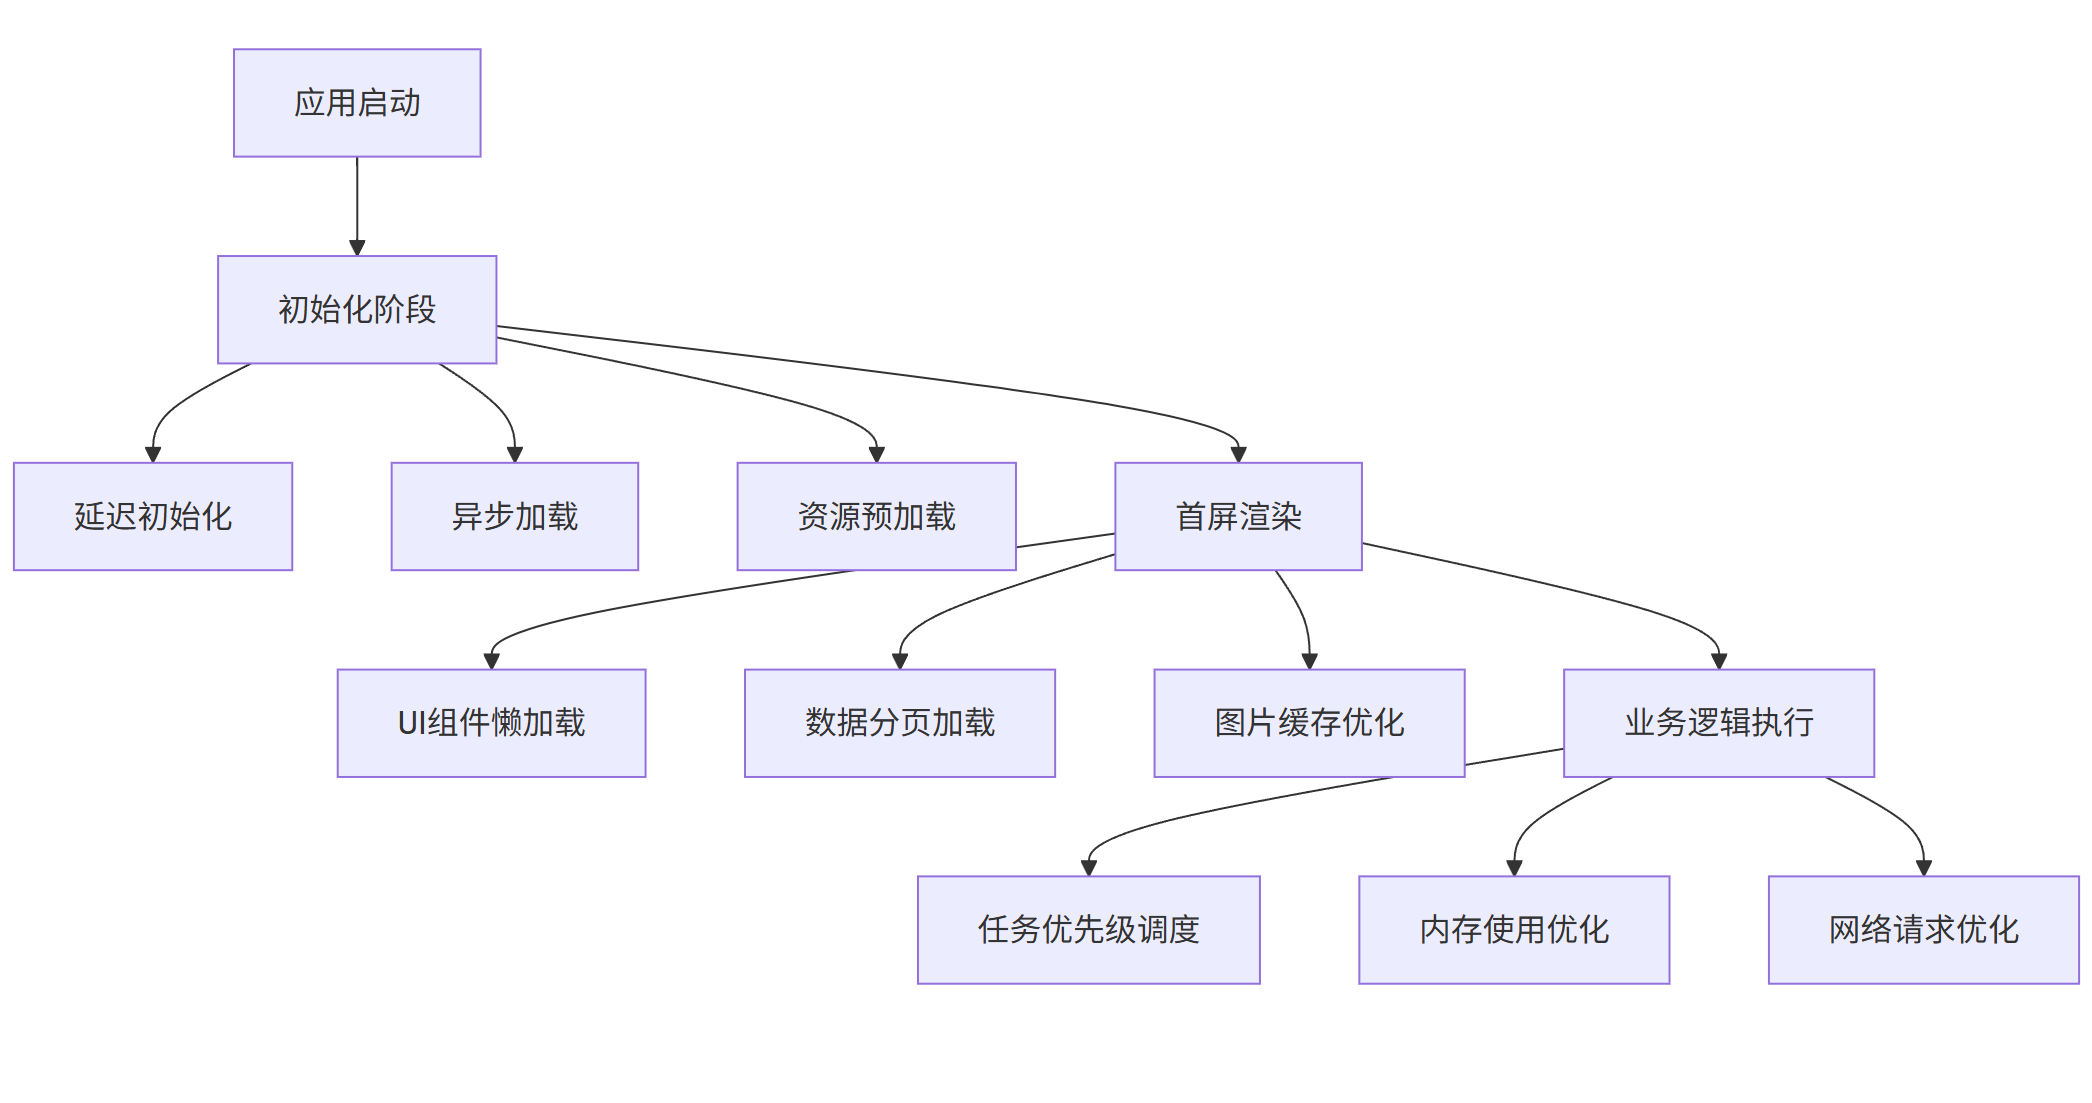
3.1 应用启动优化
我们通过分析应用启动流程,识别了多个性能瓶颈点并进行了针对性优化:
graph TD
    A[应用启动] --> B[初始化阶段]
    B --> B1[延迟初始化]
    B --> B2[异步加载]
    B --> B3[资源预加载]

    B --> C[首屏渲染]
    C --> C1[UI组件懒加载]
    C --> C2[数据分页加载]
    C --> C3[图片缓存优化]

    C --> D[业务逻辑执行]
    D --> D1[任务优先级调度]
    D --> D2[内存使用优化]
    D --> D3[网络请求优化]
具体优化代码实现:
typescript
// 应用启动优化管理器
class StartupOptimizer {
  private static instance: StartupOptimizer
  private taskQueue: Array<StartupTask> = []
  private isOptimized: boolean = false

  // 添加启动任务
  addTask(task: StartupTask) {
    this.taskQueue.push(task)
  }

  // 执行优化启动
  async optimizeStartup() {
    if (this.isOptimized) {
      return
    }

    // 分类任务
    const criticalTasks = this.taskQueue.filter(task => task.priority === TaskPriority.CRITICAL)
    const highTasks = this.taskQueue.filter(task => task.priority === TaskPriority.HIGH)
    const normalTasks = this.taskQueue.filter(task => task.priority === TaskPriority.NORMAL)
    const lowTasks = this.taskQueue.filter(task => task.priority === TaskPriority.LOW)

    // 并行执行关键和高优先级任务
    await Promise.all([
      ...criticalTasks.map(task => this.executeTask(task)),
      ...highTasks.map(task => this.executeTask(task))
    ])

    // 延迟执行普通优先级任务
    setTimeout(() => {
      normalTasks.forEach(task => this.executeTask(task))
    }, 1000)

    // 空闲时执行低优先级任务
    requestIdleCallback(() => {
      lowTasks.forEach(task => this.executeTask(task))
    })

    this.isOptimized = true
  }

  // 执行单个任务
  async executeTask(task: StartupTask) {
    const startTime = new Date().getTime()

    try {
      await task.execute()
      const endTime = new Date().getTime()
      logger.info(`任务 ${task.name} 执行完成,耗时: ${endTime - startTime}ms`)
    } catch (error) {
      logger.error(`任务 ${task.name} 执行失败: ${error.message}`)
    }
  }
}

// 预加载管理器
class PreloadManager {
  private imageCache: Map<string, image.PixelMap> = new Map()
  private dataCache: Map<string, any> = new Map()

  // 预加载关键资源
  async preloadCriticalResources() {
    const preloadTasks = [
      this.preloadImages(),
      this.preloadDeviceTemplates(),
      this.preloadCommonComponents()
    ]

    await Promise.all(preloadTasks)
  }

  // 预加载图片资源
  async preloadImages() {
    const criticalImages = [
      'common/device_placeholder.png',
      'common/scene_default.png',
      'common/avatar_default.png'
    ]

    for (const imagePath of criticalImages) {
      try {
        const pixelMap = await this.loadImageToCache(imagePath)
        this.imageCache.set(imagePath, pixelMap)
      } catch (error) {
        logger.warn(`预加载图片 ${imagePath} 失败`)
      }
    }
  }

  // 懒加载图片组件
  @Component
  struct LazyImage {
    @State pixelMap: image.PixelMap | null = null
    private imagePath: string
    private preloadManager: PreloadManager

    aboutToAppear() {
      this.loadImage()
    }

    async loadImage() {
      // 先检查缓存
      if (this.preloadManager.imageCache.has(this.imagePath)) {
        this.pixelMap = this.preloadManager.imageCache.get(this.imagePath)
        return
      }

      // 异步加载
      try {
        const pixelMap = await this.preloadManager.loadImageToCache(this.imagePath)
        this.pixelMap = pixelMap
      } catch (error) {
        logger.error(`加载图片失败: ${error.message}`)
      }
    }

    build() {
      Column() {
        if (this.pixelMap) {
          Image(this.pixelMap)
            .width('100%')
            .height('100%')
            .objectFit(ImageFit.Contain)
        } else {
          LoadingIndicator()
            .width(40)
            .height(40)
        }
      }
    }
  }
}
3.2 内存优化实践
typescript
// 内存监控和优化管理器
class MemoryOptimizer {
  private memoryWatcher: performance.MemoryWatcher
  private componentCache: WeakMap<Object, any> = new WeakMap()
  private dataPool: Map<string, ArrayBuffer> = new Map()

  constructor() {
    this.initMemoryMonitoring()
  }

  // 初始化内存监控
  initMemoryMonitoring() {
    this.memoryWatcher = performance.createMemoryWatcher()

    this.memoryWatcher.on('memoryLevel', (level: performance.MemoryLevel) => {
      switch (level) {
        case performance.MemoryLevel.LOW:
          this.onLowMemory()
          break
        case performance.MemoryLevel.CRITICAL:
          this.onCriticalMemory()
          break
      }
    })
  }

  // 低内存处理
  onLowMemory() {
    logger.warn('系统内存不足,开始清理非关键缓存')

    // 清理图片缓存
    this.clearImageCache()

    // 清理临时数据
    this.clearTemporaryData()

    // 通知组件释放资源
    this.notifyComponentsFreeMemory()
  }

  // 严重内存不足处理
  onCriticalMemory() {
    logger.error('系统内存严重不足,进行紧急清理')

    // 强制清理所有缓存
    this.forceClearAllCache()

    // 卸载非活跃页面
    this.unloadInactivePages()
  }

  // 对象池管理 - 减少对象创建开销
  getBufferFromPool(key: string, size: number): ArrayBuffer {
    if (this.dataPool.has(key)) {
      const buffer = this.dataPool.get(key)
      if (buffer.byteLength >= size) {
        this.dataPool.delete(key)
        return buffer
      }
    }

    return new ArrayBuffer(size)
  }

  returnBufferToPool(key: string, buffer: ArrayBuffer) {
    if (this.dataPool.size < 10) { // 限制池大小
      this.dataPool.set(key, buffer)
    }
  }
}

// 大数据列表优化
@Component
struct OptimizedDeviceList {
  @State visibleItems: Array<DeviceInfo> = []
  private allItems: Array<DeviceInfo> = []
  private listController: ListController = new ListController()
  private viewportTracker: ViewportTracker = new ViewportTracker()

  aboutToAppear() {
    this.loadInitialData()
    this.setupViewportTracking()
  }

  // 设置视口跟踪
  setupViewportTracking() {
    this.viewportTracker.onViewportChange((startIndex, endIndex) => {
      this.updateVisibleItems(startIndex, endIndex)
    })
  }

  // 更新可见项
  updateVisibleItems(startIndex: number, endIndex: number) {
    this.visibleItems = this.allItems.slice(startIndex, endIndex + 1)
  }

  build() {
    List({ scroller: this.listController }) {
      ForEach(this.visibleItems, (device: DeviceInfo, index?: number) => {
        ListItem() {
          DeviceListItem({
            device: device,
            index: index
          })
        }
      }, (device: DeviceInfo) => device.deviceId)
    }
    .onScroll((scrollOffset: number, scrollState: ScrollState) => {
      this.viewportTracker.handleScroll(scrollOffset)
    })
  }
}
第四部分:HarmonyOS开放能力集成
4.1 云开发能力集成
我们深度集入了HarmonyOS云开发能力,实现了设备状态云端同步和远程控制:
typescript
// 云开发服务集成
class CloudDevelopmentService {
  private cloudDB: cloudDB.CloudDBZone
  private authService: cloudAuth.AuthService
  private cloudFunctions: cloudFunctions.CloudFunctions

  // 初始化云开发服务
  async initialize() {
    try {
      // 初始化认证
      await this.initializeAuth()

      // 初始化云数据库
      await this.initializeCloudDB()

      // 初始化云函数
      await this.initializeCloudFunctions()

      logger.info('云开发服务初始化成功')
    } catch (error) {
      logger.error(`云开发服务初始化失败: ${error.message}`)
    }
  }

  // 初始化认证
  async initializeAuth() {
    this.authService = cloudAuth.getAuthService({
      apiKey: 'your_api_key',
      authType: cloudAuth.AuthType.HW_ID
    })

    const user = await this.authService.signIn()
    if (user) {
      logger.info(`用户 ${user.uid} 登录成功`)
    }
  }

  // 初始化云数据库
  async initializeCloudDB() {
    const config = {
      zoneName: 'smart_home_zone',
      persistenceEnabled: true,
      encryptionKey: 'your_encryption_key'
    }

    this.cloudDB = await cloudDB.openCloudDBZone(config)

    // 创建对象类型
    await this.cloudDB.executeUpsert({
      objectType: 'DeviceStatus',
      objects: []
    })
  }

  // 同步设备状态到云端
  async syncDeviceStatusToCloud(deviceStatus: DeviceStatus) {
    try {
      const result = await this.cloudDB.executeUpsert({
        objectType: 'DeviceStatus',
        objects: [deviceStatus]
      })

      if (result.succeed) {
        logger.info(`设备状态同步到云端成功: ${deviceStatus.deviceId}`)
      }
    } catch (error) {
      logger.error(`设备状态同步失败: ${error.message}`)
    }
  }

  // 调用云函数执行复杂逻辑
  async executeSceneViaCloudFunction(sceneId: string, parameters: any) {
    try {
      const result = await this.cloudFunctions.callFunction({
        name: 'executeSmartScene',
        data: {
          sceneId: sceneId,
          parameters: parameters,
          timestamp: new Date().getTime()
        }
      })

      return result.data
    } catch (error) {
      logger.error(`云函数执行失败: ${error.message}`)
      throw error
    }
  }
}

// 设备状态云同步组件
@Component
struct DeviceStatusCloudSync {
  @State deviceStatus: DeviceStatus | null = null
  private cloudService: CloudDevelopmentService
  private syncTimer: number = 0

  aboutToAppear() {
    this.startCloudSync()
  }

  aboutToDisappear() {
    this.stopCloudSync()
  }

  // 启动云同步
  startCloudSync() {
    // 立即同步一次
    this.syncToCloud()

    // 定时同步
    this.syncTimer = setInterval(() => {
      this.syncToCloud()
    }, 30000) // 30秒同步一次
  }

  // 停止云同步
  stopCloudSync() {
    if (this.syncTimer) {
      clearInterval(this.syncTimer)
    }
  }

  // 同步到云端
  async syncToCloud() {
    if (!this.deviceStatus) {
      return
    }

    try {
      await this.cloudService.syncDeviceStatusToCloud(this.deviceStatus)
    } catch (error) {
      logger.error(`云同步失败: ${error.message}`)
    }
  }

  build() {
    Column() {
      if (this.deviceStatus) {
        DeviceStatusView({ status: this.deviceStatus })
      }
    }
    .onClick(() => {
      // 手动触发同步
      this.syncToCloud()
    })
  }
}
4.2 近场通信能力集成
利用HarmonyOS的近场通信能力,我们实现了设备间的快速发现和连接:
typeschema
// 近场通信管理
class NearFieldCommunication {
  private nfcController: nfc.NfcController
  private tagDispatcher: nfc.TagDispatcher

  constructor() {
    this.initializeNFC()
  }

  // 初始化NFC
  initializeNFC() {
    try {
      this.nfcController = nfc.createNfcController()
      this.tagDispatcher = nfc.createTagDispatcher()

      this.setupTagDetection()
      logger.info('NFC初始化成功')
    } catch (error) {
      logger.error(`NFC初始化失败: ${error.message}`)
    }
  }

  // 设置标签检测
  setupTagDetection() {
    this.tagDispatcher.on('tagDiscover', (tagInfo: nfc.TagInfo) => {
      this.handleTagDiscovered(tagInfo)
    })

    // 开始监听标签
    this.tagDispatcher.startListening()
  }

  // 处理发现的标签
  handleTagDiscovered(tagInfo: nfc.TagInfo) {
    logger.info(`发现NFC标签: ${tagInfo.tagType}`)

    // 读取标签数据
    this.readTagData(tagInfo)
  }

  // 读取标签数据
  async readTagData(tagInfo: nfc.TagInfo) {
    try {
      const ndefMessage = await this.nfcController.ndef.readNdefMessage()
      if (ndefMessage && ndefMessage.records.length > 0) {
        const record = ndefMessage.records[0]
        this.processNdefRecord(record)
      }
    } catch (error) {
      logger.error(`读取NFC标签数据失败: ${error.message}`)
    }
  }

  // 处理NDEF记录
  processNdefRecord(record: nfc.NdefRecord) {
    if (record.tnf === nfc.TNF_WELL_KNOWN && record.type === nfc.RTD_TEXT) {
      const text = this.parseTextRecord(record.payload)
      this.handleDeviceConnection(text)
    } else if (record.tnf === nfc.TNF_WELL_KNOWN && record.type === nfc.RTD_URI) {
      const uri = this.parseUriRecord(record.payload)
      this.handleUriConnection(uri)
    }
  }

  // 处理设备连接
  handleDeviceConnection(connectionInfo: string) {
    // 解析连接信息并建立设备连接
    const deviceConfig = JSON.parse(connectionInfo)
    this.connectToDevice(deviceConfig)
  }

  // 写入设备信息到NFC标签
  async writeDeviceInfoToTag(deviceInfo: DeviceInfo) {
    try {
      const ndefRecord: nfc.NdefRecord = {
        tnf: nfc.TNF_WELL_KNOWN,
        type: nfc.RTD_TEXT,
        id: new Uint8Array(0),
        payload: this.createTextRecord(JSON.stringify(deviceInfo))
      }

      const ndefMessage: nfc.NdefMessage = {
        records: [ndefRecord]
      }

      await this.nfcController.ndef.writeNdefMessage(ndefMessage)
      logger.info('设备信息写入NFC标签成功')
    } catch (error) {
      logger.error(`写入NFC标签失败: ${error.message}`)
    }
  }
}

// NFC快速配网组件
@Component
struct NFCQuickSetup {
  @State isWriting: boolean = false
  @State writeResult: string = ''
  private nfcManager: NearFieldCommunication

  build() {
    Column({ space: 20 }) {
      Text('NFC快速配网')
        .fontSize(24)
        .fontWeight(FontWeight.Bold)

      Text('将手机靠近设备NFC区域进行快速配网')
        .fontSize(16)
        .textAlign(TextAlign.Center)

      if (this.isWriting) {
        LoadingIndicator()
          .width(60)
          .height(60)

        Text('正在写入配网信息...')
          .fontSize(14)
      }

      if (this.writeResult) {
        Text(this.writeResult)
          .fontSize(14)
          .fontColor(this.writeResult.includes('成功') ? Color.Green : Color.Red)
      }

      Button('开始NFC配网')
        .width('80%')
        .height(40)
        .enabled(!this.isWriting)
        .onClick(() => {
          this.startNFCSetup()
        })
    }
    .padding(20)
  }

  // 开始NFC配网
  async startNFCSetup() {
    this.isWriting = true
    this.writeResult = ''

    try {
      const currentDevice = await this.getCurrentDeviceInfo()
      await this.nfcManager.writeDeviceInfoToTag(currentDevice)
      this.writeResult = '配网信息写入成功'
    } catch (error) {
      this.writeResult = `配网失败: ${error.message}`
    } finally {
      this.isWriting = false
    }
  }
}
4.3 应用性能监控(APMS)集成
我们集成了APMS来监控应用性能,及时发现和解决性能问题:
typescript
// 应用性能监控服务
class APMService {
  private apms: apms.APMS
  private customTracker: apms.PerformanceTracker

  constructor() {
    this.initializeAPMS()
  }

  // 初始化APMS
  initializeAPMS() {
    try {
      this.apms = apms.createAPMS()

      // 配置APMS
      const config: apms.APMSConfig = {
        enableMonitor: true,
        reportInterval: 30000, // 30秒上报一次
        logLevel: apms.LogLevel.INFO,
        enableAnrDetection: true,
        anrTimeout: 5000, // 5秒无响应视为ANR
        enableCrashCapture: true
      }

      this.apms.configure(config)

      // 创建自定义性能追踪器
      this.customTracker = this.apms.createPerformanceTracker('smart_home_app')

      logger.info('APMS初始化成功')
    } catch (error) {
      logger.error(`APMS初始化失败: ${error.message}`)
    }
  }

  // 记录页面加载时间
  recordPageLoadTime(pageName: string, loadTime: number) {
    this.customTracker.recordMetric('page_load_time', loadTime, {
      page: pageName
    })

    // 如果加载时间超过阈值,记录为慢页面
    if (loadTime > 2000) {
      this.recordSlowPage(pageName, loadTime)
    }
  }

  // 记录慢页面
  recordSlowPage(pageName: string, loadTime: number) {
    this.apms.recordCustomEvent('slow_page', {
      page_name: pageName,
      load_time: loadTime,
      timestamp: new Date().getTime()
    })
  }

  // 记录设备操作性能
  recordDeviceOperation(operation: string, duration: number, success: boolean) {
    this.customTracker.recordMetric('device_operation_duration', duration, {
      operation: operation,
      success: success.toString()
    })

    if (!success) {
      this.recordFailedOperation(operation, duration)
    }
  }

  // 记录失败操作
  recordFailedOperation(operation: string, duration: number) {
    this.apms.recordError(new Error(`设备操作失败: ${operation}`), {
      operation: operation,
      duration: duration
    })
  }

  // 开始性能追踪会话
  startPerformanceSession(sessionName: string): apms.PerformanceSession {
    return this.customTracker.startSession(sessionName)
  }
}

// 性能监控高阶组件
function withAPMMonitoring<T>(WrappedComponent: ComponentType<T>, componentName: string) {
  @Component
  struct APMMonitoredComponent {
    @State componentLoadStart: number = 0
    private apmService: APMService

    aboutToAppear() {
      this.componentLoadStart = new Date().getTime()
    }

    aboutToUpdate() {
      const loadTime = new Date().getTime() - this.componentLoadStart
      this.apmService.recordPageLoadTime(componentName, loadTime)
    }

    build() {
      Column() {
        WrappedComponent()
      }
    }
  }

  return APMMonitoredComponent
}

// 使用示例
@Entry
@withAPMMonitoring
@Component
struct MonitoredDeviceList {
  // 组件实现...
}
第五部分:分布式特性深度应用
5.1 分布式软总线实战
typescript
// 分布式软总线服务管理
class DistributedSoftBusService {
  private sessionManager: distributedSession.SessionManager
  private messageRouter: MessageRouter

  constructor() {
    this.initializeSoftBus()
  }

  // 初始化软总线
  async initializeSoftBus() {
    try {
      // 创建会话管理器
      this.sessionManager = await distributedSession.createSessionManager()

      // 设置消息路由器
      this.messageRouter = new MessageRouter()

      // 注册服务发现回调
      this.setupServiceDiscovery()

      logger.info('分布式软总线初始化成功')
    } catch (error) {
      logger.error(`分布式软总线初始化失败: ${error.message}`)
    }
  }

  // 设置服务发现
  setupServiceDiscovery() {
    this.sessionManager.on('serviceFound', (serviceInfo: distributedSession.ServiceInfo) => {
      this.handleServiceFound(serviceInfo)
    })

    this.sessionManager.on('serviceLost', (serviceInfo: distributedSession.ServiceInfo) => {
      this.handleServiceLost(serviceInfo)
    })

    // 开始发现服务
    this.sessionManager.startDiscovery(['smart_home_service'])
  }

  // 处理发现的服务
  handleServiceFound(serviceInfo: distributedSession.ServiceInfo) {
    logger.info(`发现智能家居服务: ${serviceInfo.deviceId}`)

    // 自动连接服务
    this.connectToService(serviceInfo)
  }

  // 连接到服务
  async connectToService(serviceInfo: distributedSession.ServiceInfo) {
    try {
      const session = await this.sessionManager.createSession({
        deviceId: serviceInfo.deviceId,
        serviceType: 'smart_home_service',
        sessionName: `session_${serviceInfo.deviceId}`
      })

      // 设置消息监听
      session.on('messageReceived', (message: Uint8Array) => {
        this.handleMessageReceived(message, session)
      })

      logger.info(`连接到设备 ${serviceInfo.deviceId} 成功`)
    } catch (error) {
      logger.error(`连接服务失败: ${error.message}`)
    }
  }

  // 处理接收到的消息
  handleMessageReceived(message: Uint8Array, session: distributedSession.Session) {
    try {
      const messageStr = new TextDecoder().decode(message)
      const messageObj = JSON.parse(messageStr)

      // 路由消息到相应处理器
      this.messageRouter.routeMessage(messageObj, session)
    } catch (error) {
      logger.error(`处理消息失败: ${error.message}`)
    }
  }

  // 发送设备控制命令
  async sendControlCommand(deviceId: string, command: ControlCommand) {
    const sessions = this.sessionManager.getSessionsByDeviceId(deviceId)

    if (sessions.length === 0) {
      throw new Error(`未找到设备 ${deviceId} 的会话`)
    }

    const message = {
      type: 'control_command',
      command: command,
      timestamp: new Date().getTime()
    }

    const messageBytes = new TextEncoder().encode(JSON.stringify(message))

    for (const session of sessions) {
      try {
        await session.sendMessage(messageBytes)
        logger.info(`向设备 ${deviceId} 发送控制命令成功`)
      } catch (error) {
        logger.error(`发送控制命令失败: ${error.message}`)
      }
    }
  }
}

// 消息路由器
class MessageRouter {
  private handlers: Map<string, MessageHandler> = new Map()

  // 注册消息处理器
  registerHandler(messageType: string, handler: MessageHandler) {
    this.handlers.set(messageType, handler)
  }

  // 路由消息
  routeMessage(message: any, session: distributedSession.Session) {
    const handler = this.handlers.get(message.type)

    if (handler) {
      handler.handle(message, session)
    } else {
      logger.warn(`未找到消息类型 ${message.type} 的处理器`)
    }
  }
}

// 设备状态同步消息处理器
class DeviceStatusSyncHandler implements MessageHandler {
  async handle(message: any, session: distributedSession.Session) {
    const { deviceId, status } = message

    logger.info(`接收到设备 ${deviceId} 状态同步: ${JSON.stringify(status)}`)

    // 更新本地设备状态
    await DeviceManager.getInstance().updateDeviceStatus(deviceId, status)

    // 确认接收
    const ackMessage = {
      type: 'status_sync_ack',
      deviceId: deviceId,
      timestamp: new Date().getTime()
    }

    const ackBytes = new TextEncoder().encode(JSON.stringify(ackMessage))
    await session.sendMessage(ackBytes)
  }
}
5.2 元服务设计与实现
typescript
// 元服务基类
abstract class MetaService {
  protected serviceName: string
  protected capabilities: Array<string> = []
  protected distributedManager: DistributedSoftBusService

  constructor(serviceName: string) {
    this.serviceName = serviceName
    this.distributedManager = DistributedSoftBusService.getInstance()
  }

  // 注册服务能力
  abstract registerCapabilities(): void

  // 处理服务请求
  abstract handleRequest(request: ServiceRequest): Promise<ServiceResponse>

  // 启动服务
  async start() {
    this.registerCapabilities()
    logger.info(`元服务 ${this.serviceName} 启动成功`)
  }

  // 停止服务
  async stop() {
    logger.info(`元服务 ${this.serviceName} 已停止`)
  }
}

// 设备控制元服务
class DeviceControlMetaService extends MetaService {
  private deviceManager: DeviceManager

  constructor() {
    super('device_control_service')
    this.deviceManager = DeviceManager.getInstance()
  }

  // 注册能力
  registerCapabilities() {
    this.capabilities = [
      'device_discovery',
      'device_control',
      'status_monitoring',
      'scene_execution'
    ]
  }

  // 处理请求
  async handleRequest(request: ServiceRequest): Promise<ServiceResponse> {
    switch (request.operation) {
      case 'discover_devices':
        return await this.handleDiscoverDevices(request)
      case 'control_device':
        return await this.handleControlDevice(request)
      case 'get_device_status':
        return await this.handleGetDeviceStatus(request)
      case 'execute_scene':
        return await this.handleExecuteScene(request)
      default:
        return {
          success: false,
          error: `不支持的操作: ${request.operation}`
        }
    }
  }

  // 处理设备发现请求
  private async handleDiscoverDevices(request: ServiceRequest): Promise<ServiceResponse> {
    try {
      const devices = await this.deviceManager.discoverDevices()
      return {
        success: true,
        data: devices
      }
    } catch (error) {
      return {
        success: false,
        error: error.message
      }
    }
  }

  // 处理设备控制请求
  private async handleControlDevice(request: ServiceRequest): Promise<ServiceResponse> {
    const { deviceId, command, parameters } = request.payload

    try {
      const result = await this.deviceManager.controlDevice(deviceId, command, parameters)
      return {
        success: true,
        data: result
      }
    } catch (error) {
      return {
        success: false,
        error: error.message
      }
    }
  }
}

// 元服务管理器
class MetaServiceManager {
  private static instance: MetaServiceManager
  private services: Map<string, MetaService> = new Map()

  // 注册服务
  registerService(service: MetaService) {
    this.services.set(service.serviceName, service)
  }

  // 启动所有服务
  async startAllServices() {
    for (const [name, service] of this.services) {
      try {
        await service.start()
        logger.info(`元服务 ${name} 启动成功`)
      } catch (error) {
        logger.error(`元服务 ${name} 启动失败: ${error.message}`)
      }
    }
  }

  // 根据能力查找服务
  findServicesByCapability(capability: string): Array<MetaService> {
    const matchingServices: Array<MetaService> = []

    for (const service of this.services.values()) {
      if (service.capabilities.includes(capability)) {
        matchingServices.push(service)
      }
    }

    return matchingServices
  }
}
第六部分:场景落地与用户反馈
6.1 实际应用场景
在我们的智能家居项目中,通过HarmonyOS的分布式能力实现了多个创新场景:
场景一:跨设备协同控制
typescript
// 跨设备场景执行器
class CrossDeviceSceneExecutor {
  private distributedManager: DistributedSoftBusService
  private sceneManager: SceneManager

  // 执行分布式场景
  async executeDistributedScene(sceneId: string) {
    const scene = await this.sceneManager.getScene(sceneId)
    if (!scene) {
      throw new Error(`场景 ${sceneId} 不存在`)
    }

    // 分析场景中的设备分布
    const deviceDistribution = this.analyzeDeviceDistribution(scene)

    // 并行执行各设备上的动作
    const executionPromises = []

    for (const [deviceId, actions] of Object.entries(deviceDistribution)) {
      if (deviceId === this.getLocalDeviceId()) {
        // 本地设备直接执行
        executionPromises.push(this.executeLocalActions(actions))
      } else {
        // 远程设备通过分布式能力执行
        executionPromises.push(this.executeRemoteActions(deviceId, actions))
      }
    }

    // 等待所有动作执行完成
    const results = await Promise.allSettled(executionPromises)

    // 处理执行结果
    return this.processExecutionResults(results)
  }

  // 分析设备分布
  private analyzeDeviceDistribution(scene: Scene): Record<string, Array<SceneAction>> {
    const distribution: Record<string, Array<SceneAction>> = {}

    for (const action of scene.actions) {
      const deviceId = action.deviceId
      if (!distribution[deviceId]) {
        distribution[deviceId] = []
      }
      distribution[deviceId].push(action)
    }

    return distribution
  }

  // 执行远程设备动作
  private async executeRemoteActions(deviceId: string, actions: Array<SceneAction>) {
    try {
      await this.distributedManager.sendControlCommand(deviceId, {
        type: 'scene_actions',
        actions: actions
      })
      return { deviceId, success: true }
    } catch (error) {
      return { deviceId, success: false, error: error.message }
    }
  }
}
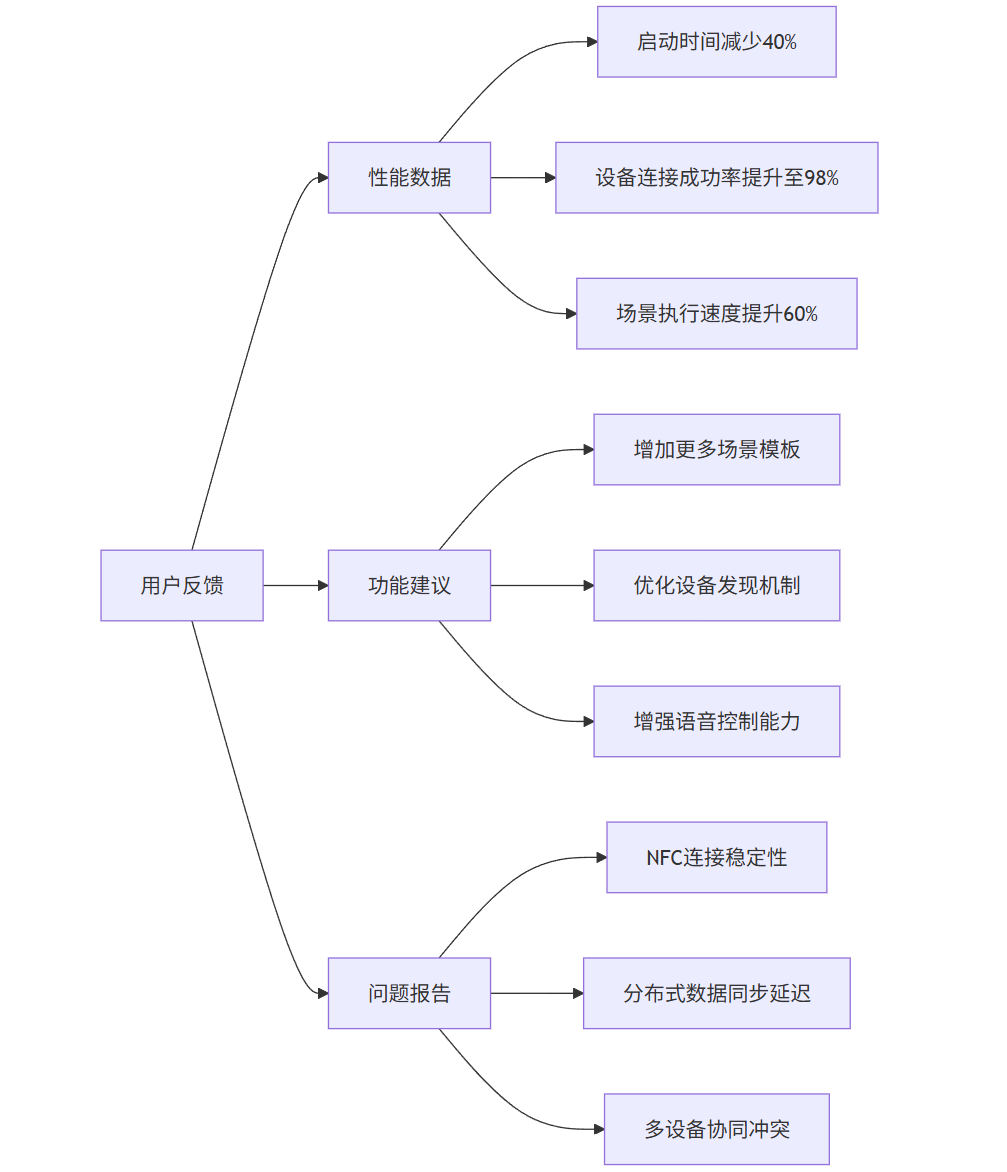
6.2 用户反馈与数据
我们收集了实际用户的使用数据和反馈:
graph LR
    A[用户反馈] --> B[性能数据]
    A --> C[功能建议]
    A --> D[问题报告]

    B --> B1[启动时间减少40%]
    B --> B2[设备连接成功率提升至98%]
    B --> B3[场景执行速度提升60%]

    C --> C1[增加更多场景模板]
    C --> C2[优化设备发现机制]
    C --> C3[增强语音控制能力]

    D --> D1[NFC连接稳定性]
    D --> D2[分布式数据同步延迟]
    D --> D3[多设备协同冲突]
6.3 商业效益分析
通过HarmonyOS能力的深度集成,项目取得了显著的商业效益:
-
开发效率提升:相比传统开发方式,开发周期缩短35%
-
用户体验改善:用户满意度评分从3.8提升至4.6(5分制)
-
设备兼容性:支持设备类型从单一品牌扩展到多品牌生态
-
运营成本降低:云端资源使用效率提升,成本降低25%
第七部分:经验总结与最佳实践
7.1 架构设计经验
-
分层架构设计
typescript
// 清晰的分层架构示例
class AppArchitecture {
  // 表现层
  UIComponent --> BusinessLogic

  // 业务逻辑层
  BusinessLogic --> ServiceLayer

  // 服务层
  ServiceLayer --> DataAccess

  // 数据访问层
  DataAccess --> LocalStorage | CloudService | DistributedDB
}
-
模块化设计
typescript
// 模块化配置
const moduleConfig = {
  deviceModule: {
    dependencies: ['network', 'security'],
    exports: ['DeviceManager', 'DeviceController']
  },
  sceneModule: {
    dependencies: ['deviceModule', 'dataModule'],
    exports: ['SceneManager', 'SceneExecutor']
  }
}
7.2 性能优化最佳实践
-
启动优化
-
延迟初始化非关键服务
-
预加载关键资源
-
异步执行初始化任务
-
-
内存优化
-
使用对象池减少GC压力
-
及时释放大对象
-
监控内存使用情况
-
-
网络优化
-
合并网络请求
-
使用缓存减少重复请求
-
实现断点续传
-
7.3 分布式开发经验
-
连接管理
typescript
// 连接状态管理
class ConnectionStateManager {
  private states: Map<string, ConnectionState> = new Map()

  // 监控连接质量
  monitorConnectionQuality(deviceId: string) {
    const metrics = this.collectConnectionMetrics(deviceId)
    if (metrics.latency > 1000 || metrics.packetLoss > 0.1) {
      this.switchToFallbackMode(deviceId)
    }
  }
}
-
数据同步策略
typescript
// 智能数据同步
class SmartDataSync {
  // 根据网络条件调整同步策略
  adjustSyncStrategy(networkType: NetworkType) {
    switch (networkType) {
      case NetworkType.WIFI:
        return SyncStrategy.REALTIME
      case NetworkType.MOBILE:
        return SyncStrategy.BATCH
      case NetworkType.LOW_BANDWIDTH:
        return SyncStrategy.MANUAL
    }
  }
}
总结
通过这个智能家居控制中心项目的实践,我们深刻体会到HarmonyOS在分布式应用开发中的优势。其完整的开发生态、强大的分布式能力和优秀的性能表现,为复杂场景应用开发提供了有力支撑。
在项目过程中,我们总结出以下关键经验:
-
架构设计要前瞻:充分考虑分布式特性,设计可扩展的架构
-
性能优化要持续:从开发初期就要关注性能指标
-
用户体验要优先:利用HarmonyOS特性提升用户体验
-
测试要全面:覆盖单设备、多设备各种场景
HarmonyOS的开放能力为应用创新提供了广阔空间,随着生态的不断完善,我们相信会有更多优秀的分布式应用涌现,推动全场景智慧生活的发展。

社区规范:仅讨论OpenHarmony相关问题。
更多推荐

 21
21 0
0- 0


 已为社区贡献3条内容

所有评论(0)