【开源鸿蒙Flutter跨平台开发学习笔记 】DAY11:实现 GitCode一个完全原生的代码仓详情页
一、接口毕竟第一天开始学习的时候对Flutter一无所知,最近一直在学习各种组件,加入【开源跨平台开发训练营】第16天,本小鱼觉得已经对大部分组件的使用游刃有余啦😏,并且了解了Flutter的部分原理,今天的目标是不掉队,完成DAY1216的目标:实现仓库详情页。一、接口。
毕竟第一天开始学习的时候对Flutter一无所知,最近一直在学习各种组件,加入【开源鸿蒙跨平台开发训练营】第16天,本小鱼觉得已经对大部分组件的使用游刃有余啦😏,并且了解了Flutter的部分原理,今天的目标是不掉队,完成 DAY12~16的目标:实现仓库详情页。
一、接口
从小白开始,毕竟在今天之前,对这个功能小鱼就是个小白~
GitCode接口文档:https://docs.gitcode.com/docs/apis/get-api-v-5-repos-owner-repo-git-trees-sha/
1、接口使用示例
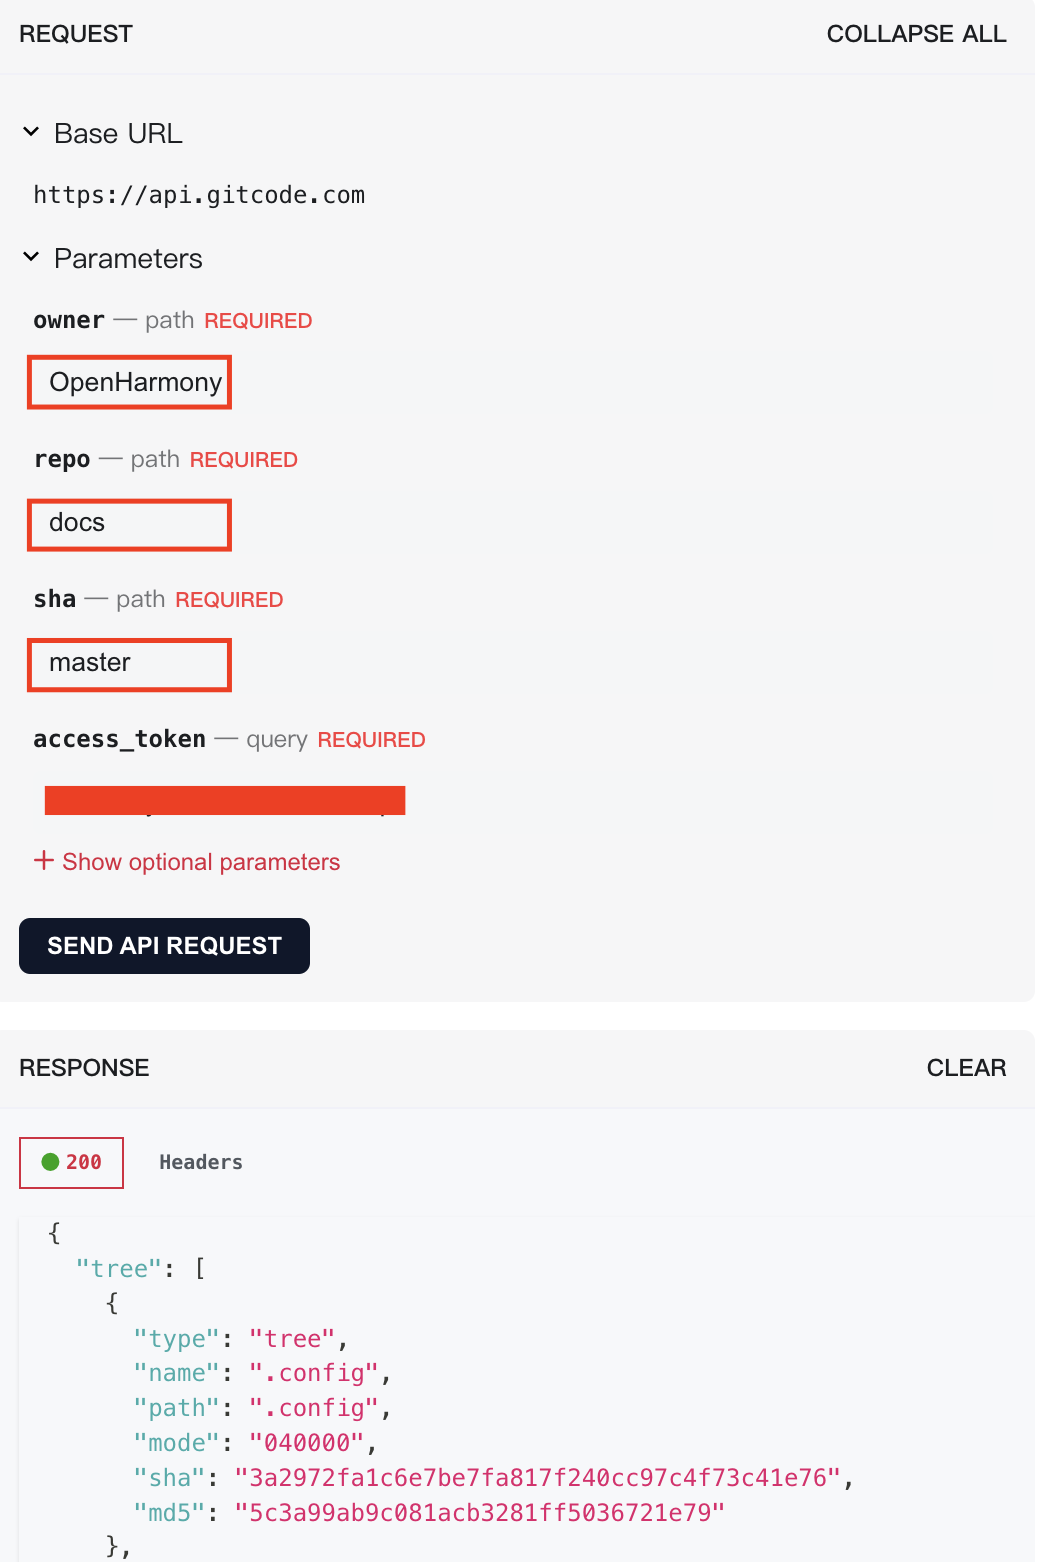
在接口文档的右边可以填上参数以及access_token,是你申请的令牌(前面博客里面有介绍)
点击 SEND API REQUEST 按钮就会返回对应的数据
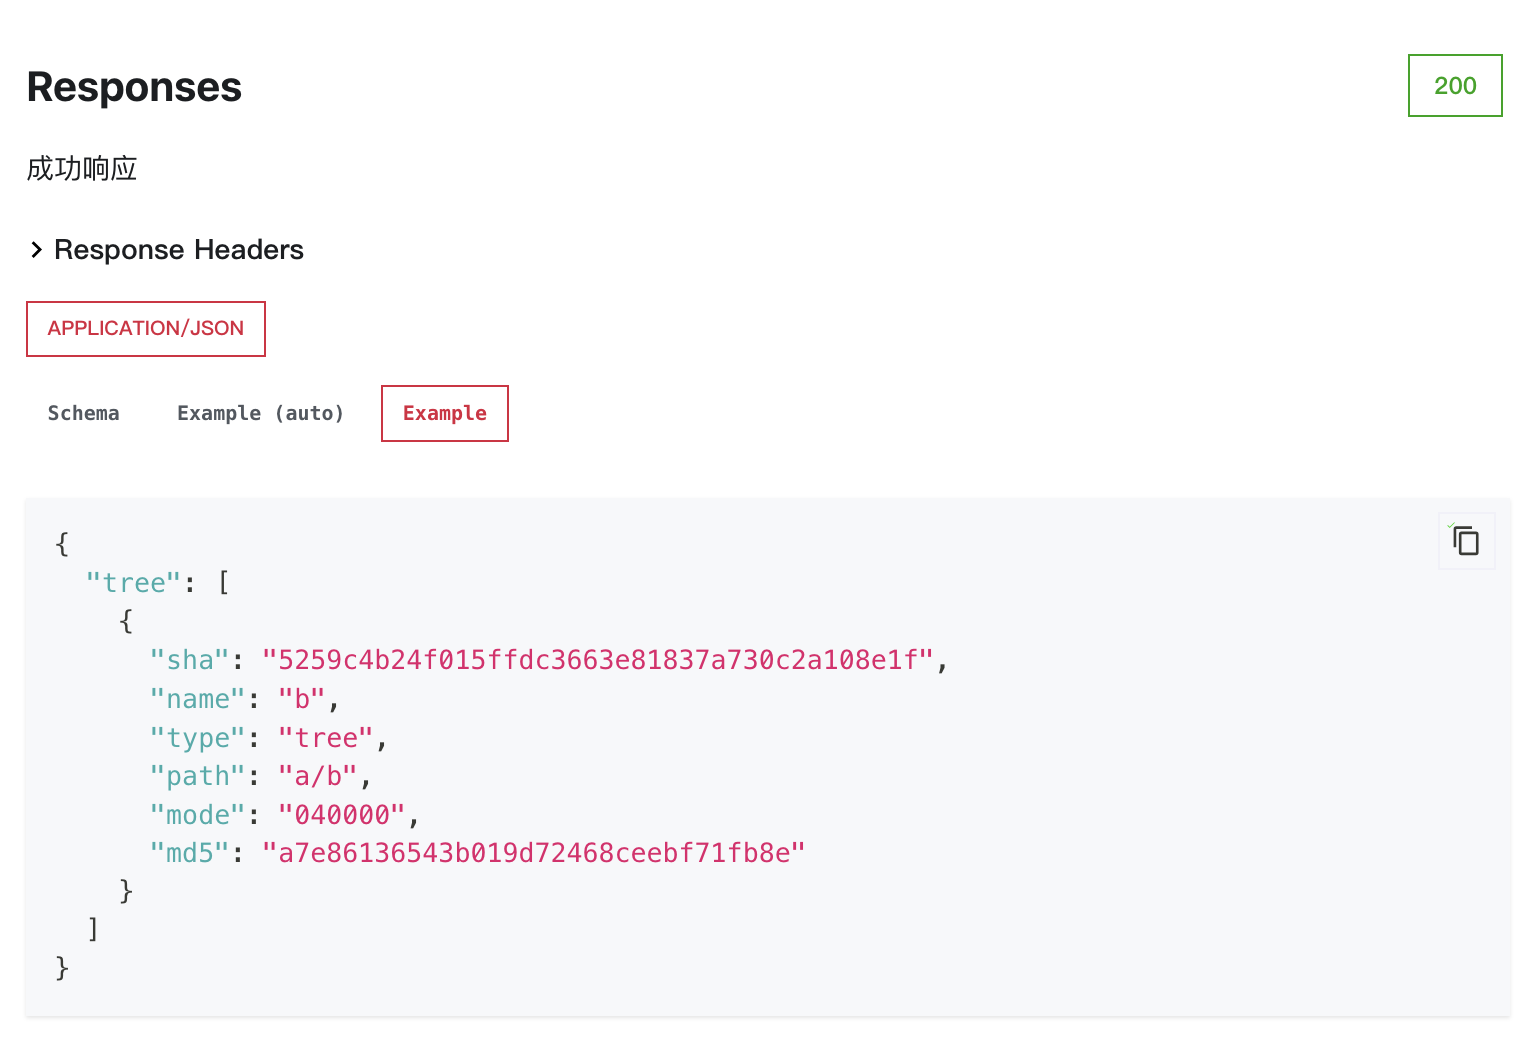
不过在文档的中间部分也可以看到数据模型
2、接口参数

这也没什么难的,认真看接口文档,注意:文件夹递归的时候需要使用 recursive 这个参数
3、接口封装及数据解析
1)、数据模型
// git_object.dart
class RepositoryTree {
  final String type;
  final String name;
  final String path;
  final String mode;
  final String sha;
  final String md5;

  RepositoryTree({
    required this.type,
    required this.name,
    required this.path,
    required this.mode,
    required this.sha,
    required this.md5,
  });

  factory RepositoryTree.fromJson(Map<String, dynamic> json) {
    return RepositoryTree(
      type: json['type'] as String,
      name: json['name'] as String,
      path: json['path'] as String,
      mode: json['mode'] as String,
      sha: json['sha'] as String,
      md5: json['md5'] as String,
    );
  }

  Map<String, dynamic> toJson() {
    return {
      'type': type,
      'name': name,
      'path': path,
      'mode': mode,
      'sha': sha,
      'md5': md5,
    };
  }

  // 便捷属性
  bool get isTree => type == 'tree';
  bool get isBlob => type == 'blob';
  bool get isDirectory => type == 'tree';
  bool get isFile => type == 'blob';

  // 根据文件扩展名获取图标
  String get iconName {
    if (isDirectory) return 'folder';

    final ext = name.split('.').last.toLowerCase();
    switch (ext) {
      case 'dart':
      case 'java':
      case 'py':
      case 'js':
      case 'ts':
      case 'cpp':
      case 'c':
      case 'h':
        return 'code';
      case 'md':
        return 'markdown';
      case 'yaml':
      case 'yml':
        return 'yaml';
      case 'json':
        return 'json';
      case 'xml':
        return 'xml';
      case 'png':
      case 'jpg':
      case 'jpeg':
      case 'gif':
      case 'svg':
        return 'image';
      case 'txt':
      case 'text':
        return 'text';
      case 'diff':
        return 'git';
      default:
        return 'file';
    }
  }

  // 获取文件类型描述
  String get fileType {
    if (isDirectory) return '文件夹';

    final ext = name.split('.').last.toLowerCase();
    switch (ext) {
      case 'dart': return 'Dart 文件';
      case 'md': return 'Markdown 文件';
      case 'yaml':
      case 'yml': return 'YAML 配置';
      case 'json': return 'JSON 文件';
      case 'xml': return 'XML 文件';
      case 'png': return 'PNG 图片';
      case 'jpg':
      case 'jpeg': return 'JPEG 图片';
      case 'gitignore': return 'Git 忽略配置';
      case 'gitattributes': return 'Git 属性配置';
      case 'diff': return '差异文件';
      default: return '文件';
    }
  }

  @override
  String toString() {
    return 'GitObject{name: $name, type: $type, path: $path}';
  }
}
除了对创建对应属性外,还增加了获取文件类型方法
2)、接口封装
这一步也简单,直接使用之前封装的Dio网球请求类即可
获取仓库树:
  /// 获取仓库树(目录/文件列表)
  ///
  /// - owner: 仓库所属空间地址(组织或个人的 `path`)
  /// - repo: 仓库 `path`
  /// - sha: 分支名(如 `master`)、Commit 或目录 Tree 的 SHA
  /// - recursive: 传 `1` 时递归返回树
  /// - filePath: 指定某个子目录的路径,仅返回该目录下的一级或递归内容
  ///
  /// GET `/repos/{owner}/{repo}/git/trees/{sha}`
  /// Query: `recursive`, `file_path`
  ///
  /// 返回体包含 `tree` 数组,其中每项为目录(`tree`)或文件(`blob`),对应 `RepositoryTree`
  Future<List<RepositoryTree>> getReposDetail({
    required String owner,
    required String repo,
    required String sha,
    int? recursive,
    String? filePath,
  }) async {
    try {
      // 构造请求:允许 4xx 进入响应分支(由 validateStatus 控制),便于统一友好提示
      final response = await _httpClient.get<Map<String, dynamic>>(
        '/repos/$owner/$repo/git/trees/$sha',
        // 查询参数:
        // - recursive=1 递归获取目录
        // - file_path 指定需要获取的目录路径
        queryParameters: {
          if (recursive != null) 'recursive': recursive,
          if (filePath != null && filePath.isNotEmpty) 'file_path': filePath,
        },
        options: Options(
          headers: _buildHeaders(ApiConfig.token),
          responseType: ResponseType.json,
          validateStatus: (status) => status != null && status < 500,
        ),
      );

      final statusCode = response.statusCode;
      switch (statusCode) {
        case 200:
          // 仅解析 `tree` 数组为 `RepositoryTree` 列表
          final data = response.data;
          final list = (data!['tree'] as List?) ?? const [];
          return list
              .map((e) => RepositoryTree.fromJson(e as Map<String, dynamic>))
              .toList();
        default:
          throw ValidationException('查询失败 (HTTP $statusCode),请稍后重试');
      }
    } on DioException catch (error) {
      // 连接/接收超时
      if (error.type == DioExceptionType.connectionTimeout ||
          error.type == DioExceptionType.receiveTimeout) {
        throw ValidationException('请求超时,请检查网络后重试');
      }
      if (error.type == DioExceptionType.badResponse) {
        // 服务器已响应,但状态码 >= 400;由于 validateStatus 只放行 < 500,此处意味着 4xx。
        throw ValidationException(
          '请求异常:HTTP ${error.response?.statusCode ?? '-'}',
        );
      }
      // 其它类型(取消、未知等)直接透传人类可读信息
      throw ValidationException(error.message ?? '未知网络错误');
    }
  }
获取单个文件:
/// 获取单个文件的内容
  ///
  /// - owner/repo/path: 仓库与文件路径
  /// - ref: 分支、Tag 或 Commit SHA(如 `master`)
  ///
  /// GET `/repos/{owner}/{repo}/contents/{path}?ref={ref}`
  ///
  /// 若为文本文件,通常返回 `encoding: base64` 与 `content`;
  /// 若为二进制或较大文件,可能返回 `download_url` 用于直接下载。
  Future<RepositoryContent> getFileContent({
    required String owner,
    required String repo,
    required String path,
    required String ref,
  }) async {
    try {
      final response = await _httpClient.get<Map<String, dynamic>>(
        '/repos/$owner/$repo/contents/$path',
        queryParameters: {
          'ref': ref,
        },
        options: Options(
          headers: _buildHeaders(ApiConfig.token),
          responseType: ResponseType.json,
          validateStatus: (status) => status != null && status < 500,
        ),
      );

      final statusCode = response.statusCode;
      switch (statusCode) {
        case 200:
          final data = response.data!;
          return RepositoryContent.fromJson(data);
        default:
          throw ValidationException('查询失败 (HTTP $statusCode),请稍后重试');
      }
    } on DioException catch (error) {
      // 超时错误
      if (error.type == DioExceptionType.connectionTimeout ||
          error.type == DioExceptionType.receiveTimeout) {
        throw ValidationException('请求超时,请检查网络后重试');
      }
      if (error.type == DioExceptionType.badResponse) {
        throw ValidationException(
          '请求异常:HTTP ${error.response?.statusCode ?? '-'}',
        );
      }
      throw ValidationException(error.message ?? '未知网络错误');
    }
  }
文件下载:
/// 按绝对 URL 下载原始字节(图片/大文件兜底方案)
///
/// - url: 由 `download_url` 提供的直链
///
/// 使用 `ResponseType.bytes` 返回二进制数据。
Future<Uint8List> downloadBytesFromUrl(String url) async {
try {
final response = await _httpClient.get<List<int>>(
url,
options: Options(
headers: _buildHeaders(ApiConfig.token),
responseType: ResponseType.bytes,
validateStatus: (status) => status != null && status < 500,
),
);
final statusCode = response.statusCode;
switch (statusCode) {
case 200:
final data = response.data ?? <int>[];
return Uint8List.fromList(data);
default:
throw ValidationException('下载失败 (HTTP $statusCode)');
}
} on DioException catch (error) {
// 保持错误信息简洁友好
throw ValidationException(error.message ?? '未知网络错误');
}
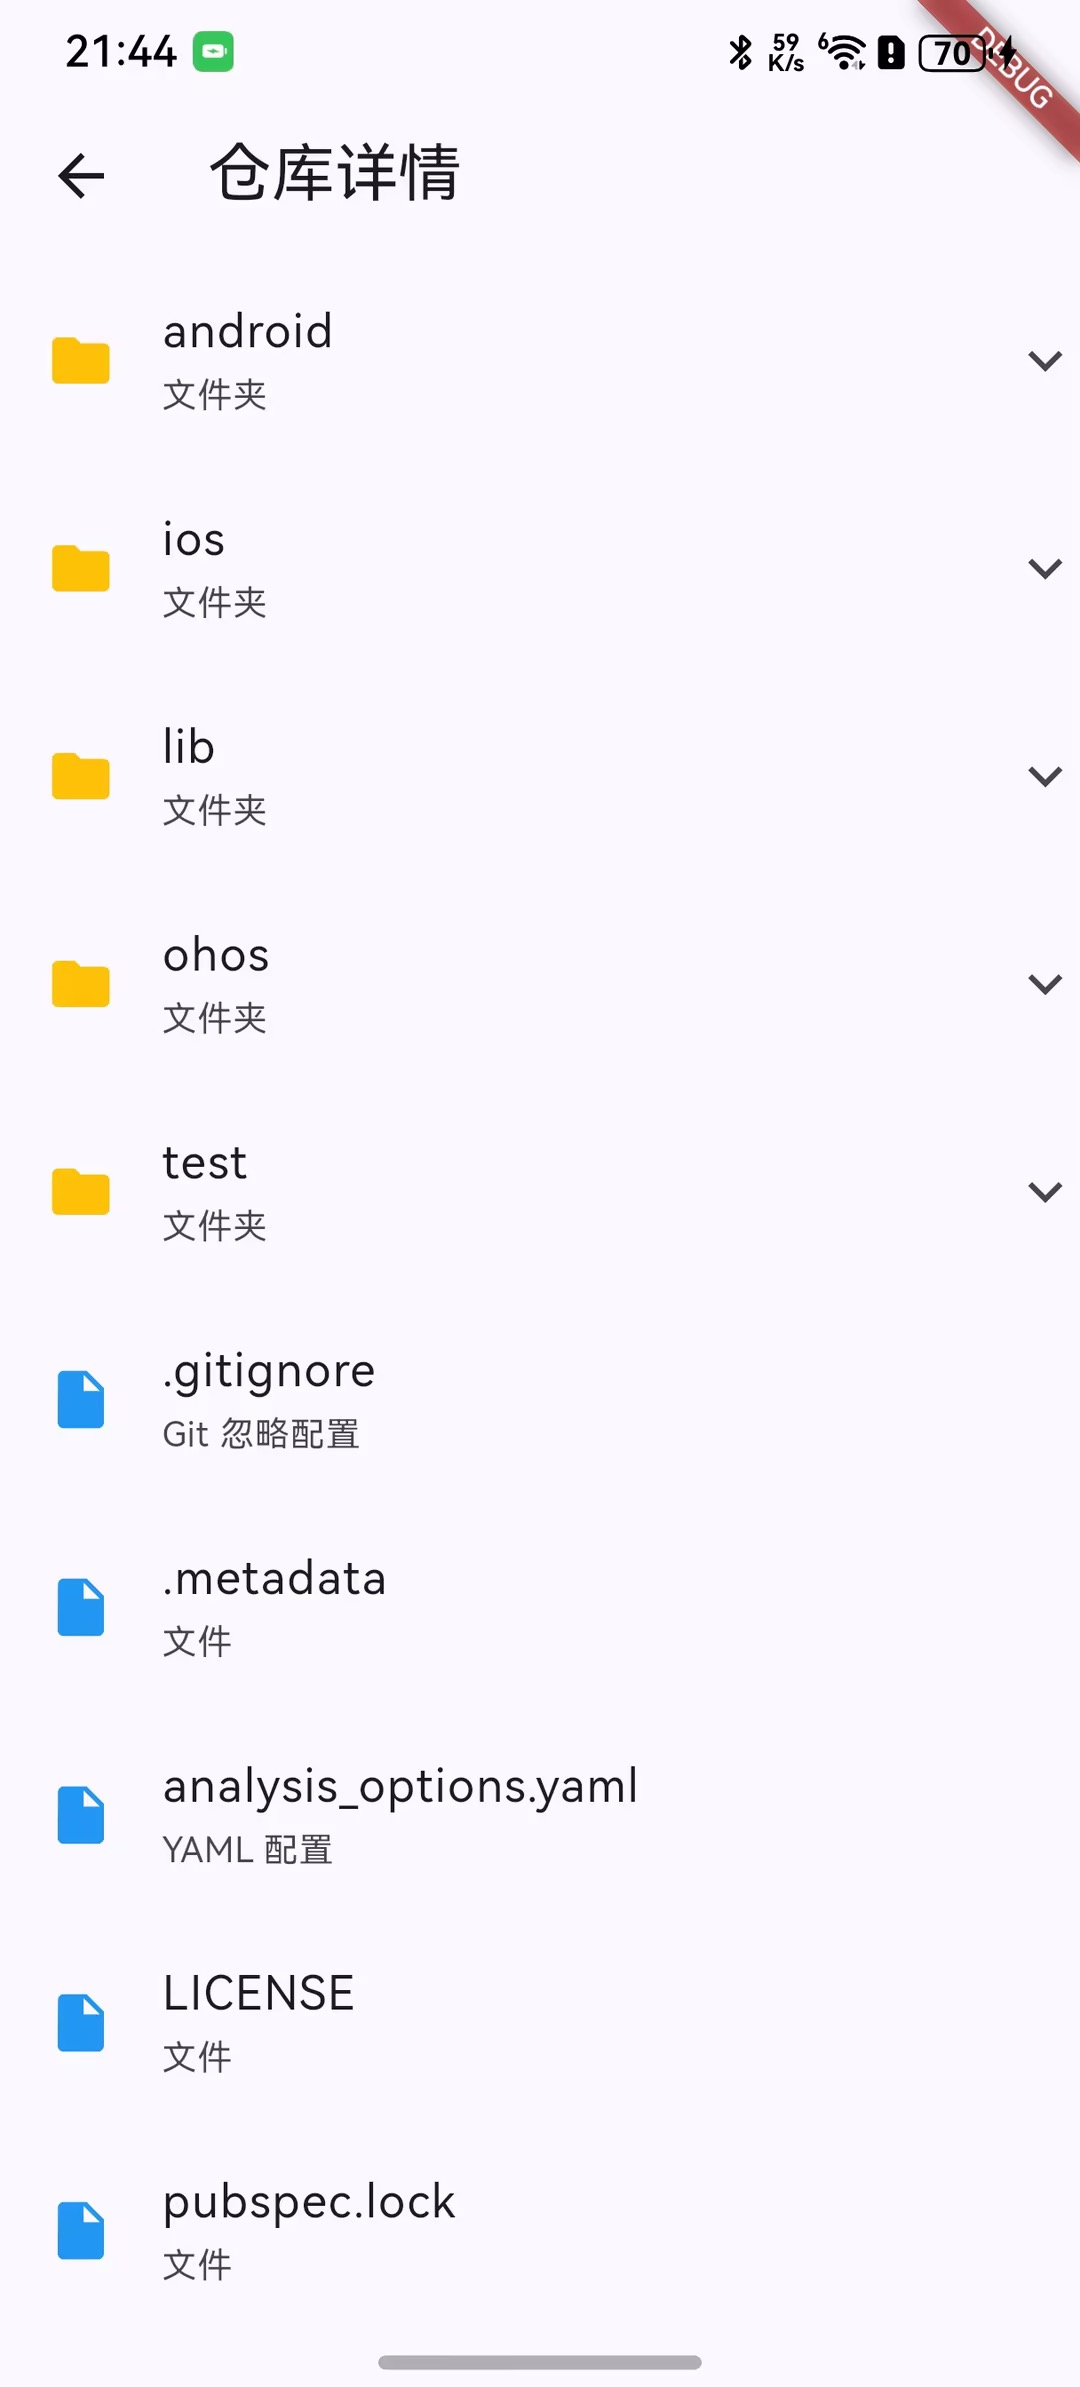
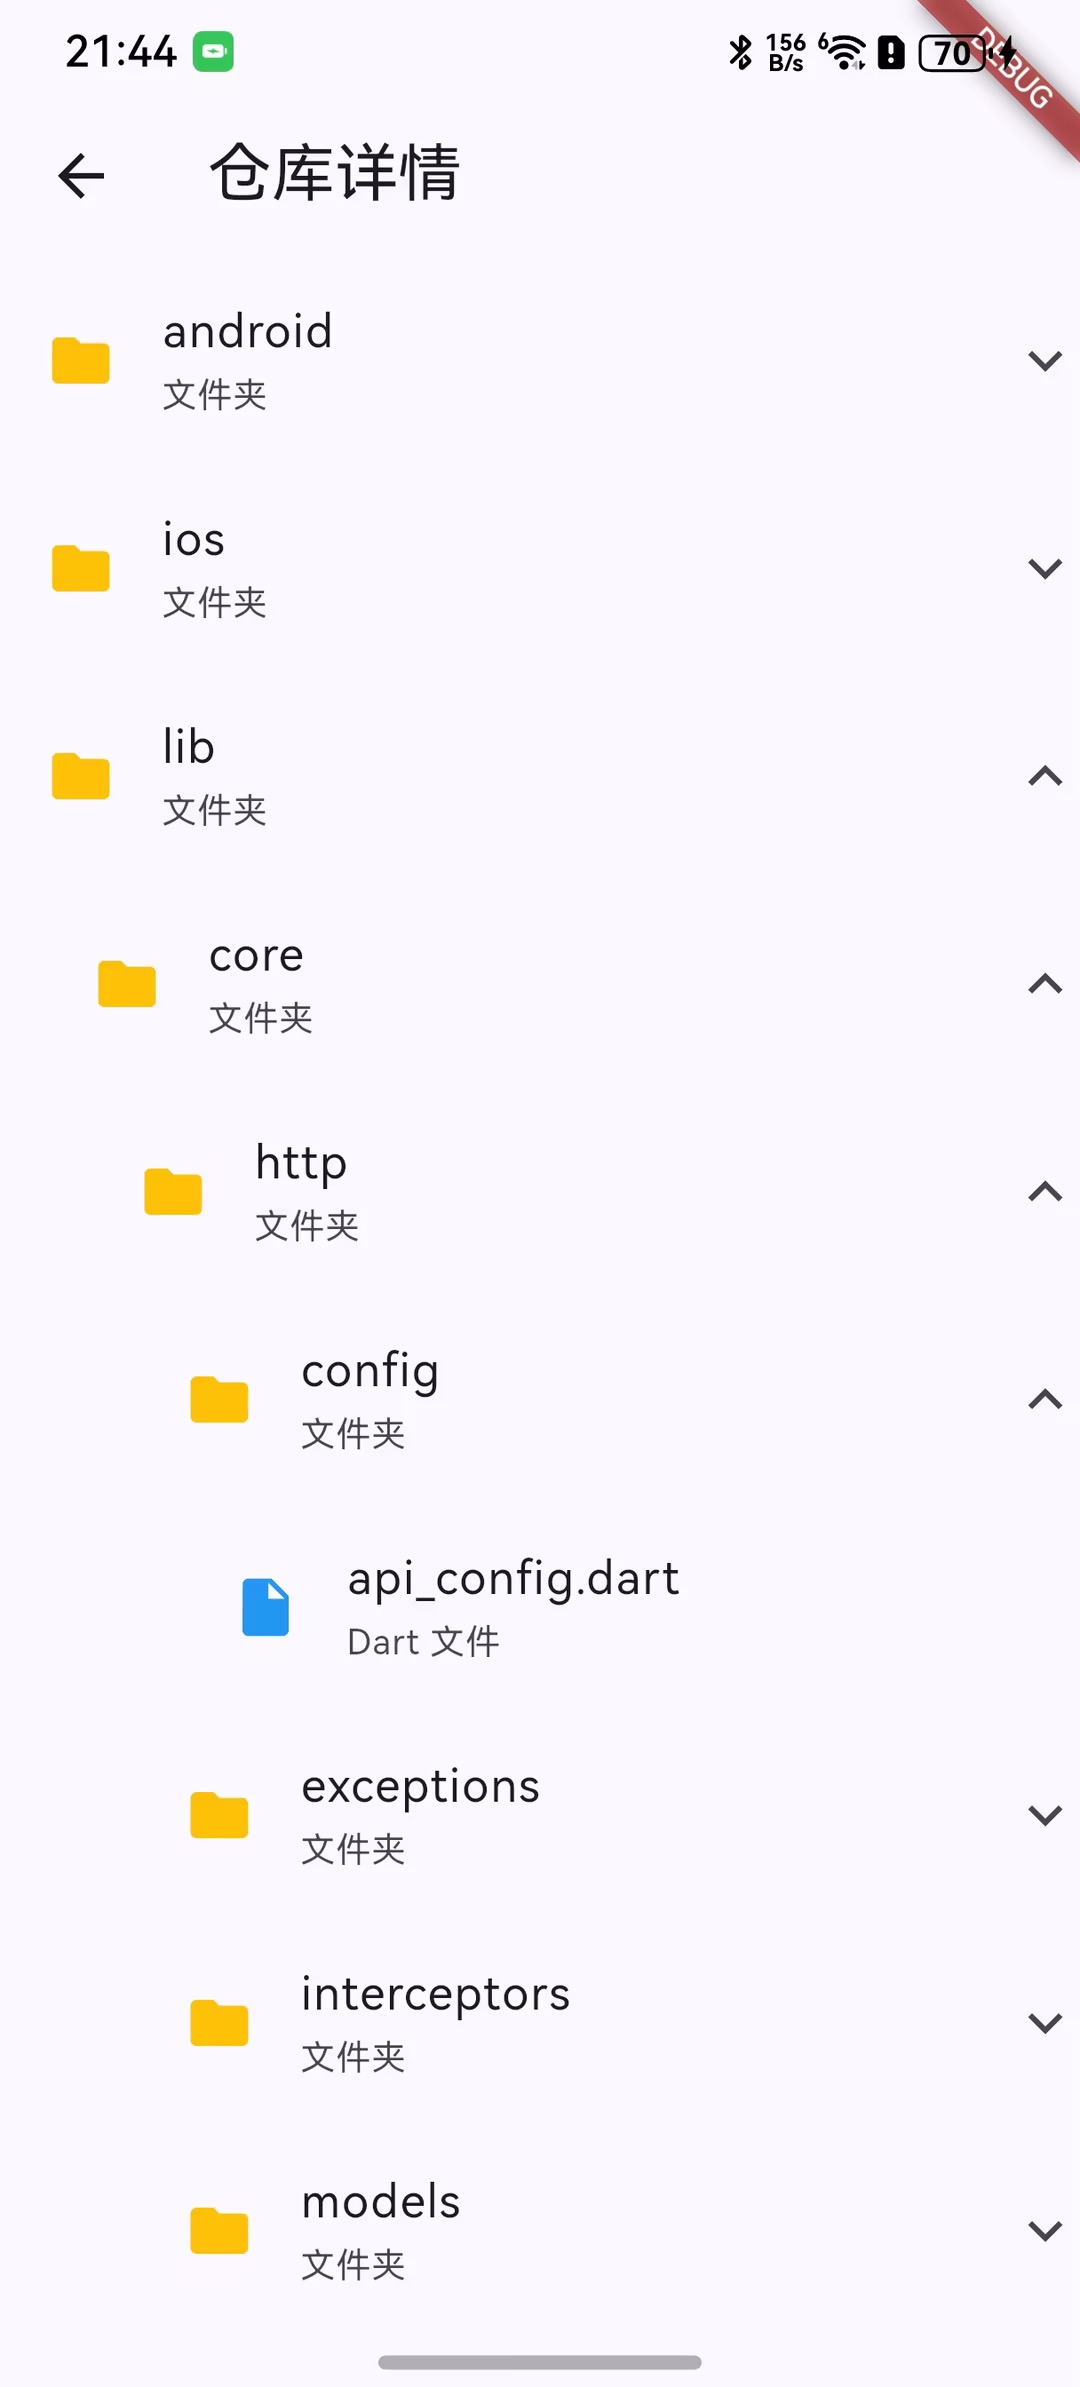
}二、文件夹递归
1、创建仓库列表
  /// 根页面 Scaffold,展示仓库树列表
  @override
  Widget build(BuildContext context) {
    return Scaffold(
      appBar: AppBar(title: Text('仓库详情')),
      body: ListView.builder(
        itemCount: _treeNodes.length,
        itemBuilder: (context, index) {
          return _buildTreeNode(_treeNodes[index]);
        },
      ),
    );
  }
2、创建单个树节点
/// 构建单个树节点(目录或文件)的展示项
  ///
  /// - 目录:展示可展开的图标与层级缩进
  /// - 文件:展示文件图标与类型描述
  /// 点击后调用 `_toggleExpand` 执行展开或跳转
  Widget _buildTreeNode(TreeNodeModel node) {
    return Column(
      crossAxisAlignment: CrossAxisAlignment.start,
      children: [
        // 节点本身
        ListTile(
          leading: Icon(
            node.data.isDirectory ? Icons.folder : Icons.insert_drive_file,
            color: node.data.isDirectory ? Colors.amber : Colors.blue,
          ),
          title: Text(node.data.name),
          subtitle: Text(
            node.data.isDirectory ? '文件夹' : node.data.fileType,
            style: TextStyle(fontSize: 12),
          ),
          trailing: node.data.isDirectory
              ? Icon(
            node.isExpanded ? Icons.expand_less : Icons.expand_more,
          ) : null,
          onTap: () async {
            print('点击: ${node.data.path}');
            // 处理点击事件
            await _toggleExpand(node);
          },
          contentPadding: EdgeInsets.only(left: 16.0 * (node.depth + 1)),
        ),
        // 子节点
        if (node.isExpanded && node.children != null)
          ...node.children!.map(_buildTreeNode),
      ],
    );
  }
3、处理点击事件 - 文件夹展开与递归
Future<void> _toggleExpand(TreeNodeModel node) async {
if (node.data.isDirectory) {
// 首次展开目录:先标记展开,再拉取该目录的子树(递归 + 指定路径)
if (!node.isExpanded && node.children == null) {
setState(() {
_treeNodes = _updateNode(
_treeNodes,
node.data.path,
(current) => current.copyWith(isExpanded: true),
);
});
final list = await _apiService.getReposDetail(
owner: widget.owner,
repo: widget.repo,
sha: widget.sha,
recursive: 1,
filePath: node.data.path,
);
final children = TreeNodeModel.buildTree(list, node.data.path);
setState(() {
_treeNodes = _updateNode(
_treeNodes,
node.data.path,
(current) => current.copyWith(children: children),
);
});
return;
}
// 非首次展开:仅切换展开/收起
setState(() {
_treeNodes = _updateNode(
_treeNodes,
node.data.path,
(current) => current.copyWith(isExpanded: !current.isExpanded),
);
});
return;
}
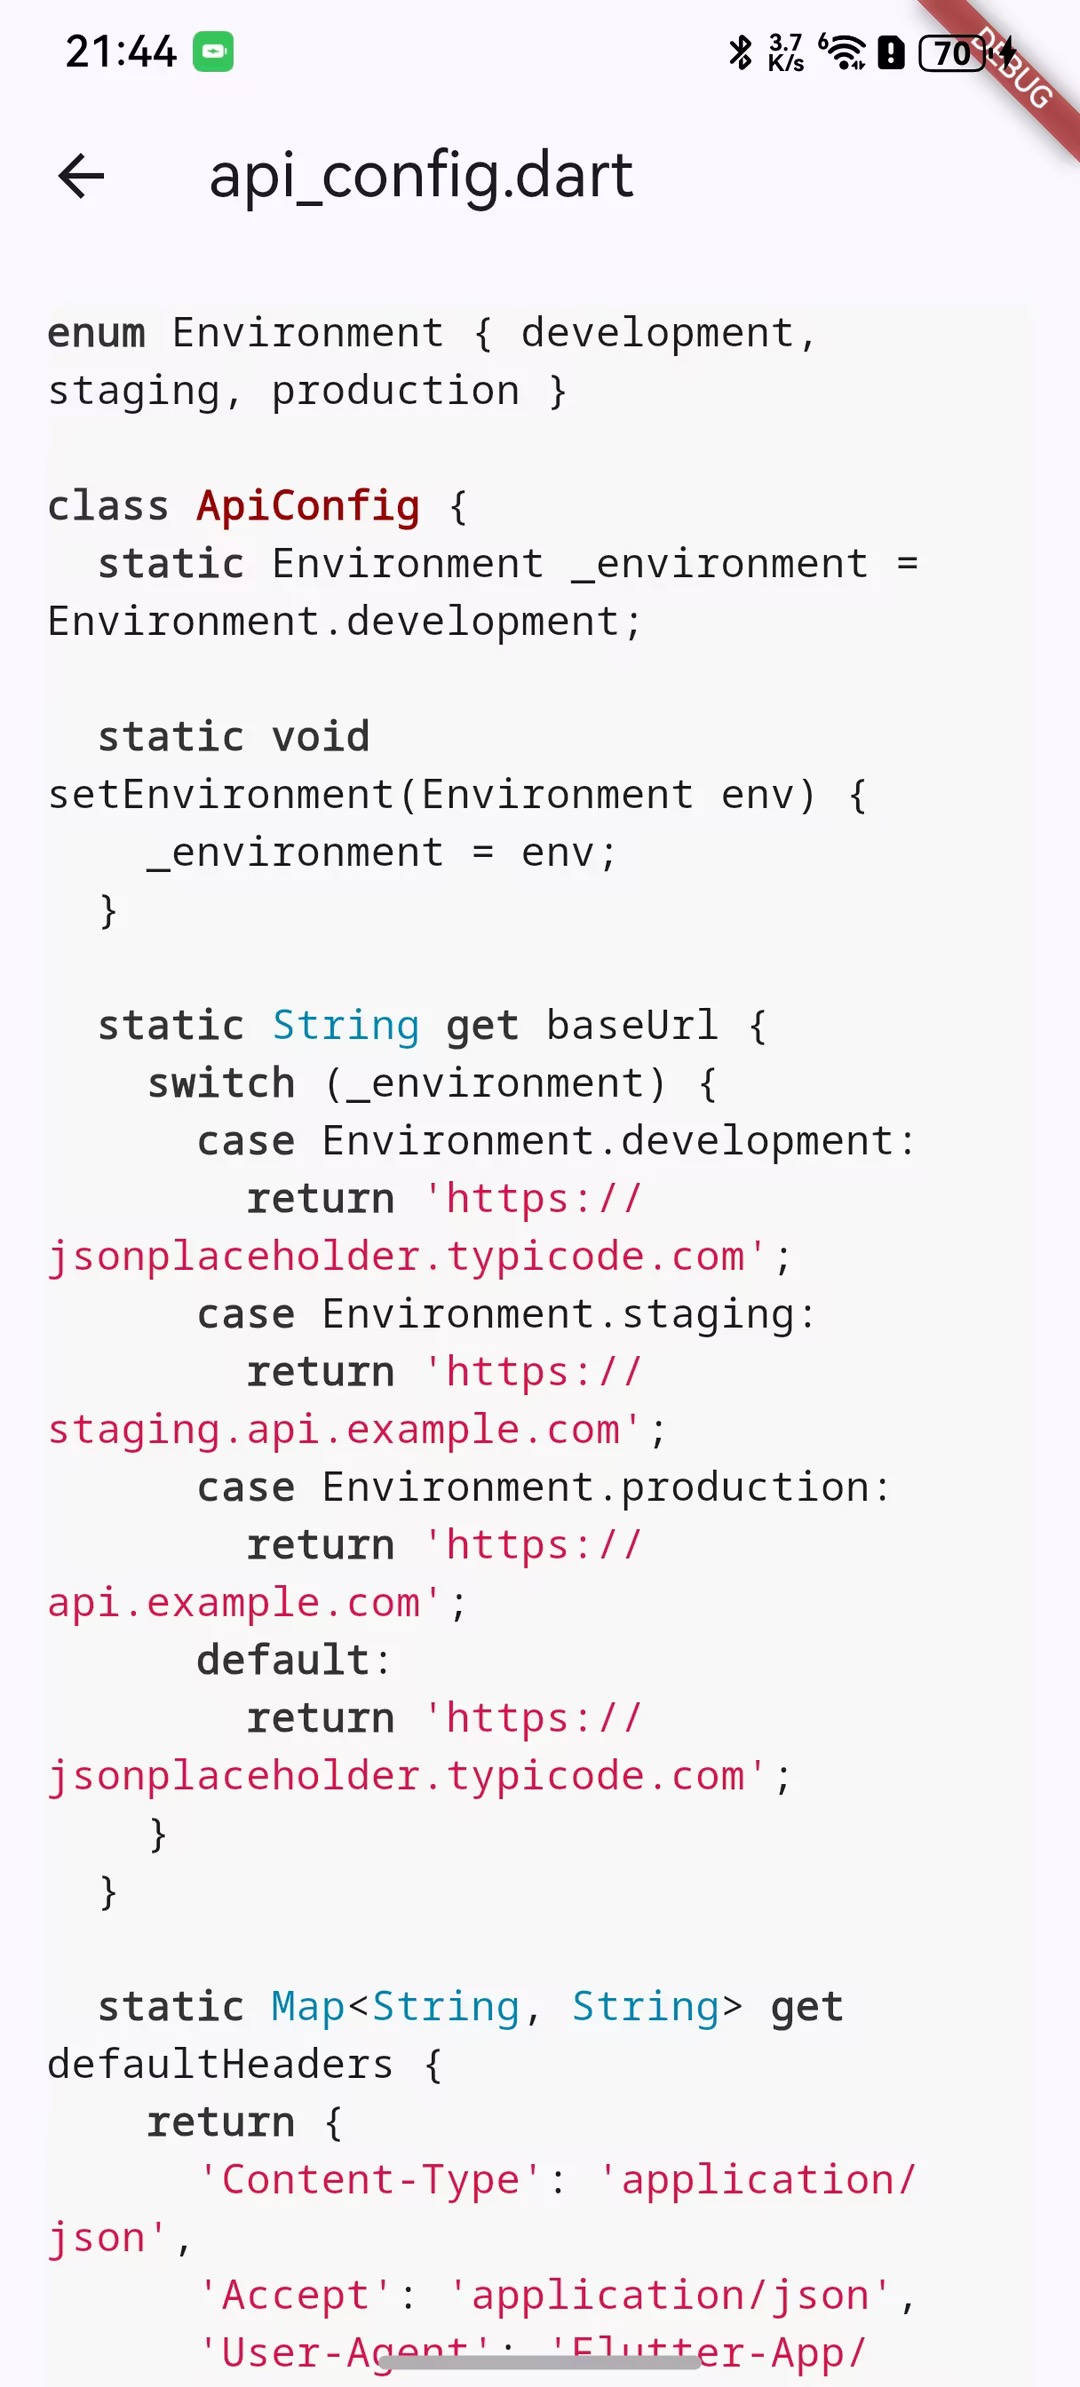
}三、文件详情
上述步骤只处理了文件夹类型,继续在_toggleExpand处理其他类型的文件
1、获取单个文件
// 文件:根据扩展名路由到不同查看页,并做内容兜底(Base64/下载)
      final ext = node.data.name.split('.').last.toLowerCase();
      final content = await _apiService.getFileContent(
        owner: widget.owner,
        repo: widget.repo,
        path: node.data.path,
        ref: widget.sha,
      );
2、根据后缀名判断是否是图片,如果是图片跳转到图片页面
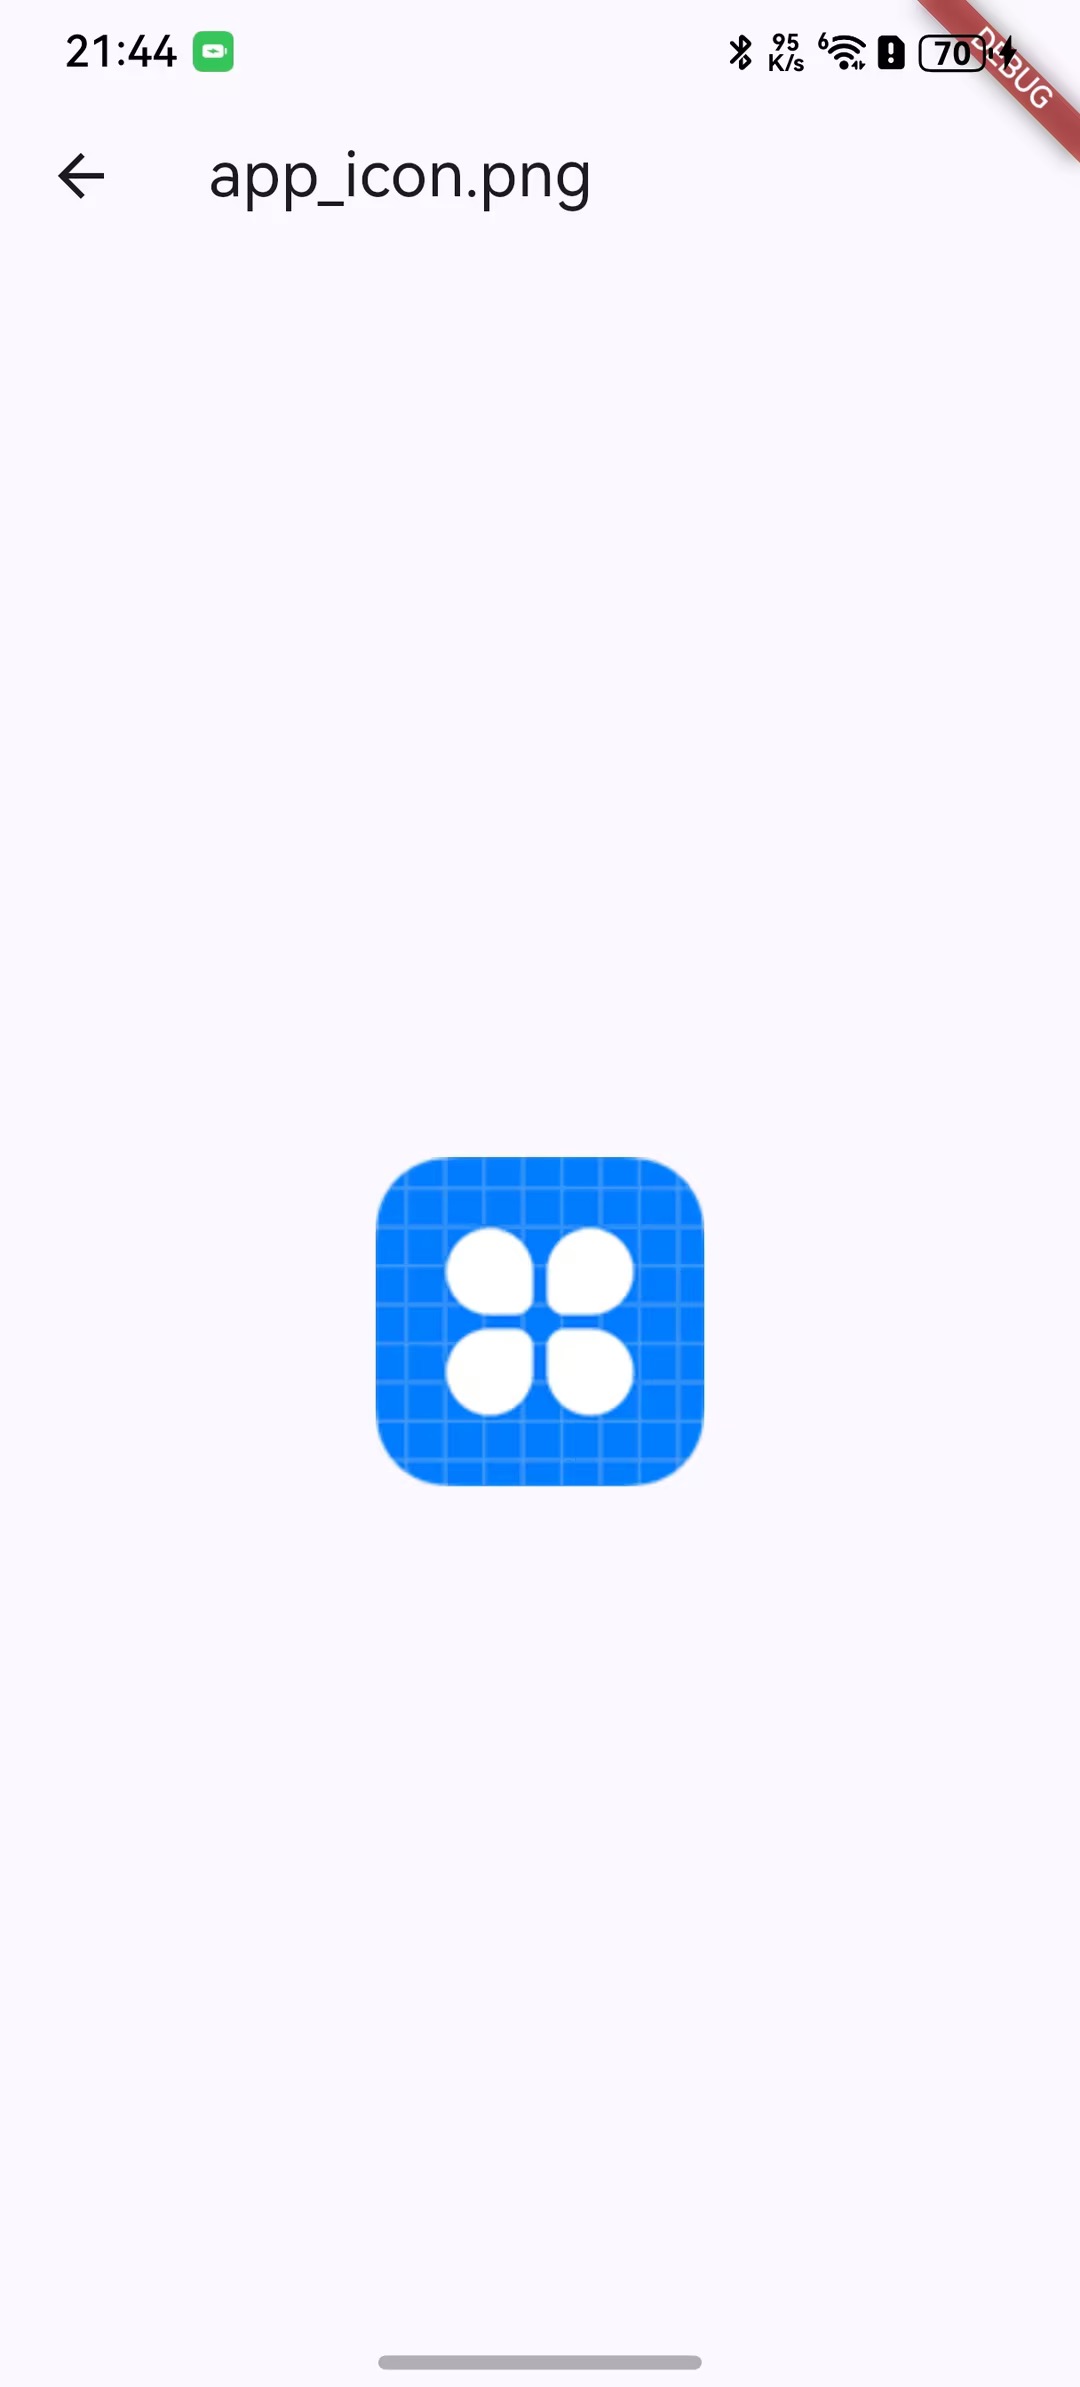
if ({'png', 'jpg', 'jpeg', 'gif'}.contains(ext)) {
        // 图片优先使用 Base64 字节;若为空则使用 download_url 下载或直接展示
        var bytes = content.bytes;
        if (bytes.isEmpty && (content.downloadUrl ?? '').isNotEmpty) {
          try {
            bytes = await _apiService.downloadBytesFromUrl(content.downloadUrl!);
          } catch (_) {}
        }
        if (!mounted) return;
        Navigator.of(context).push(
          MaterialPageRoute(
            builder: (_) => ImageViewerPage(
              title: node.data.name,
              bytes: bytes.isNotEmpty ? bytes : null,
              url: bytes.isEmpty ? content.downloadUrl : null,
            ),
          ),
        );
        return;
      }
import 'dart:typed_data';
import 'package:flutter/material.dart';

class ImageViewerPage extends StatelessWidget {
  final String title;
  final Uint8List? bytes;
  final String? url;

  const ImageViewerPage({super.key, required this.title, this.bytes, this.url});

  @override
  Widget build(BuildContext context) {
    return Scaffold(
      appBar: AppBar(title: Text(title)),
      body: Center(
        child: InteractiveViewer(
          minScale: 0.5,
          maxScale: 4.0,
          child: bytes != null
              ? Image.memory(bytes!, fit: BoxFit.contain)
              : (url != null
                  ? Image.network(url!, fit: BoxFit.contain)
                  : const SizedBox.shrink()),
        ),
      ),
    );
  }
}
其他类型则当文本处理
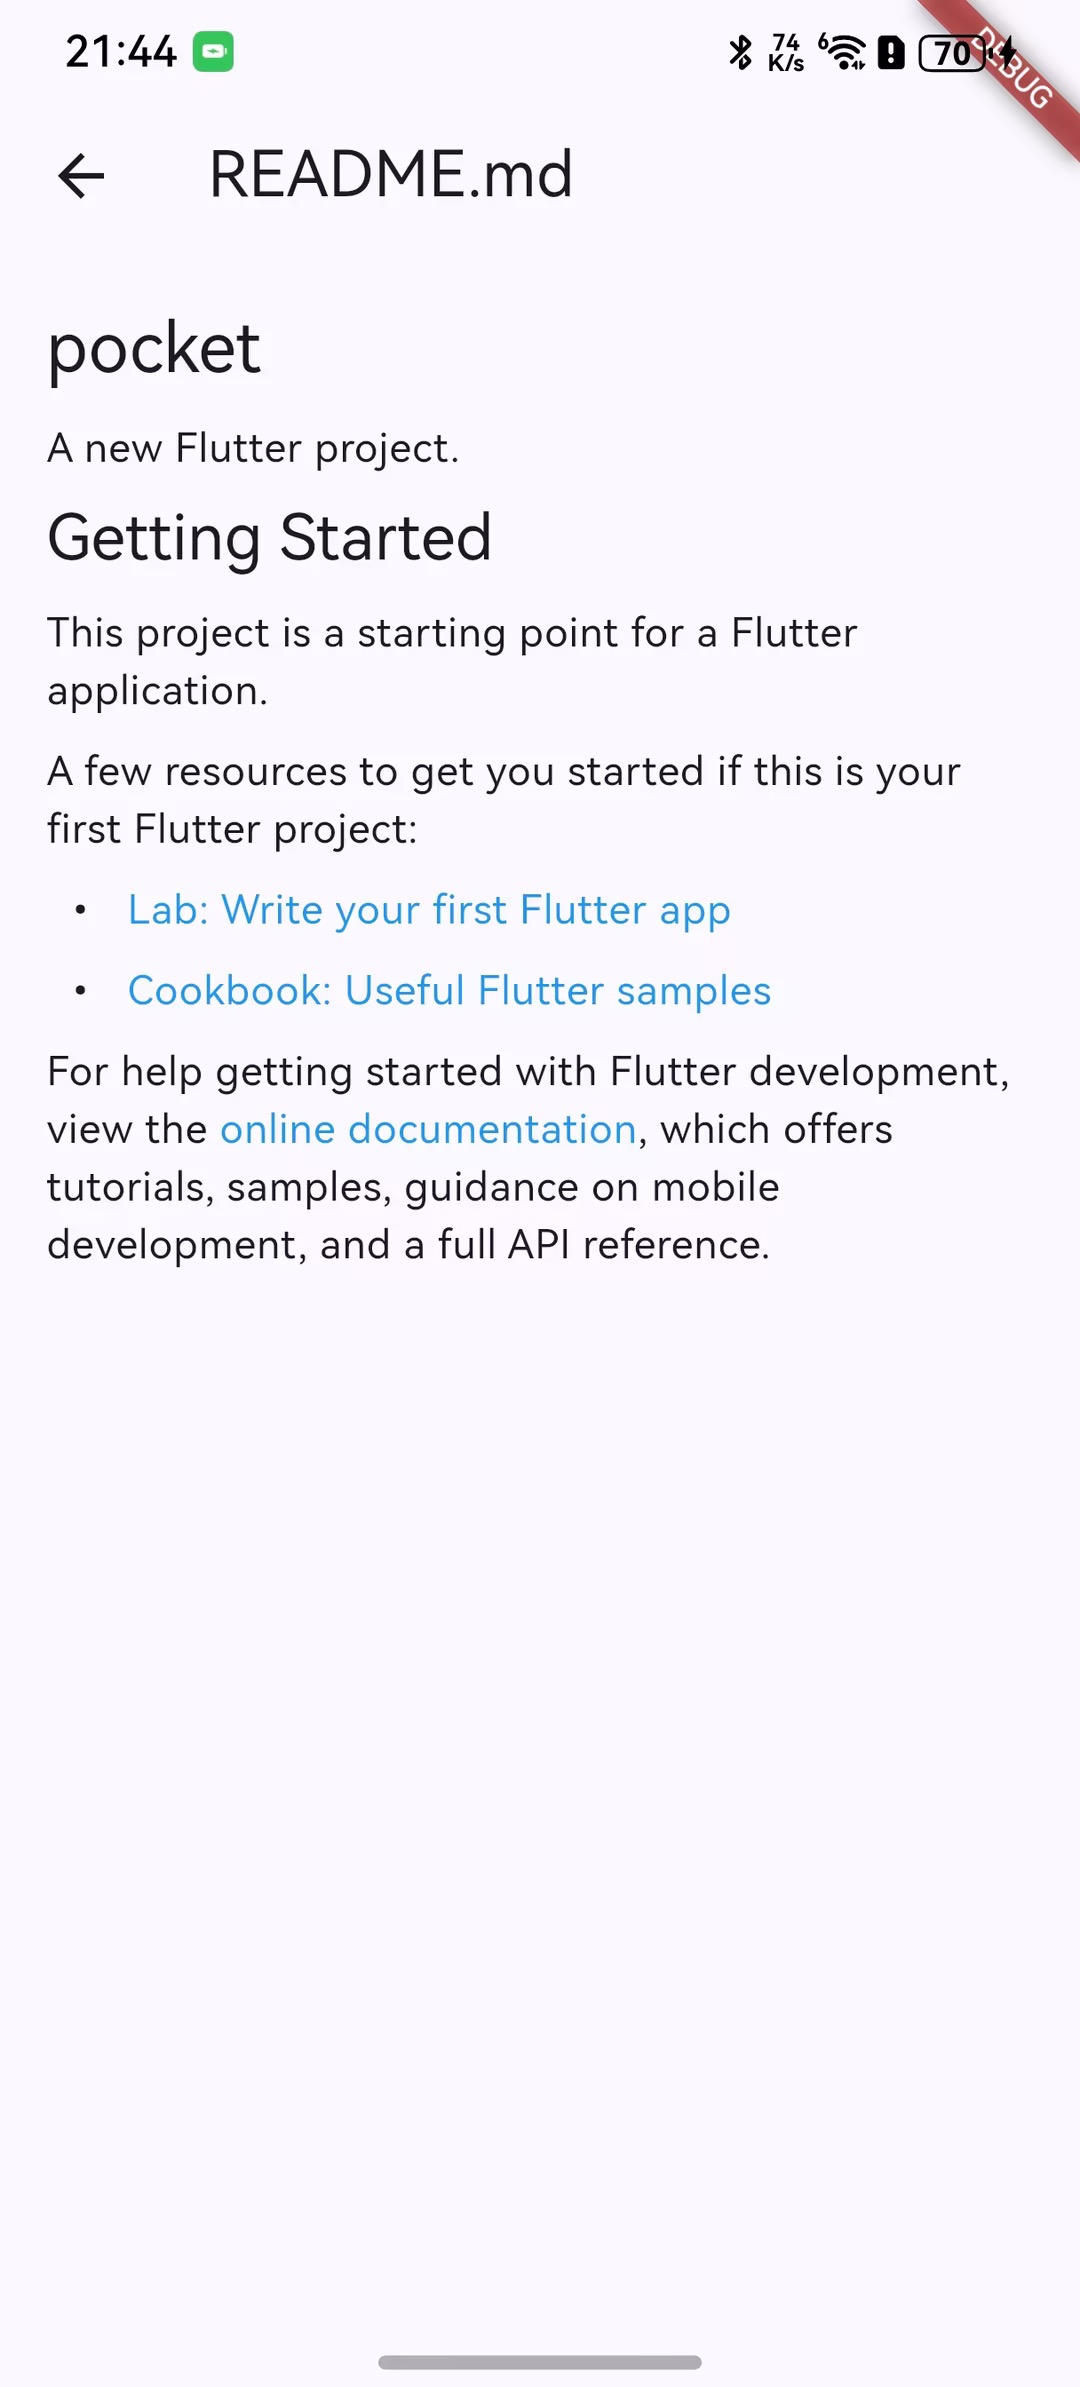
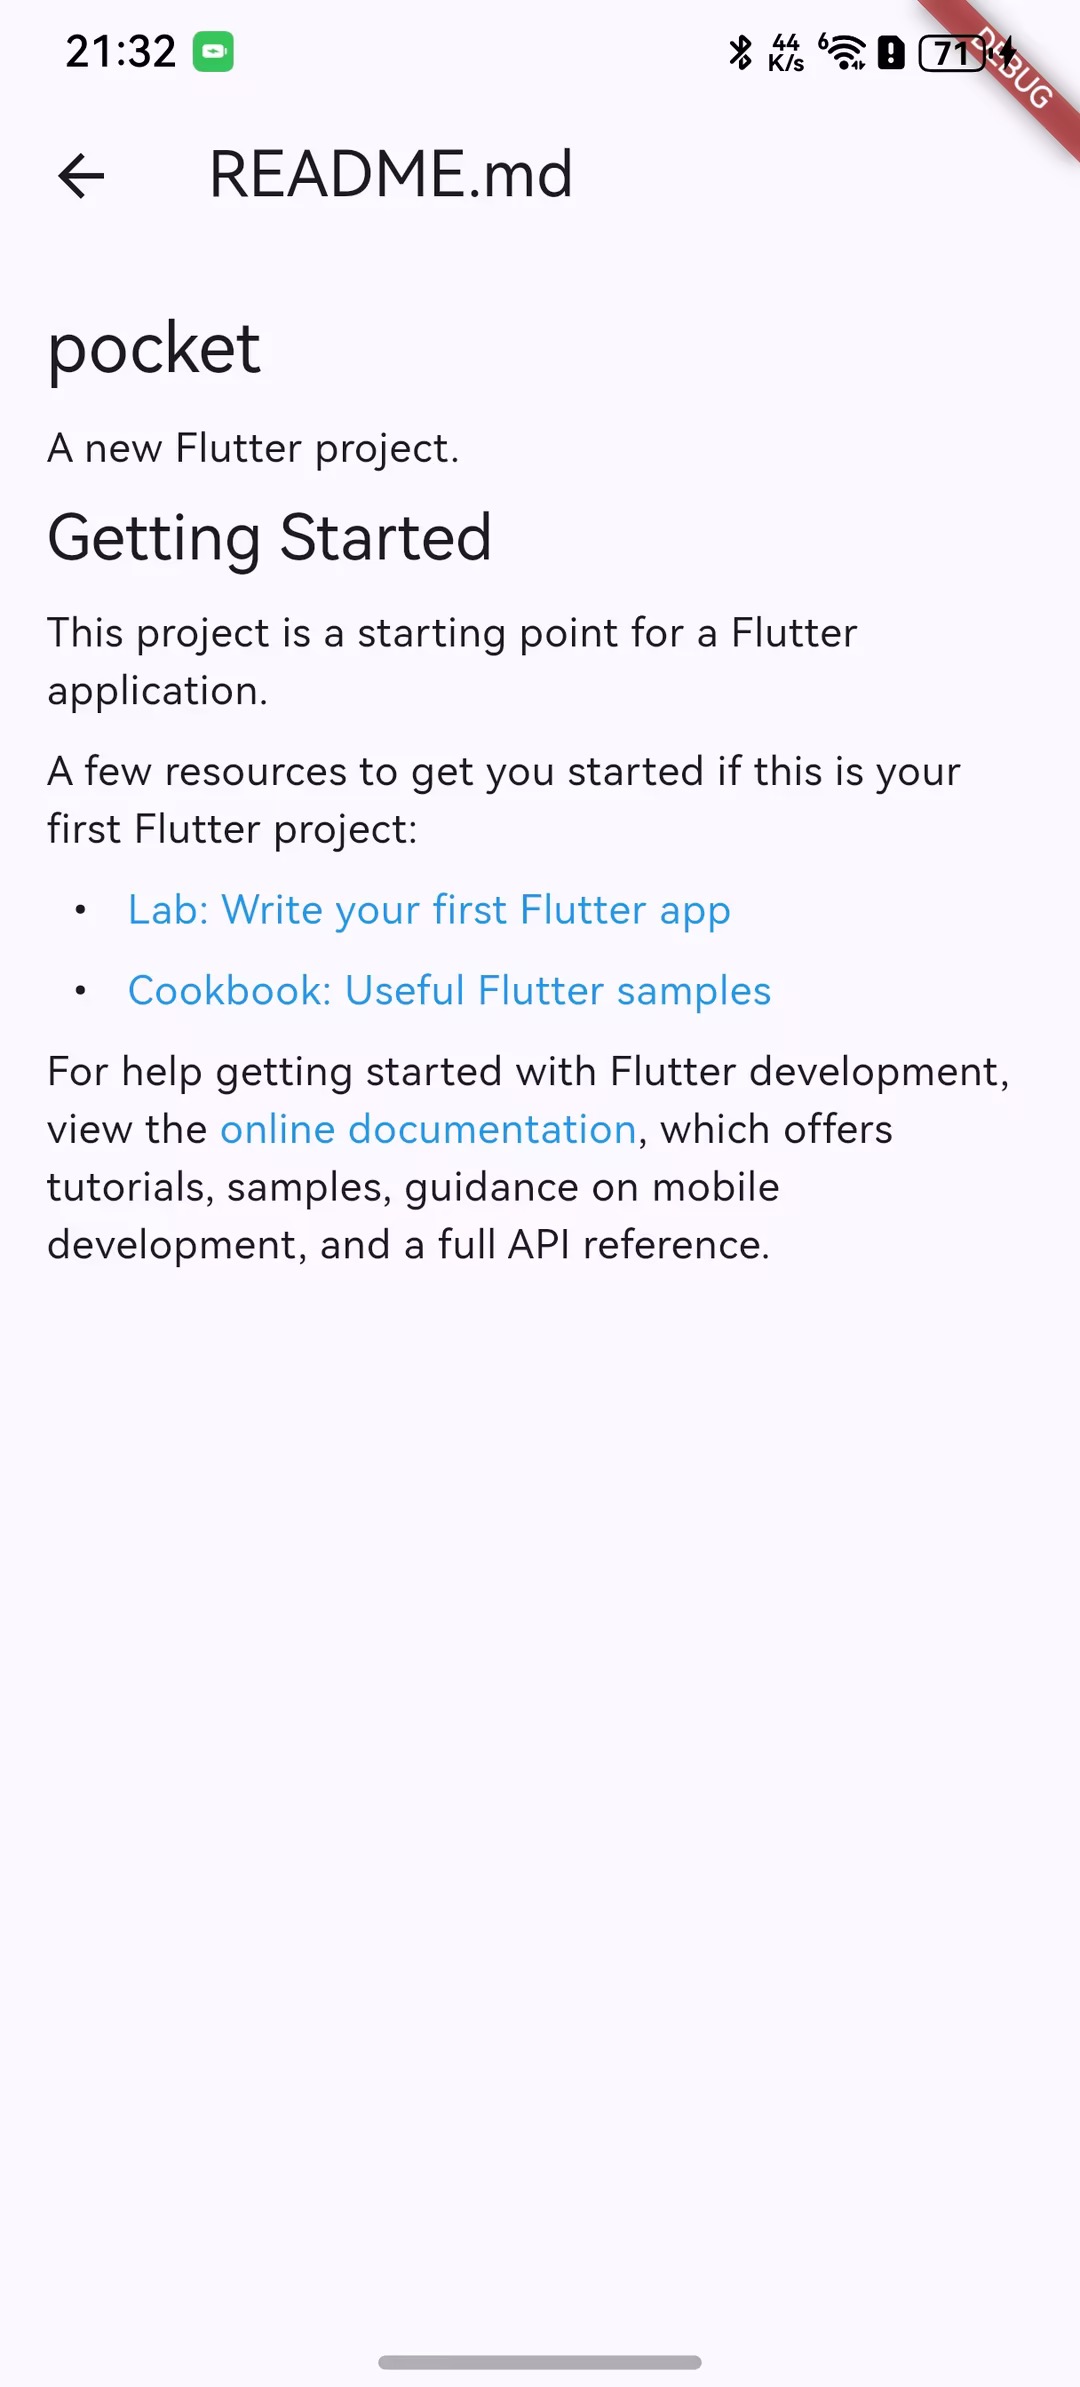
四、markdown解析
学习大纲提了一个挑战:需要实现一个Markdown渲染器,但是小鱼从不会为难自己(换言之对技术没太高追求),于是找呀找,找到了一个插件,小鱼就直接使用插件实现了该功能 😏
  # 用于渲染Markdown格式的文本
  flutter_markdown: ^0.6.18
import 'package:flutter/material.dart';
import 'package:flutter_markdown/flutter_markdown.dart';
class MarkdownViewerPage extends StatelessWidget {
final String title;
final String markdown;
const MarkdownViewerPage({super.key, required this.title, required this.markdown});
@override
Widget build(BuildContext context) {
return Scaffold(
appBar: AppBar(title: Text(title)),
body: Markdown(
data: markdown,
styleSheet: MarkdownStyleSheet.fromTheme(Theme.of(context)),
),
);
}
}
效果如下图:
五、代码高亮
同markdown一样,小鱼也找到了代码高亮的插件
flutter_highlight: ^0.7.0import 'package:flutter/material.dart';
import 'package:flutter_highlight/flutter_highlight.dart';
import 'package:flutter_highlight/themes/github.dart';
class TextViewerPage extends StatelessWidget {
final String title;
final String content;
final String? language;
const TextViewerPage({
super.key,
required this.title,
required this.content,
this.language,
});
@override
Widget build(BuildContext context) {
final mono = Theme.of(context).textTheme.bodyMedium?.copyWith(
fontFamily: 'monospace',
fontSize: 14,
) ?? const TextStyle(fontFamily: 'monospace', fontSize: 14);
return Scaffold(
appBar: AppBar(title: Text(title)),
body: SingleChildScrollView(
padding: const EdgeInsets.all(16),
child: language == null
? SelectableText(content, style: mono)
: HighlightView(
content,
language: language!,
theme: githubTheme,
padding: EdgeInsets.zero,
textStyle: mono,
),
),
);
}
}
效果如下:
希望下一篇小鱼能明白flutter_markdown以及flutter_highlight的实现原理,咱们下篇见。

社区规范:仅讨论OpenHarmony相关问题。
更多推荐
 37
37 0
0- 0


 已为社区贡献12条内容

所有评论(0)