基于 OpenHarmony Matisse 三方件开发指南
Matisse 组件是一个图片选择框架,实现图片的选择及使用相机进行拍摄,最后将选择或拍摄的照片显示在 ability 中(目前初版还未实现所有功能)。
1. Matisse 组件功能介绍
1.1. 功能介绍:
Matisse 组件是一个图片选择框架,实现图片的选择及使用相机进行拍摄,最后将选择
或拍摄的照片显示在 ability 中(目前初版还未实现所有功能)。
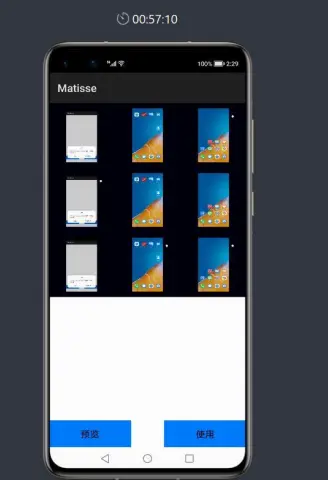
1.2. 模拟器上运行效果:
2. Matisse 使用方法
2.1. 新建工程,增加组件 Har 包依赖
在应用模块中添加 HAR,只需要将 Matisse.har 复制到 entry\libs 目录下即可(由于 build.gradle
中已经依赖的 libs 目录下的*.har,因此不需要在做修改)。
2.2. 修改主页面代码成为请求方
在 MainAbilitySlice 中 构 造 Intent 以 及 包 含 Action 的 Operation 对 象 , 并 调 用
startAbilityForResult()方法发起请求。然后重写 onAbilityResult()回调方法,对请求结果进行处
理。
private void pickPicture() {
    Intent intent = new Intent();
      Operation operation = new Intent.OperationBuilder()
        .withAction("action.pick_pic")
        .withBundleName("com.example.matisse")
        .withAbilityName("com.example.matisse.MatisseAbility")
        .build();
    intent.setOperation(operation);
    startAbilityForResult(intent, REQ_CODE_PICK_PIC);
}
@Override
protected void onAbilityResult(int requestCode, int resultCode, Intent resultData)
{
    switch (requestCode) {
    case REQ_CODE_PICK_PIC:
    // Do something with result.
    ...
    return;
    default:
    ...
  }
}
3. Matisse 开发实现
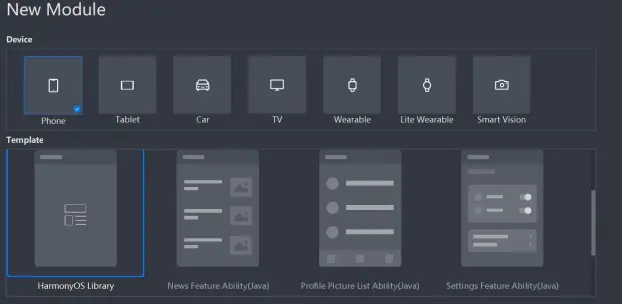
3.1. 新建一个 Module
新建一个 Module,类型选择 HarmonyOS Library,模块名为 Matisse,如图
3.2. 获得媒体库所有图片
新建一个 MatisseAbility 在其 slice 的 onStart 方法中申请权限并配制 config.json:
@Override
public void onStart(Intent intent) {
super.onStart(intent);
super.setUIContent(ResourceTable.Layout_ability_matisse);
String[] per={"ohos.permission.READ_USER_STORAGE"};
requestPermissionsFromUser(per,0);
}
为了获得媒体库所有图片(的 URI),需要定义一个 DataAbilityHelper,并设置 resultSet,代码如下:
DataAbilityHelper helper = DataAbilityHelper.creator(this);
try {
ResultSet resultSet =
helper.query(AVStorage.Images.Media.EXTERNAL_DATA_ABILITY_URI, null, null);
while (resultSet != null && resultSet.goToNextRow()) {
int mid =
resultSet.getInt(resultSet.getColumnIndexForName(AVStorage.Images.Media.ID))
;
Uri uri =
Uri.appendEncodedPathToUri(AVStorage.Images.Media.EXTERNAL_DATA_ABILITY_URI,
"" + mid);
FileDescriptor fileDescriptor = null;
fileDescriptor = helper.openFile(uri, "r");
ImageSource.DecodingOptions decodingOptions = new ImageSource.DecodingOptions();
decodingOptions.desiredSize = new Size(180, 320);
ImageSource imageSource = ImageSource.create(fileDescriptor, null);
PixelMap pixelMap =
imageSource.createThumbnailPixelmap(decodingOptions, true);
uris.add(new UriModel(uri, pixelMap));
}
} catch (DataAbilityRemoteException | FileNotFoundException e) {
e.printStackTrace();
}
由于 Listcontainer 目前不支持 grid 布局,所以取得所有图片的 uri 后对结果进行分组:
if(uris.size()>3) {
List<List<UriModel>> newList = arraySplitUtil.splistList(uris, 3);
for (List<UriModel> uriModel : newList) {
nestedLists.add(new NestedList(uriModel));
}
}else {
nestedLists.add(new NestedList(uris));
}
3.3. 新建 Listconainer 并使用嵌套方式实现相册视图:
listContainer = (ListContainer)
findComponentById(ResourceTable.Id_galley);
UltimateProvider ultimateProvider=new
UltimateProvider(nestedLists,getContext());
listContainer.setItemProvider(ultimateProvider);
这里使用了三方件 UltimateProvider 减少代码量编写。
3.4. 点击事件和回调处理
使用 DependentLayout 在图片布局右上方加上 checkbox, 代码中 id_icon 为图片:
checkbox=(Checkbox)findComponentById(ResourceTable.Id_checked);
checkbox.setChecked(false);
icon.setClickedListener(new Component.ClickedListener() {
@Override
public void onClick(Component component) {
checkbox.toggle();
// getModel().getUri()
}
});
checkbox.setCheckedStateChangedListener((view, state) -> {
if (state) {
MatisseAbilitySlice.selectedSet.add(getModel());
}else {
MatisseAbilitySlice.selectedSet.remove(getModel());
}
});
回调:在 config.json 中增加"action.pick_pic"并在 MatisseAbility 中添加如下路由:
addActionRoute("action.pick_pic", MatisseAbilitySlice.class.getName());
新建使用按钮,并增加如下代码:
use.setClickedListener(new Component.ClickedListener() {
@Override
public void onClick(Component component) {
if (selectedSet.size()==0){
return;
}
else {
Intent resultIntent = new Intent();
resultIntent.setParam("model", (Serializable) selectedSet);
// Intent resultIntent = new Intent();
setResult(resultIntent);
}
}
});
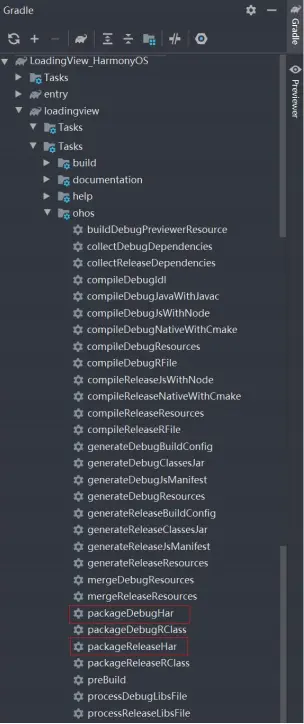
3.5. 编译 HAR 包
利用 Gradle 可以将 HarmonyOS Library 库模块构建为 HAR 包,构建 HAR 包的方法如下:
在 Gradle 构建任务中,双击 PackageDebugHar 或PackageReleaseHar 任务,构建 Debug 类型 或 Release 类型的 HAR。
待构建任务完成后,可以在工程目录中的 Matisse> bulid > outputs > har 目录中,获取生成的HAR 包。
码牛课堂也为了积极培养鸿蒙生态人才,让大家都能学习到鸿蒙开发最新的技术,针对一些在职人员、0基础小白、应届生/计算机专业、鸿蒙爱好者等人群,整理了一套纯血版鸿蒙(HarmonyOS Next)全栈开发技术的学习路线。大家可以进行参考学习:https://qr21.cn/FV7h05

①全方位,更合理的学习路径:
路线图包括ArkTS基础语法、鸿蒙应用APP开发、鸿蒙能力集APP开发、次开发多端部署开发、物联网开发等九大模块,六大实战项目贯穿始终,由浅入深,层层递进,深入理解鸿蒙开发原理!②多层次,更多的鸿蒙原生应用:
路线图将包含完全基于鸿蒙内核开发的应用,比如一次开发多端部署、自由流转、元服务、端云一体化等,多方位的学习内容让学生能够高效掌握鸿蒙开发,少走弯路,真正理解并应用鸿蒙的核心技术和理念。③实战化,更贴合企业需求的技术点:
学习路线图中的每一个技术点都能够紧贴企业需求,经过多次真实实践,每一个知识点、每一个项目,都是码牛课堂鸿蒙研发团队精心打磨和深度解析的成果,注重对学生的细致教学,每一步都确保学生能够真正理解和掌握。
为了能让大家更好的学习鸿蒙(HarmonyOS NEXT)开发技术,这边特意整理了《鸿蒙开发学习手册》(共计890页),希望对大家有所帮助:https://qr21.cn/FV7h05
《鸿蒙开发学习手册》:https://qr21.cn/FV7h05
如何快速入门:
- 基本概念
- 构建第一个ArkTS应用
- ……

开发基础知识:https://qr21.cn/FV7h05
- 应用基础知识
- 配置文件
- 应用数据管理
- 应用安全管理
- 应用隐私保护
- 三方应用调用管控机制
- 资源分类与访问
- 学习ArkTS语言
- ……

基于ArkTS 开发:https://qr21.cn/FV7h05
- Ability开发
- UI开发
- 公共事件与通知
- 窗口管理
- 媒体
- 安全
- 网络与链接
- 电话服务
- 数据管理
- 后台任务(Background Task)管理
- 设备管理
- 设备使用信息统计
- DFX
- 国际化开发
- 折叠屏系列
- ……

鸿蒙开发面试真题(含参考答案):https://qr21.cn/FV7h05

大厂鸿蒙面试题::https://qr18.cn/F781PH

鸿蒙开发面试大盘集篇(共计319页):https://qr18.cn/F781PH
1.项目开发必备面试题
2.性能优化方向
3.架构方向
4.鸿蒙开发系统底层方向
5.鸿蒙音视频开发方向
6.鸿蒙车载开发方向
7.鸿蒙南向开发方向


社区规范:仅讨论OpenHarmony相关问题。
更多推荐
 3
3 0
0- 0


 已为社区贡献87条内容

所有评论(0)