Windows下使用VirtualBox与Ubuntu编译OpenHarmony
笔者Windows系统版本为Windows 11
下载
在Windows上编译OpenHarmony系统,有两种方式:一种是使用WSL安装Ubuntu,另一种是使用虚拟机。这里选用免费的VirtualBox来实现第二种方式,Ubuntu的系统版本为20.04.6。
安装VirtualBox前需要先安装microsoft visual c++ 2019 redistributable package,安装过程比较简单这里略过。下面是需要在Windows上下载的软件:
-
VirtualBox:https://www.virtualbox.org/wiki/Downloads
-
Ubuntu镜像:https://releases.ubuntu.com/20.04.6/ubuntu-20.04.6-desktop-amd64.iso
虚拟机
创建虚拟机
在VirtualBox主界面新建并使用专家模式:
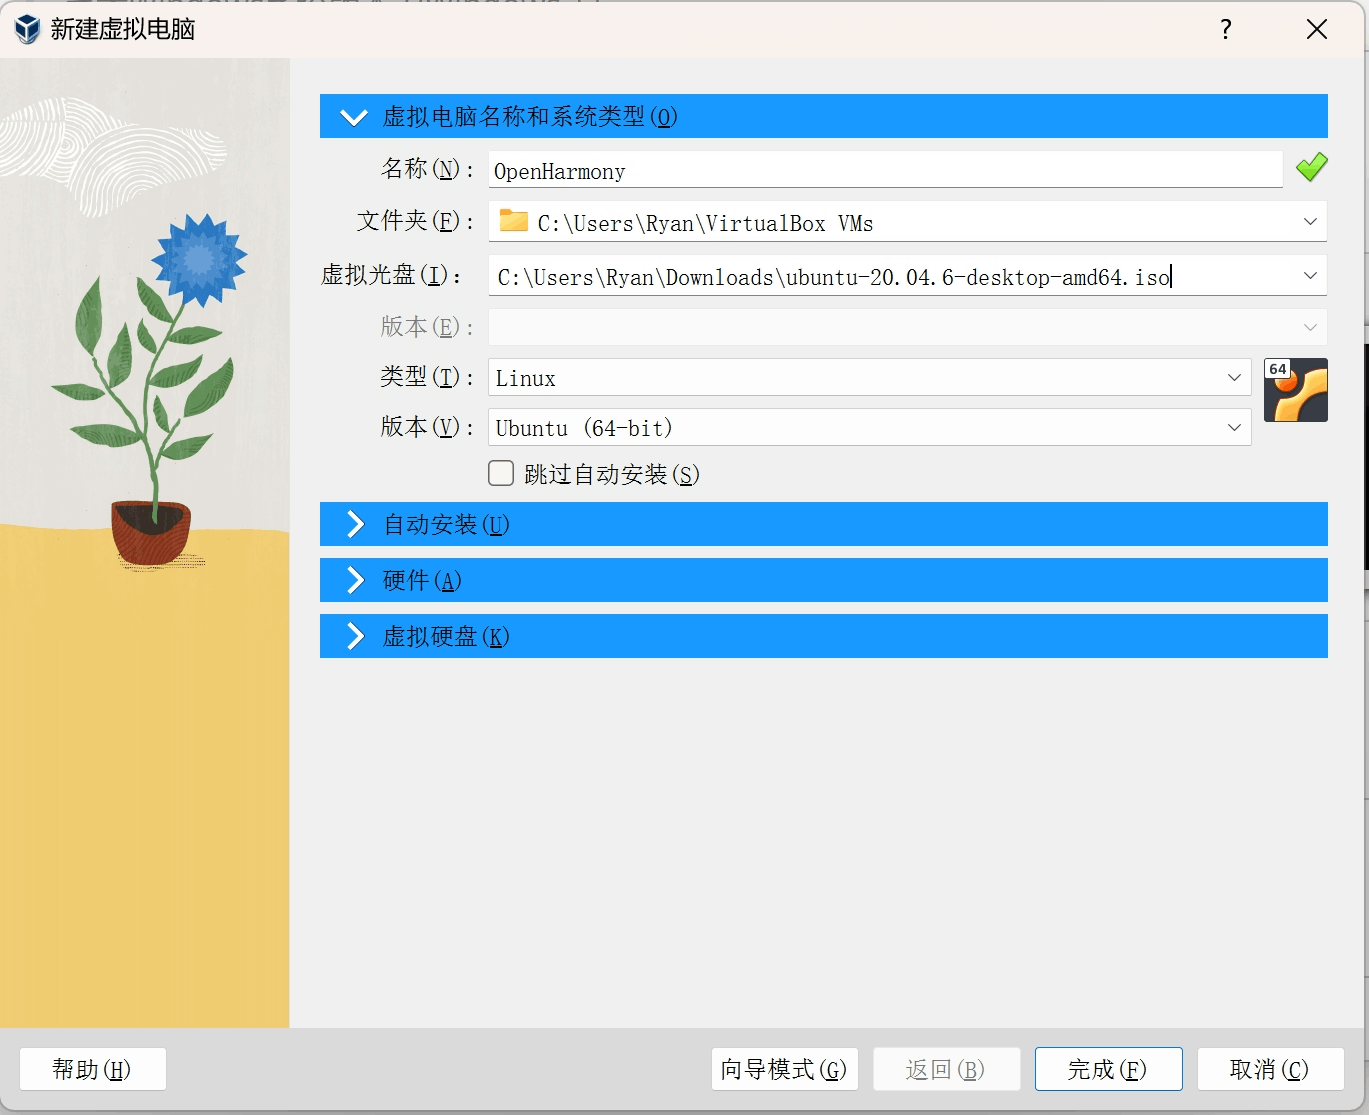
虚拟电脑名称和系统类型
在此栏目中,注意虚拟光盘选择下载的Ubuntu镜像。
自动安装
在此栏目中,注意修改用户名和密码,并记住,其他默认。
硬件
在此栏目中,内存建议给10G及以上,不然初次编译ArkUI大概率会由于内存不足报错;处理器数量尽量多给,提高编译速度。
虚拟硬盘
在此栏目中,虚拟硬盘大小建议50G以上,其余保持默认。
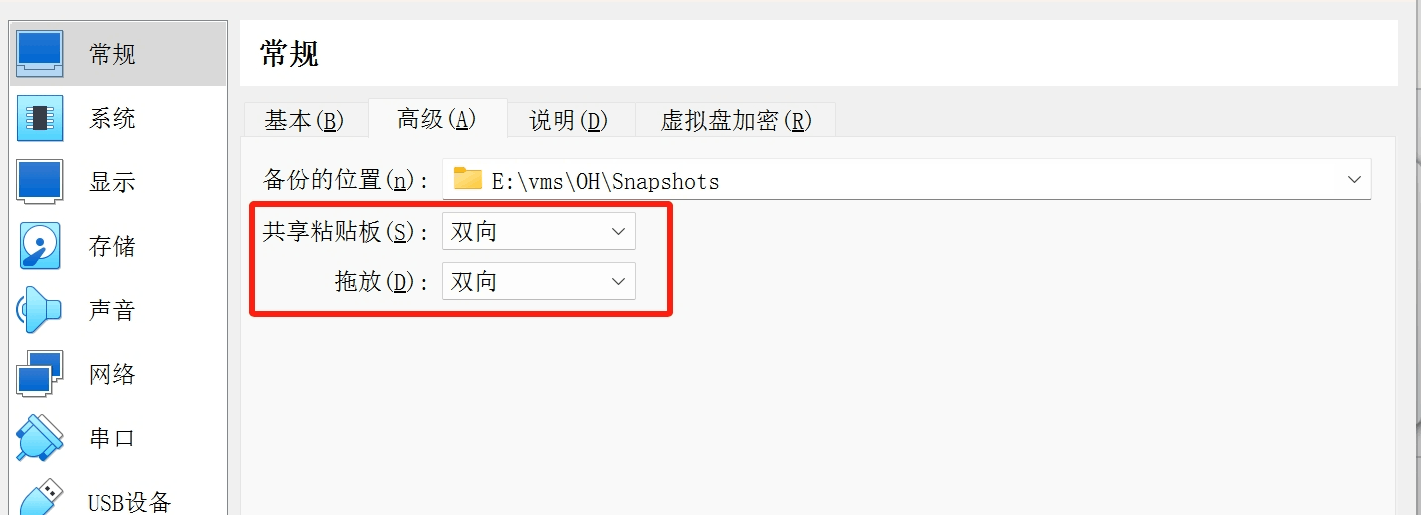
复制粘贴
默认情况下,Windows和虚拟机之间是无法直接进行复制粘贴的,需要进行如下操作:
- 创建完虚拟机后,右键进入设置,将共享粘贴板和拖放都改为双向
-
启动虚拟机,开机完成后,在虚拟机内执行指令:
sudo apt install virtualbox-guest-utils virtualbox-guest-x11 virtualbox-guest-dkms由于此时还不能粘贴,只能手动输入,完成后重启虚拟机即可。如果在执行指令时遇到:
xxx is not in the sudoers file. This incident will be reported.可以选择将用户(创建虚拟机时,自动安装的用户)加入sudoers,或者在执行指令前先执行
su,然后输入在创建虚拟机时设置的密码,以root来执行指令
编译OpenHarmony
以下操作均需要在Ubuntu虚拟机中执行。如果执行指令遇到xxx is not in the sudoers file错误可以参考复制粘贴一节通过su以root运行
安装库和工具集
使用如下apt-get命令安装后续操作所需的库和工具:
sudo apt-get update; sudo apt-get install binutils; sudo apt-get install binutils-dev; sudo apt-get install git; sudo apt-get install git-lfs; sudo apt-get install gnupg; sudo apt-get install flex; sudo apt-get install bison; sudo apt-get install gperf; sudo apt-get install build-essential; sudo apt-get install zip; sudo apt-get install curl; sudo apt-get install zlib1g-dev; sudo apt-get install gcc-multilib; sudo apt-get install g++-multilib; sudo apt-get install libc6-dev-i386; sudo apt-get install libc6-dev-amd64; sudo apt-get install lib32ncurses5-dev; sudo apt-get install x11proto-core-dev; sudo apt-get install libx11-dev; sudo apt-get install lib32z1-dev; sudo apt-get install ccache; sudo apt-get install libgl1-mesa-dev; sudo apt-get install libxml2-utils; sudo apt-get install xsltproc; sudo apt-get install unzip; sudo apt-get install m4; sudo apt-get install bc; sudo apt-get install gnutls-bin; sudo apt-get install python3.9; sudo apt-get install python3-pip; sudo apt-get install ruby; sudo apt-get install genext2fs; sudo apt-get install device-tree-compilersudo apt-get install make; sudo apt-get install libffi-dev; sudo apt-get install e2fsprogs; sudo apt-get install pkg-config; sudo apt-get install perl; sudo apt-get install openssl; sudo apt-get install libssl-dev; sudo apt-get install libelf-dev; sudo apt-get install libdwarf-dev; sudo apt-get install u-boot-tools; sudo apt-get install mtd-utils; sudo apt-get install cpio; sudo apt-get install doxygen; sudo apt-get install liblz4-tool; sudo apt-get install openjdk-8-jre; sudo apt-get install gcc; sudo apt-get install g++; sudo apt-get install texinfo; sudo apt-get install dosfstools; sudo apt-get install mtools; sudo apt-get install default-jre; sudo apt-get install default-jdk; sudo apt-get install libncurses5; sudo apt-get install apt-utils; sudo apt-get install wget; sudo apt-get install scons; sudo apt-get install python3.9-distutils; sudo apt-get install tar; sudo apt-get install rsync; sudo apt-get install git-core; sudo apt-get install libxml2-dev; sudo apt-get install lib32z-dev; sudo apt-get install grsync; sudo apt-get install xxd; sudo apt-get install libglib2.0-dev; sudo apt-get install libpixman-1-dev; sudo apt-get install kmod; sudo apt-get install jfsutils; sudo apt-get install reiserfsprogs; sudo apt-get install xfsprogs; sudo apt-get install squashfs-tools; sudo apt-get install pcmciautils; sudo apt-get install quota; sudo apt-get install ppp; sudo apt-get install libtinfo-dev; sudo apt-get install libtinfo5; sudo apt-get install libncurses5-dev; sudo apt-get install libncursesw5; sudo apt-get install libstdc++6; sudo apt-get install gcc-arm-none-eabi; sudo apt-get install vim; sudo apt-get install ssh; sudo apt-get install locales; sudo apt-get install libxinerama-dev; sudo apt-get install libxcursor-dev; sudo apt-get install libxrandr-dev; sudo apt-get install libxi-dev
随着OpenHarmony版本不断迭代,需要的库和工具可能会有出入,最新的指令可以参考:https://gitee.com/openharmony/docs/blob/master/zh-cn/device-dev/quick-start/quickstart-pkg-install-package.md
由于我们使用的是Ubuntu20及以上版本,而gcc-multilib和gcc-arm-linux-gnueabi互斥,因此在指令中删除了gcc-arm-linux-gnueabi。
执行过程中需要多次点击回车以确认安装所需的库和工具,如果觉得麻烦,可以将指令中重复的sudo apt-get install去掉。
检查python版本
Python要求安装Python 3.8及以上版本,因此可以通过如下指令检查下Python版本:
python --version
如果版本不满足要求,可以参考https://gitee.com/openharmony/docs/blob/master/zh-cn/device-dev/quick-start/quickstart-pkg-install-package.md 中python的部分安装对应版本的python。
获取源码
执行prebuilts
在源码根目录下执行prebuilts脚本,安装编译器及二进制工具。
bash build/prebuilts_download.sh
编译
以RK3568为例:
./build.sh --product-name rk3568 --ccache
共享文件
默认情况下,编译后的镜像Windows无法访问,需要通过配置Samba服务器来共享文件。
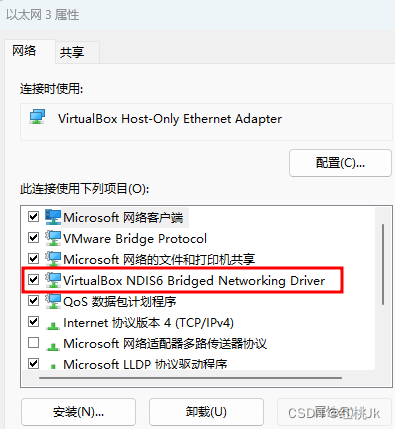
- 首先在Windows中,保证网络配置中对允许VirtualBox使用网络
- 关闭虚拟机后,在VirtualBox中追加一个新网卡

-
启动虚拟机后,在虚拟机中安装Samba
sudo apt-get install samba samba-common -
修改Samba配置文件,配置共享信息。 打开配置文件:
sudo gedit /etc/samba/smb.conf在配置文件末尾添加以下配置信息(根据实际需要配置相关内容):
[Share] #在Windows中映射的根文件夹名称(此处以“Share”为例) comment = Shared Folder #共享信息说明 path = /home/ryan/work #共享目录 valid users = username #可以访问该共享目录的用户(Ubuntu的用户名) writable = yes #是否可写 browseable = yes #是否可浏览 -
添加Samba服务器用户和访问密码
sudo smbpasswd -a username #用户名为Ubuntu用户名。输入命令后,根据提示设置密码。 -
重启Samba服务
sudo service smbd restart -
查看网卡ip信息
apt install net-tools安装net-tools后通过
ifconfig查看:~$ ifconfig enp0s3: flags=4163<UP,BROADCAST,RUNNING,MULTICAST> mtu 1500 inet 10.0.2.15 netmask 255.255.255.0 broadcast 10.0.2.255 inet6 fe80::636e:785b:dd4d:990e prefixlen 64 scopeid 0x20<link> ether 08:00:27:77:ae:95 txqueuelen 1000 (Ethernet) RX packets 587 bytes 334459 (334.4 KB) RX errors 0 dropped 0 overruns 0 frame 0 TX packets 609 bytes 115432 (115.4 KB) TX errors 0 dropped 0 overruns 0 carrier 0 collisions 0 enp0s8: flags=4163<UP,BROADCAST,RUNNING,MULTICAST> mtu 1500 inet 192.168.56.101 netmask 255.255.255.0 broadcast 192.168.56.255 inet6 fe80::d1f7:e7e8:63aa:47db prefixlen 64 scopeid 0x20<link> ether 08:00:27:c2:f8:96 txqueuelen 1000 (Ethernet) RX packets 61 bytes 15966 (15.9 KB) RX errors 0 dropped 0 overruns 0 frame 0 TX packets 109 bytes 16148 (16.1 KB) TX errors 0 dropped 0 overruns 0 carrier 0 collisions 0 lo: flags=73<UP,LOOPBACK,RUNNING> mtu 65536 inet 127.0.0.1 netmask 255.0.0.0 inet6 ::1 prefixlen 128 scopeid 0x10<host> loop txqueuelen 1000 (Local Loopback) RX packets 271 bytes 29120 (29.1 KB) RX errors 0 dropped 0 overruns 0 frame 0 TX packets 271 bytes 29120 (29.1 KB) TX errors 0 dropped 0 overruns 0 carrier 0 collisions 0可以看到第二个网卡ip为192.168.56.101
-
在Windows中通过ip加上Share(Share为Samba配置文件中映射的根文件夹名称)添加网络位置,如:

到此就能在Windows中访问Ubuntu虚拟机中编译的镜像了。

社区规范:仅讨论OpenHarmony相关问题。
更多推荐
 0
0 0
0- 0


 已为社区贡献91条内容

所有评论(0)