OpenHarmony分布式的基本用法
前言 使用OpenHarmony分布式相机、分布式屏幕、分布式手写板、分布式数据管理等功能模块前,需要进行设备间配对鉴权操作。OpenHarmony基于DeviceManager组件提供了设备配对鉴权的基本操作,本教程对OpenHarmony分布式配对基本用法做简要介绍。 DeviceManager组件 简介 DeviceManager组件在OpenHarmony中提供与账号无关的分布式设
前言
使用OpenHarmony分布式相机、分布式屏幕、分布式手写板、分布式数据管理等功能模块前,需要进行设备间配对鉴权操作。OpenHarmony基于DeviceManager组件提供了设备配对鉴权的基本操作,本教程对OpenHarmony分布式配对基本用法做简要介绍。
简介
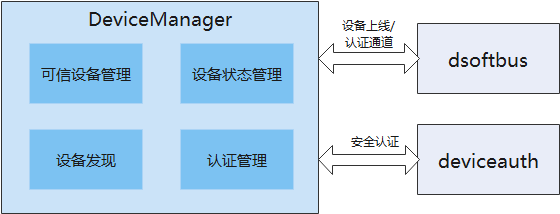
DeviceManager组件在OpenHarmony中提供与账号无关的分布式设备的认证组网能力,并为开发者提供了一套用于分布式设备间监听、发现和认证的接口。
架构
DeviceManager组件组成及依赖如下所示:

目录
foundation/distributedhardware/devicemanager ├── common #公共能力头文件存放目录 │ └── include │ └── ipc │ └── model #ipc功能模块头文件存放目录 ├── display #DM显示hap代码 │ └── entry │ └── src │ └── main │ ├── js #DM PIN码显示FA相关JS代码 │ └── resources #DM PIN码显示FA相关资源配置文件目录 ├── figures ├── interfaces │ ├── inner_kits #内部接口及实现存放目录 │ │ └── native_cpp #内部native接口及实现存放目录 │ │ ├── include │ │ │ ├── ipc #ipc头文件存放目录 │ │ │ │ ├── lite #small │ │ │ │ └── standard #standard │ │ │ └── notify #ipc回调通知头文件目录 │ │ └── src │ │ ├── ipc #ipc功能代码 │ │ │ ├── lite #small │ │ │ └── standard #standard │ │ └── notify ipc回调通知功能代码 │ └── kits #外接口及实现存放目录 │ └── js #外部JS接口及实现存放目录 │ ├── include #外部JS接口及实现欧文件存放目录 │ └── src #外部JS接口及实现代码 ├── sa_profile ├── services │ └── devicemanagerservice #devicemanagerservice服务实现核心代码 │ ├── include │ │ ├── ability #与PIN码显示FA拉起管理相关头文件 │ │ ├── auth #devie_auth交互相关头文件 │ │ ├── ipc #进程间通信相关头文件 │ │ │ ├── lite #small │ │ │ └── standard #standard │ │ ├── message #消息数据解析相关头文件 │ │ ├── requestauth #设备认证功能相关头文件 │ │ ├── softbus #软总线相关头文件 │ │ └── timer #定时器处理相关头文件 │ └── src │ ├── ability #与PIN码显示FA拉起管理相关功能代码 │ │ ├── lite #small │ │ └── standard #standard │ ├── auth #devie_auth交互相关核心代码 │ ├── ipc #进程间通信相功能代码 │ │ ├── lite #small │ │ └── standard #standard │ ├── message #消息数据解析相功能代码 │ ├── requestauth #设备认证功能代码 │ ├── softbus #通道建立功能核心代码 │ └── timer #timer处理代码 └── utils #公共能力头文件存放目 ├── include │ ├── cipher #加解密功能相关头文件 │ ├── ipc #ipc公共头文件存放目录 │ │ ├── lite #small │ │ └── standard #standard │ └── log #log相关头文件存放目录 └── src ├── cipher #加解密功能代码 ├── ipc #ipc公共功能代码 │ ├── lite #small │ └── standard #standard └── log #log相关功能代码
接口说明
DeviceManager 接口说明请参考: 仓库的ohos.distributedHardware.deviceManager.d.ts 文件。
使用DeviceManager相关接口前,需要通过createDeviceManager接口创建DeviceManager实例,不使用DeviceManager接口时需要释放对应的DeviceManager实例。
-
公共接口
| 原型 | 描述 |
|---|---|
| createDeviceManager(bundleName: string, callback: AsyncCallback): void; | 异步方法获取DeviceManager实例 |
| release(): void; | 释放DeviceManager实例 |
-
系统能力接口
DeviceManage提供可信设备列表获取、可信设备状态监听、周边设备发现、设备认证等相关接口。
开始设备发现、停止发现设备接口需要使用同一个subscribeId配对使用。
| 原型 | 描述 |
|---|---|
| getTrustedDeviceListSync(): Array; | 获取信任设备列表 |
| on(type: 'deviceStateChange', callback: Callback<{ action: DeviceStateChangeAction, device: DeviceInfo }>): void; | 设备状态变更回调 |
| off(type: 'deviceStateChange', callback?: Callback<{ action: DeviceStateChangeAction, device: DeviceInfo }>): void; | 取消设备状态变更回调 |
| on(type: 'serviceDie', callback: () => void): void; | 服务错误回调 |
| off(type: 'serviceDie', callback?: () => void): void; | 取消服务错误回调 |
| startDeviceDiscovery(subscribeInfo: SubscribeInfo): void; | 开始设备发现 |
| stopDeviceDiscovery(subscribeId: number): void; | 停止发现设备 |
| authenticateDevice(deviceInfo: DeviceInfo, authparam: AuthParam, callback: AsyncCallback<{deviceId: string, pinTone ?: number}>): void; | 设备认证接口 |
| verifyAuthInfo(authInfo: AuthInfo, callback: AsyncCallback<{deviceId: string, level: number}>): void; | 设备认证信息校验 |
| on(type: 'deviceFound', callback: Callback<{ subscribeId: number, device: DeviceInfo }>): void; | 发现设备列表回调 |
| off(type: 'deviceFound', callback?: Callback<{ subscribeId: number, device: DeviceInfo }>): void; | 取消发现设备列表回调 |
| on(type: 'discoverFail', callback: Callback<{ subscribeId: number, reason: number }>): void; | 发现设备失败回调 |
| off(type: 'discoverFail', callback?: Callback<{ subscribeId: number, reason: number }>): void; | 取消发现设备失败回调 |
示例
下面展示基于DeviceManager进行设备间组网配对,并远程启动Ability的示例Demo。提前准备2台搭载OpenHarmony 3.1 release 系统的开发板,2台开发板连接至同一wifi环境下。
示例环境
API版本:api 9
开发模型:Stage
调用端代码
创建设备管理器
通过createDeviceManager接口创建DeviceManager实例,在DeviceManager实例初始化后,设置对应可信设备状态监听器、周边设备发现监听器。
-
创建设备管理器
/** * 创建 DeviceManager */ async createDeviceManager() { console.log(`${TAG} createDeviceManager`) let self = this let bundleName = await globalThis.context.abilityInfo.bundleName console.log(`${TAG} createDeviceManager bundleName = ${bundleName}`) deviceManager.createDeviceManager(bundleName, (err, dm) => { console.log(`${TAG} createDeviceManager ---err: ${JSON.stringify(err)} --success: ${JSON.stringify(dm)}`) if (!dm) { return } self.deviceManager_ = dm //设备管理器赋值 console.log(`${TAG} createDeviceManager` + self.deviceManager_) // 注册设备上下线监听 dm.on("deviceStateChange", data => { console.log(`${TAG} deviceStateChange ${JSON.stringify(data)}`) let device = data.device as any let trustedDeviceList = [{ device }] self.trustedDeviceList = trustedDeviceList self.deviceFoundList = [] self.trustedDeviceCall && self.trustedDeviceCall(self.trustedDeviceList) self.foundDeviceCall && self.foundDeviceCall(self.deviceFoundList) }) dm.on("serviceDie", () => { console.log(`${TAG} serviceDie`) self.serviceDieCall && self.serviceDieCall() }) //获取信任设备列表 let array = dm.getTrustedDeviceListSync() as any; console.log(`${TAG} getTrustedDeviceListSync ${JSON.stringify(array)}`) if (array && array.length) { self.trustedDeviceList = [array] self.trustedDeviceCall && self.trustedDeviceCall(self.trustedDeviceList) } }) }
以上为创建设备管理器的方法,本示例中,在index.ets文件的aboutToAppear生命周期方法中调用该方法创建设备管理器。
-
页面路径:page/index.ets
-
调用示例
private aboutToAppear(): void { // 创建设备管理器 this.createDeviceManager() }
获取可信设备列表
-
获取可信设备列表
// 通过createDeviceManager获取的对象获取可信设备列表 let array = deviceManager_.getTrustedDeviceListSync() as any; console.log(`${TAG} getTrustedDeviceListSync ${JSON.stringify(array)}`)
发现周边新设备、停止发现设备
通过DeviceManager.startDeviceDiscovery方法发现周边新设备(必须要保证需要被发现的设备在同一wifi网络环境下),通过DeviceManager.stopDeviceDiscovery方法停止发现设备,startDeviceDiscovery与stopDeviceDiscovery一定要成对使用,发现新设备的结果,会通过注册的监听回调给调用方。
-
发现周边设备
/** * 开始发现周边设备 */ startDeviceDiscovery() { console.log(`${TAG} startDeviceDiscovery`) if (this.deviceManager_ == null) { console.error(`${TAG} deviceManager_ == null`) return } // 开始设备发现(发现周边不可信设备) this.deviceManager_.on('deviceFound', (data) => { if (data == null) { console.error(`${TAG} deviceFound data=null`) return } console.log(`${TAG} deviceFound ${JSON.stringify(data)}`) }); // 发现设备失败回调 this.deviceManager_.on('discoverFail', (data) => { console.log(`${TAG} discoverFail ${JSON.stringify(data)}`) }); this.subscribeId = Math.floor(Math.random() * 10000 + 1000) var info = { "subscribeId": this.subscribeId, "mode": 0xAA, "medium": 0, "freq": 2, "isSameAccount": false, "isWakeRemote": true, "capability": 0 } loadingCall && loadingCall(true) this.deviceManager_.startDeviceDiscovery(info); }
-
停止发现设备
/** * 停止发现设备,需要和startDeviceDiscovery接口配对使用 */ stopDeviceDiscovery() { console.log(`${TAG} stopDeviceDiscovery`) if (this.deviceManager_ == null) { console.error(`${TAG} deviceManager_ == null`) return } // 停止设备发现 this.deviceManager_.stopDeviceDiscovery(this.subscribeId); }
认证新设备
OpenHarmony在标准系统提供了一个简单的HAP程序支持弹窗PIN码认证机制。
这里使用一个临时的Stage来进行对应界面的弹窗。
该Stage为:,作为系统应用进行预置。
-
具体认证步骤:
1.远程设备在屏幕显示一个6位数字PIN码
2.控制设备弹出一个PIN码输入窗口
3.用户在控制设备输入远程设备所显示的PIN码,通过验证即可继续远程控制
4.PIN码输入成功后,该设备成为可信设备存储于系统,下次再次连接时不需要再次验证
通过DeviceManager.authenticateDevice方法,认证新设备,在输入PIN码认证通过后,会通过deviceStateChange监听回到设备的状态。经过认证的设备即为可信设备,可通过DeviceManager.getTrustedDeviceListSync方法直接获取该设备的信息。
-
设备认证
authenticateDevice(device, authParam) { console.log(`${TAG} authenticateDevice ${JSON.stringify(device)}`) if (this.deviceManager_ == null) { console.error(`${TAG} deviceManager_ == null`) return } this.deviceManager_.authenticateDevice(device, authParam, (error, data) => { console.log(`${TAG} authenticateDevice data= ${JSON.stringify(data)} error= ${JSON.stringify(error)}`) }) }
远程启动Ability
在获取到可信设备数组后,使用适当的弹窗或者选择界面,让用户选择其中之一进行连接,随即远程启动一个Ability。
远程启动一个Ability,需要动态申请对应的权限。
-
config.json配置
"requestPermissions": [ { "name" : "ohos.permission.DISTRIBUTED_DATASYNC" } ]
-
动态申请
public requestPermissions(permissions: Array<string>): Promise<boolean> { Logger.info(`Permissions : ${JSON.stringify(permissions)}`) return new Promise(async (resolve, reject) => { let permissionFlag: boolean = false // 获取应用信息 TokenID 用做鉴权使用 const appInfo = await bundle.getApplicationInfo(await this.getBundleName(), 0, 100) let tokenId = appInfo.accessTokenId Logger.info(`TokenId : ${tokenId}`) let statusPromise: Array<Promise<number>> = [] let requestList: Array<string> = [] // 访问控制管理:获取访问控制模块对象。 let atManager = abilityAccessCtrl.createAtManager() for (let i = 0; i < permissions.length; i++) { // 校验应用是否授予权限,使用Promise方式异步返回结果。 statusPromise.push(atManager.verifyAccessToken(tokenId, permissions[i])) } Promise.all(statusPromise).then(async (status) => { Logger.info(`VerifyAccessToken result : ${JSON.stringify(status)}`) for (let i = 0; i < status.length; i++) { // 如果权限验证不通过,加入授权列表 if (status[i] == abilityAccessCtrl.GrantStatus.PERMISSION_DENIED) { requestList.push(permissions[i]) } } Logger.info(`RequestList : ${JSON.stringify(requestList)}`) if (requestList.length != 0) { if (this.context.stageMode) { permissionFlag = this.handlePermissionRequestResult(await this.context.requestPermissionsFromUser(requestList)) resolve(permissionFlag) } else { // 动态申请权限 目前仅安装第一次会弹出授权 // 拉起弹窗请求用户授权。 this.context.requestPermissionsFromUser(requestList, 1, (pRR: any) => { permissionFlag = this.handlePermissionRequestResult(pRR) resolve(permissionFlag) }) } } else { permissionFlag = true Logger.info(`Request permissions from user succeeded`) resolve(permissionFlag) } }) }) }
动态申请代码在index.ets的aboutToAppear生命周期方法中调用。
-
远程启动Ability
/** * 拉起对方设备应用,并传参 * @param device */ private connectStageAbility(device){ var want = { "deviceId": device.deviceId, "bundleName": "com.example.myapplication_distributeddevicemanager", "abilityName": "MainAbility", parameters: { content: `我来自来自远程设备${device.deviceName}` } }; //拉起对方应用 globalThis.context.startAbility(want).then(() => { console.log(tag,'startAbility successful') }).catch((error) => { console.log(tag,'startAbility failed: '+JSON.stringify(error)); }) }
远程被调用端代码
远程设备中安装上述对应被启动包名的hap包,并在page/index.ets 的aboutToAppear生命周期方法中添加如代码。远程设备收到请求后,将以对应的参数启动应用,并且在启动时获取到相应参数。
-
示例代码
aboutToAppear(){ PermissionService.getInstance(globalThis.context).requestPermissions([ "ohos.permission.DISTRIBUTED_DATASYNC" ]).then((flag) => { this.permissionFlag = flag console.log('permissionFlag'+flag); //授权之后,判断当前Ability是否是被拉起应用 let parameter = globalThis.content; console.info(tag,'parameter info: '+JSON.stringify(parameter)) if(parameter){ AlertDialog.show( { title: '当前应用被远程启动', message: parameter } ) } //权限申请后,创建DeviceManager this.createDeviceManager() }) }
事例中,被远程启动的Ability,在aboutToAppear的生命周期方法中获取了对应的参数,并弹出了一个Dialog。
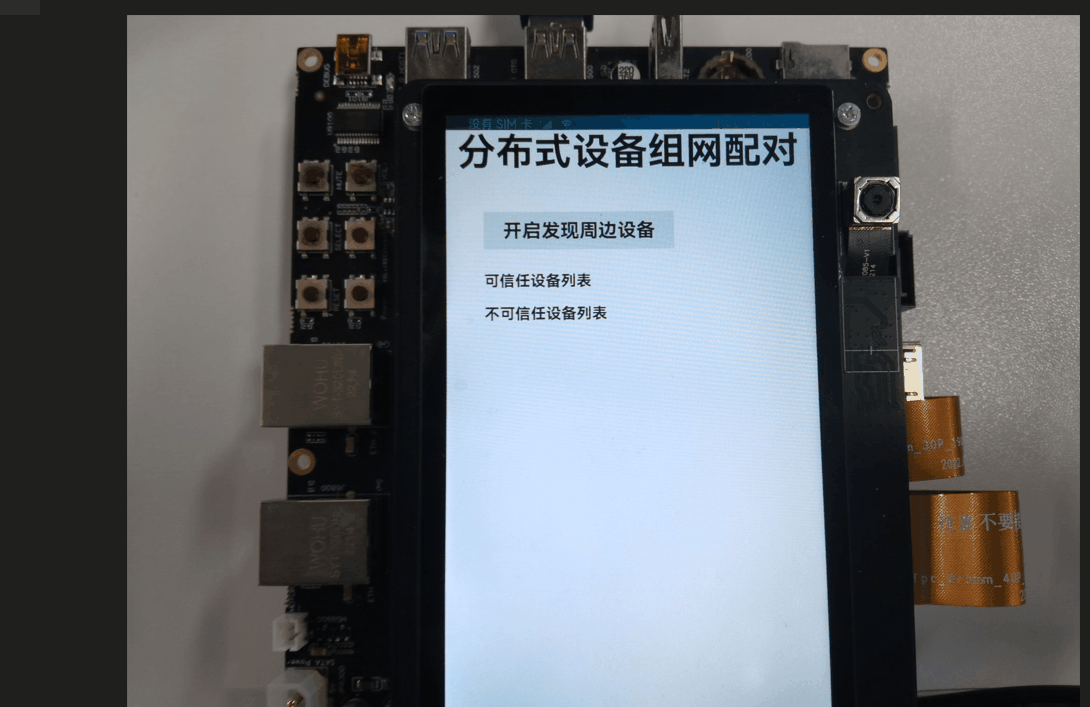
示例效果展示

参考文献
[1] 分布式设备管理能力模块介绍.

社区规范:仅讨论OpenHarmony相关问题。
更多推荐
 2
2 1
1- 0


 已为社区贡献77条内容

所有评论(0)